
Related Manuals for Kval 965X


Summary of Contents for Kval 965X
- Page 1 Operation Manual Published: June 10, 2021 Innovation, Quality & Honesty 965X Jamb Machining System ® With KvalCAM...
- Page 2 Inc. For authorization to copy this information, please call Customer Support at (800) 553-5825 or fax (707) 762-0485. Outside the U.S. and Canada, call (707) 762- 7367. Manual Part Number: DOC-228-1-OP 965-X is a trademark of Kval Incorporated. ® KvalCAM is a registered trademark of Kval Incorporated.
- Page 3 KVAL 965-X System Operation Manual Your Feedback is Welcome: To help us design products that make your job easier and your business more successful, we'd like to gain your perspective about your user experience with our product - that is, the manual, the machinery, the software, etc.
- Page 4 Licensor retains all ownership of the KvalCAM Software. Title, ownership rights, and intellectual property rights in the KvalCAM Software shall remain with, Inc. The Kval- CAM Software is protected by copyright laws and treaties. Title and related rights in the content generated through the KvalCAM Software are also the property of the Licensor and are protected by applicable law.
-
Page 5: Table Of Contents
Summary of Machining a Jamb ..........2-5 Step 1: Start the Process..............2-5 Step 2: Steps Before Processing Jamb ..........2-5 Step 3: Create or Load a Door Job............2-6 Step 4: Open the Main 965X Screen ............2-6 About Processing the Jamb..............2-7 965X Operation Manual... - Page 6 Step 7: Start Sequence.................2-8 Step 8: Next Group, Next Job, or End Process ........2-9 Powering Operations for the 965X........... 2-10 How to Power Up the 965X ..............2-10 Home the 965X.................. 2-11 How to Power Down ................2-11 About Emergency Stops ..............2-12 To Resume Normal Operation after an E-Stop ........2-12...
- Page 7 Enter a Positive or Negative Number? ........3-5 How to Enter Calibration Data ..........3-6 About The Calibration Box..............3-6 About Restore Points................3-7 About the 965X Calibration Screen ......... 3-8 965X Calibration Screen...............3-8 Calibration Selections ................3-8 About Calibration Sequence ............ 3-9 Step 1: Check the Carriage Location........
- Page 8 Table of Contents Operator’s Station and Controls on the 965X ......4-3 Operator’s Station.................4-3 Front Section Controls ................4-4 User Interface ..................4-4 Foot Pedal Control................4-5 Assemblies on the Carriage Head ........... 4-6 Tool Set in the Carriage Head...............4-6 Carriage Head Rear View..............4-7 Servo Axis Direction................4-7...
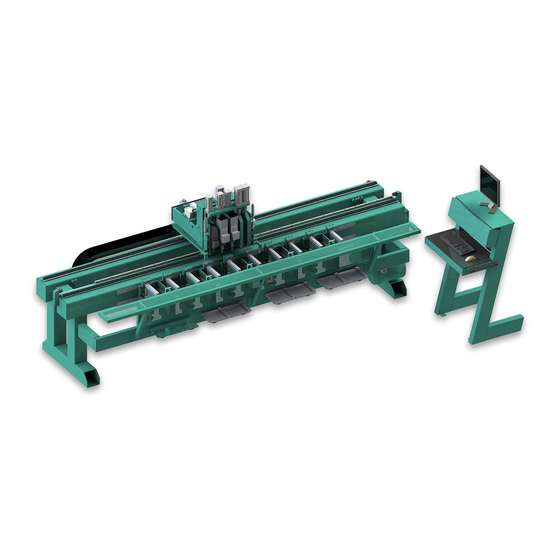
- Page 9 Introduction to the 965X System CHAPTER 1 Chapter 1 at a Glance The following information is available in this chapter: Section Name Summary Page This section provides an overview of the page 1-2 Overview of the 965X Jamb machine. It includes a general description...
-
Page 10: Overview Of The 965X System
K offers increased supportability and trouble- valCAM shooting capabilities. Newly developed error codes and code definitions quickly identify any problems to the operator and or Kval support technician on-site or via a connection to our offices. 965X Operation Manual... - Page 11 Overview of the 965X System Calibration and Quality Control: Two fixed end stops (left and right) are used for location index. These automatically retract when end work is required next to the stop. Routers: The machine head includes two hi-frequency 3HP spindle motors with double bearings, rotating in opposite directions.
-
Page 12: About This Manual
Overview of the 965X System About this Manual This manual is part of a package delivered with the machine line. Integration Package includes the following: includes the following: Operation Manual Chapter Title Description Introduction Descriptions of Machine Line and Safety Information. - Page 13 Overview of the 965X System KvalCAM Reference Manual Chapter Title Description KvalCAM reference Description of the Interface KvalCAM Examples Examples of Common Door Job Features KvalCAM Common Common terms associated with Terms KvalCAM 965X Operation Manual...
-
Page 14: Safety First
Training Ensure that all employees who operate this machine are aware of and adhere to all safety precautions posted on the machine and are trained to operate this machine in a safe manner. 965X Operation Manual... - Page 15 All cylinders on machine are under high pressure and can be very dangerous when activated. Before performing any mainte- nance or repairs on this machine turn off the main air disconnect. Lockout and tagout this connection. See “Lockout Tagout Procedure” on page 1-11. 965X Operation Manual...
- Page 16 This should be done in accordance with applicable state and/or federal code requirements. Laser Warnings On some machines, laser indicators are used to set boundaries. Follow the manufacturers safety precautions. 965X Operation Manual...
- Page 17 Follow Your Company’s Safety Procedures In addition to these safety guidelines. Your company should have on-site and machine specific safety proce- dures to follow. 965X Operation Manual...
-
Page 18: Lockout-Tagout Guidelines
O..OFF! Shut off all power sources and isolating devices P..Place lock and tag E..ENERGY: Release stored energy to a zero-energy state R ..Recheck controls and test to ensure they are in the “OFF” state 965X Operation Manual 1-10... -
Page 19: Lockout Tagout Procedure
Turn Switch to the Lock and Tag out Insert Lock into hole. OFF position When multiple people are working on the machine, each person needs to Note: have a lock on the handle in the extra holes provided. 965X Operation Manual 1-11... -
Page 20: Lockout Tagout Air Supply
The lock and tag can now be removed (only by the person(s) who placed them), and the machine can be re-energized. The tags must be destroyed and the locks and keys returned to the lockout center. 965X Operation Manual 1-12... -
Page 21: Zero-Energy To Start-Up
Service team. See “Getting Help from KVAL KVAL” on page 1-15. Check Controls Confirm that all switches are in the “OFF” position. Please be advised that some com- ponents of the machine may start automatically when energy is restored. - Page 22 Be sure to follow the P-R-O- P-E-R lockout/tagout procedures, and that those around you do also. Close the Cage Gate Verify all cage gates are securely closed. Ensure all safety protocols are in effect. 965X Operation Manual 1-14...
-
Page 23: Getting Help From Kval
Getting Help from KVAL Getting Help from KVAL Before you seek help, first try the troubleshooting procedures. Follow the procedures below. If you are unable to resolve the problem: Locate the machine’s Specification Plate and record the serial number, 3 phase volts, electrical print number, and air print number. -
Page 24: Kval Return And Warranty Policy
KVAL Return and Warranty Policy KVAL Return and Warranty Policy KVAL's goal is to provide customers with high quality products. If, for any reason, you are not completely satisfied with your purchase, please contact us at: Email: parts@kvalinc.com +1 (800) 553-5825 Phone: •... -
Page 25: Customer Errors
Kval provides a warranty to products that are deemed defective. Within 30 days of discovery of said defect, please notify Kval, but no more than one (1) year after delivery will the product be covered under Warranty. The repair, replacement, or payment in the manner described above shall be the exclusive remedy of Buyer for breach of Kval’s warranty or for claims based upon failure... -
Page 26: How To Download The Service Application
KVAL tab. Follow the instruc- Support tions on the Support web page. Click the Download button to download the application that allows the technician to KVAL have access to the operator sta- tion. 965X Operation Manual 1-18... - Page 27 Sample of i.e Explorer: Located at the bottom of the screen. select the arrow and choose Save and Run A pop-up window is displayed. Accept the request to run the program. Security settings may differ from Note: plant to plant. If issues occur, con- tact your IT department. 965X Operation Manual 1-19...
- Page 28 Session code: An internal number to track this machine. It is auto filled. Your Name Field: Enter your name. The KVAL techni- cian will use this field to identify this machine. Description: Enter machine Serial number and issue.
- Page 29 How to Download the Service Application Page Intentionally Left Blank 965X Operation Manual 1-21...
-
Page 30: Safety Sign-Off Sheet
It is recommended you make a copy of this sheet for new operators. If a copy is Note: needed, you may download a PDF at the website (http:// KVAL www.KVALinc.com). You may also contact our Service Department at (800) 553-5825 or email at service@KVALinc.com. 965X Operation Manual 1-22... -
Page 31: About The 965X
Chapter 2 at a Glance The following information is available in this chapter Section Name Summary Page A summary of the 965X machining process page 2-2 About the 965X Process A summary of the steps to machine a jamb. page 2-5... -
Page 32: Shape And Special Cut Highlights
About the 965X About the 965X allows customers to easily program and machine all of their door frame needs with a 965X KvalCAM ® single compact machine. The is powered by , which allows rapid programming 965X for door frame shapes. -
Page 33: Jamb Data Properties
About the 965X Jamb Data Properties Properties of the jambs and headers are calculated in to create a precise cut. See the sep- KvalCAM arate for further descriptions. KavlCAM Reference Guide Jamb Properties include all the parameters to create a door frame. The data is normally created remotely and saved into the database. -
Page 34: 965X Jamb Basics
About the 965X 965X Jamb Basics The types of processes applied to jambs and headers are detailed in the figure below. Header Jamb Pocket and plates for hardware. (closers, holders, overhead latches) Trim the length from one side. Trim Pockets... -
Page 35: Summary Of Machining A Jamb
Step 1: Start the Process Ensure factory air is present at the machine and the main air supply valve is 965X turned on. Power up the See “How to Power Up the 965X” on page 2-10. 965X Select the shortcut. KvalCAM Home the See “Home the 965X”... - Page 36 Enter the quantity of jambs to be processed in the box at the bottom of the Door Qty screen. Select the Button. Add to Queue Step 4: Open the Main 965X Screen After the is loaded into , select the tab. At this screen Queued Jobs 965X the cuts to be performed are displayed and pre-process streps can be made.
-
Page 37: About Processing The Jamb
(Foot Pedal, Start Sequence button) at the machine. Step 5: Load the Jamb To extend the select the Door Clamps Door Stops, Jamb Stop Foot Pedal utton at the screen. Toggle Stop b Main • Load the jamb onto the machine Jamb Shelf 965X Operation Manual... -
Page 38: Step 6: Align And Clamp The Jamb
After beginning the Start Sequence, the operator must exit the cutting area beyond the Safety Light Curtain within 3 seconds. If not exited, the Start Sequence will cancel. To restart, press the Start Sequence again and leave the cutting area within the 3 second rule. 965X Operation Manual... -
Page 39: Step 8: Next Group, Next Job, Or End Process
• If continuing to a different job, repeat from page 2-5. Next Job: Step 2 • If ending processing, Shut down and secure th machine. See “How to Power Down” on page 2-11 965X Operation Manual... -
Page 40: Powering Operations For The 965X
• Starting the Control Circuit Powering down the system includes: • Shutting down the control power • Removing power from the entire system How to Power Up the 965X Don t Forget Ensure factory air is applied to machine Air ON and main air supply is turned on. -
Page 41: Home The 965X
2. The machine will move to the home position at the in-feed end of the machine. 3. The machine will then move to its neutral position 4. The 965X is now ready for work. How to Power Down Park the... -
Page 42: About Emergency Stops
Powering Operations for the 965X About Emergency Stops Important: Learn all safety precautionary controls on the machine. Depending on the model of machine, there are emergency shutdown (E- Stop) switches located at key points around the machine. The E-Stop switches are to be used when the machine is out of control or is about to damage personnel or equipment. -
Page 43: About Machine Status Feedback
This infor- mation can be used to troubleshoot any issues that may occur. When activated, the tab will highlight. At the top of the screen, the revision Note: of software is displayed. 965X Operation Manual 2-13... -
Page 44: About The 965X Interface Screens
About the 965X interface Screens About the 965X interface Screens Jobs are created in are processed at the interface screens. For information about KvalCAM and , see the separate document, KvalCAM KvalCAM Reference Guide. Operator Screens contains the controls to operate the machine. -
Page 45: About The Main Control Screen
Main Control Tab is the most utilized screen. Information to machine a jamb is displayed Main Control Screen on this screen. Machine Controls (See page 2-16) Job Parameters and Tasks (See ) 965X Main Screen FIGURE 2-5. 965X Operation Manual 2-15... -
Page 46: Machine Controls Section
In Position Clamps Displays the Location of Clamps used for the cutting process Routine Speed Adjust the speed of the cutting process. Jamb Support Block From a drop down menu choose the correct Jamb Support Block 965X Operation Manual 2-16... -
Page 47: About The Main Control Section
Select to stop (abort) the process of the job that is currently running. Park Select the button to move the to the end of the machine. Perform at Park Carriage Head the end of the work day, if machine is at rest, or during maintenance. 965X Operation Manual 2-17... -
Page 48: About The Sequence Control Section
The box at displays the ref- Jamb Stop Location Main Screen erence location. Orange background indicates the reference is activated. A gray Dado background indicates the reference is activated. Jamb End Jamb End Reference Dado Reference 965X Operation Manual 2-18... -
Page 49: About Jamb Clamp And Jamb Stop Section
Orange is activated, Grey is not activated About Speed Control Adjust the speed of the cut. Press the graduated speeds or select box or enter a desired speed. The speed can be changed during real time processing. 965X Operation Manual 2-19... -
Page 50: About The Jamb Support Selection
Add the designated .See Figure 2- 6 Jamb Support Block Jamb Support Block Storage Jamb Support Block Storage Align and secure the block to the Jamb Stop Assembly (X10) Add a Jamb Support Block FIGURE 2- 6. 965X Operation Manual 2-20... -
Page 51: Job Parameters And Task Section
View Door Job info. (job name. jamb parameters) Group Cut Information A display the number of groups in the Door Job Task Message A display of the sequence of the jamb machining. Task Control Information A display of the Feature Group information 965X Operation Manual 2-21... -
Page 52: About The Top Bar
Displays the current and number of groups in the job. Groups are cutting routines that require a different setup within the job. Note: Status Message Displays the steps in the cutting process. Follow the steps displayed in the message box during cutting the jamb. 965X Operation Manual 2-22... -
Page 53: About The Tasks Screen
Relationship to the jamb cut and the task screen is displayed in the figure below. Match the Task number to the number on the jamb illustration. Trim Cut Dado Cut Standard Cut Standard Cut Standard Cut Standard Cut Task Display FIGURE 2- 7. 965X Operation Manual 2-23... -
Page 54: About The Task Box
(left click) in any display box. Toggle Between Decimal and Fractional Values: Select or left click the displayed value in the task box to toggle between decimal or fractional display. Fractional and Decimal Display FIGURE 2- 9. 965X Operation Manual 2-24... -
Page 55: About The Cut Icons
2, 3, and 4 are skipped while Dado number 1 is the only cut to be made. If the check box is cleared., the text will be displayed Note: Skipped Process Box. Cleared Check Box FIGURE 2- 10. 965X Operation Manual 2-25... -
Page 56: How To Change The Jamb Reference Display
About Rollover Parameter Information To display a pop-up window with parameter summary of the cut, roll over the upper left hand cor- ner of the Task Box Mouse Roll Over Roll Over Parameters FIGURE 2- 12. 965X Operation Manual 2-26... -
Page 57: About Timers
The Main screen contains timers that add up the time for each individual cuts and a timer that adds up the entire process. Total Time to complete the entire process Time to complete selected cut Timers FIGURE 2- 13. 965X Operation Manual 2-27... -
Page 58: About The Manual Servo Control Screen
Y-Axis Forward Direction Push and hold the Forward Button to move car- riage in this direction. To go in the opposite direction, push and hold the Reverse Button Movement Direction of Carriage Head FIGURE 2- 14. 965X Operation Manual 2-28... -
Page 59: About The Tool Config Tabs
• The ability to enable or disable specific tool slots • The ability to name the tools to familiar names. • The ability to lock and unlock the ability to enter data. List of Tools Available Pop-Up Menus: enter tool data.(Router,Drill and Chisels (opt) 965X Operation Manual 2-29... -
Page 60: Unlock The Tool Slot Configuration (Option)
Identify the tool that needs replacement.Mea- sure the dimensions and capture the data. (Use this information to populate the Drill or pop-up screens). Router Select the Tool Slot nter the data into the pop-up screen 3. E 965X Operation Manual 2-30... -
Page 61: Enable Or Disable Tool
• A red line will cross out the tool on the list. • The tool slot menu will turn red. • The tool will not operate during the cutting pro- cess To Enable • Re-select the Enabled Check-Box 965X Operation Manual 2-31... -
Page 62: About The Tool Path Preview Test Screen
View the path of the tool on the screen. Step 2 Step 4 Step 3 Step 5 Center Circle represents the tool Point and the animation rep- resents the path Tool Path Review FIGURE 2- 15. 965X Operation Manual 2-32... -
Page 63: About Viewing G-Code
To view a G-Code file, left click the Cutting Icon. The file will open in a separate window. On first use, set the file to open in the desired application using the “Open With” Note: function of Windows. (Notepad, Notepad ++, etc) Left Click the Icon Opening G-Code FIGURE 2- 16. 965X Operation Manual 2-33... -
Page 64: About The Status Screen
(idle, operation). The data can be filtered to observe certain aspects of the operation of the machine. This tool is great for troubleshooting to locate faulty assemblies. Filter Data List of Parameter of jamb in Process Status is listed by Location Status Screen FIGURE 2-17. 965X Operation Manual 2-34... -
Page 65: About The Log Screen
If the machine issue can not be resolved, call (1-800-553-5825). Have any error code Kval Inc. that is displayed, ready to give the representative. This will aid in troubleshooting and Kval shorten down time. Log Screen FIGURE 2-18. 965X Operation Manual 2-35... -
Page 66: Description Of The Light Tower
Solid: General Error • Flashing: Not Ready to Re-Start (E-Sop Switch is Active) Green: Machine is Operational Off: No Control Power Control Power ON (Green): 24 VDC Control Power ON Ready to Work Light Tower Rev 2 965X Operation Manual 2-36... - Page 67 About the Calibration Tabs page 3-3 Descriptions of the Calibration Tabs. How to Enter Calibration Data page 3-6 Descriptions of how to use the calibration screens About the Calibration Screen page 3-8 Descriptions of the calibration available. 965X Operation Manual...
-
Page 68: About Calibration
When was the last calibration? Is the jamb True? Check for sawdust build-up, which may affect depth. recommends that a test jamb is run first and checked for specifications Note: Kval before a full run is started. 965X Operation Manual... -
Page 69: About The Calibration Tabs
Lists of assemblies to calibrate are in the main body of the page. Calibration Buttons: Calibration Tab: Unlock a Calibration Select to enter the calibration screen Save a Calibration Restore a Calibration Calibration Lists: Select to access calibration adjust- ments Calibration Header FIGURE 3- 1. 965X Operation Manual... -
Page 70: Unlock The Calibration (Option)
Access to the calibration is password protected. (Optional) Select the button Unlock At the pop-up, enter Password the password and select OK to continue. The calibration message will change from a red ''Calibration is Locked '' to a green Calibration is Unlocked”. 965X Operation Manual... -
Page 71: Enter A Positive Or Negative Number
X-Axis To understand the machine axis movement direction, stand behind the machine and with Left Hand, point down at the cut. Y-Axis Positive movement Z-Axis Positive movement X-Axis Positive movement Z+ Into Axis Direction FIGURE 3- 2. 965X Operation Manual... -
Page 72: How To Enter Calibration Data
After every calibration change, select the button to store the calibration. Run a Save test jamb again to verify the offset correction was successful. Keep running a test jamb and adjusting the offset until satisfied with the result. 965X Operation Manual... -
Page 73: About Restore Points
Name and enter to save To Load or Delete a Restore Point: Select the restore point from the menu Select the button to use the calibration. Select the Load button to load Load Select the button to delete the point. Delete 965X Operation Manual... -
Page 74: About The 965X Calibration Screen
About the 965X Calibration Screen About the 965X Calibration Screen contains a list of calibration adjustments. Select the located on Calibration Screen 965X Tab the left hand side of the machine, then select the to jump to this menu. Enter... -
Page 75: About Calibration Sequence
• See “Step 1: Check the Carriage Location” on page 3-10 • See “Step 2: Calibrate the Stops” on page 3-11 • See “Step 3: Calibrate the Tools” on page 3-12 • See “Routers: How to Isolate and Calibrate a Specific Router” on page 3-18 965X Operation Manual... -
Page 76: Step 1: Check The Carriage Location
Verify that the distance is 5.0 inches ± 0.005 inches. If the measurement is outside the specification. Do not operate the Important: machine. Stop and contact the Damage Kval Service Department. may occur to the machine. 5.0” ± 0.005” Carriage Check FIGURE 3- 3. 965X Operation Manual 3-10... -
Page 77: Step 2: Calibrate The Stops
• If the shape is out specification, adjust for the best location then check the tool calibrations. Reference from back of machine. Point down to the cut machine. Point down to the cut using left hand rule. Procedure to Calibrate a Stop FIGURE 3- 4. 965X Operation Manual 3-11... -
Page 78: Step 3: Calibrate The Tools
Point to Point: Drills Left Hand Stop: Top refer- pilot holes on the jamb ence for a Left Hand jamb Jamb. Right Hand Stop: Top ref- erence for a Right Hand jamb Jamb. Tool Locations FIGURE 3- 5. 965X Operation Manual 3-12... -
Page 79: Calibration Reference Cut
Z-Axis • If the of the lock cut are out of specification, the eeds to corners Chisels Offsets (n be adjusted. See “Sample Calibration Chisels Cut” on page 3-17. Axis Location Reference FIGURE 3- 6. 965X Operation Manual 3-13... -
Page 80: Router Calibration Reference Cut
Tool Path Review • Use to turn routers on or off to isolate. See “Routers: How to Isolate and Tool Config Calibrate a Specific Router” on page 3-18 Example of Axis Movement Direction FIGURE 3- 7. 965X Operation Manual 3-14... -
Page 81: Sample Calibration Cut
• In the case below enter the measured difference (negative value) in the Offset Box to bring into specification. Rectangle Cut Lock Plate Measured Difference Measure the actual cut. input the measured differences in the Offset Box. Measured Difference Example Cuts FIGURE 3- 8. 965X Operation Manual 3-15... -
Page 82: Predrill
Perform the Left Hand Rule at the lock side of the door to determine axis direction. See illustration below. • If the chisel cut is out of specification in the of the jamb, the needs length X-Axis to be adjusted. 965X Operation Manual 3-16... -
Page 83: Sample Calibration Chisels Cut
Chisel Locations FIGURE 3- 10. Figure 3- 11 shows the direction of the axis for each chisel location. Lower Min Chisel Lower Max Chisel Upper Min Chisel Upper Max Chisel Chisel Reference Axis Direction FIGURE 3- 11. 965X Operation Manual 3-17... -
Page 84: Routers: How To Isolate And Calibrate A Specific Router
If it is a 1.0 inch diameter router then set the Width = 2.0*1.0 = 1.0 For Example: Set the depth deep enough to measure. • 0.15 inches). For Example: Feature Details and Tool Configuration FIGURE 3- 12. 965X Operation Manual 3-18... -
Page 85: Example Of A Calibration Cut
, and Diameter Z axis X axis axis by measuring from the edges of the rectangle to the edges of the door. Enter offsets to adjust the cut match the Door Job. X-Axis Y-Axis 965X Operation Manual 3-19... - Page 86 Routers: How to Isolate and Calibrate a Specific Router Appendix: Servo Motor Drive Assemblies Z-Axis Servo Motor X-Axis Servo Motor Y-Axis Servo Motor Location of Servo Drive Motors FIGURE 3- 13. 965X Operation Manual 3-20...
- Page 87 Tour of the 965X Line CHAPTER 4 This chapter describes components, assemblies, and the user interface of the KVAL 965X System. The content is geared to help operators understand the basic operation of the machine. Chapter 4 at a Glance...
-
Page 88: Front View Of The 965X
Contains mechanical Machine See “Operator’s Station and Con- Controls.See “Operator’s Station trols on the 965X” on page 4-3 . and Controls on the 965X” on page 4-3 . Tour of Front of the Machine FIGURE 4- 1. -
Page 89: Operator's Station And Controls On The 965X
Operator’s Station and Controls on the 965X Operator’s Station and Controls on the 965X has an Operator’s Station and Foot Pedals to control the machine. 965X Operator’s Station The Operator’s Station includes a touch screen and keyboard to run the program that operates the machine. -
Page 90: Front Section Controls
Operator’s Station and Controls on the 965X Front Section Controls At the front section of the machine are controls to start the machine and emergency stop if neces- sary. The Start Sequence begins the process to cut the jamb. The E-Stop emergency stops the machine in dangerous situations. -
Page 91: Foot Pedal Control
Operator’s Station and Controls on the 965X Foot Pedal Control includes and the Stop/ controls. The user interface is Foot Pedal Start Sequence Jamb Clamp used in tandem with the pedal controls. See “Summary of Machining a Jamb” on page 2-5 These controls can also software buttons the Operator’s Station. -
Page 92: Assemblies On The Carriage Head
Point to Point: Drills Left Hand Stop: Top refer- pilot holes on the jamb ence for a Left Hand jamb Jamb. Right Hand Stop: Top ref- erence for a Right Hand jamb Jamb. FIGURE 4- 6. 965X Operation Manual... -
Page 93: Carriage Head Rear View
Y-Axis Servo Motor FIGURE 4- 7. Servo Axis Direction The axis directions are defined in the illustration below. Y-Axis horizontal forward and back X-Axis horizontal across the machine Z-Axis vertical into cut and away from cut FIGURE 4- 8. 965X Operation Manual... -
Page 94: 965X Jamb Clamps
The Jamb Clamps that are activated depends on the job being processed. The sequence of the jambs activated is displayed at the Main Control screen. Each Jamb assembly is assigned a number. For more information about the interface, see “About the 965X interface Screens” on page 2-14. Jamb Clamps and... -
Page 95: Jamb Support Blocks On The Vertical Jamb Clamp
Jamb Support Block Storage The blocks are stored to custom fit at each end at the machine. This space also serves to catch the cut ends of a jamb. After cutting, remove the ends dispose of them. FIGURE 4- 12. 965X Operation Manual... -
Page 96: Safety Light Curtain
If the beam is broken during the cutting process, the machine will stop processing. To Resume Normal Operation after an Beam is Broken If a beam is broken, use the following procedure to recover.\ Select the button on the operator's station screen. Reset Machine Main 965X Operation Manual 4-10... -
Page 97: About Sensors
Frame Carriage Head tions below and on the next page. See the machine E-Print for more information about the sen- sors. Frame Sensors Homing Sensor Crash Sensor Crash Sensor Frame Sensor Locations FIGURE 4- 15. 965X Operation Manual 4-11... -
Page 98: Carriage Head Sensors
The figure below shows the locations of the sensors location on the Carriage Head. In addition to crash sensors, the Carriage Head homing sensor is also present. Homing Sensor Z Axis Crash Sensor Y Axis Crash Sensor X Axis Crash Sensor Carriage Head Sensor Locations FIGURE 4- 16. 965X Operation Manual 4-12... -
Page 99: Location Of Servo Motors And Valve Bank Locations
Labels on the solenoids identify loads they control. Note: Carriage Head Valve Bank Chisels (Left and Right) CC Router Standard Router Predrill Stops (Left and Right) Jamb Clamps (Edge) Jamb Clamps (Vertical) Air Input Location of Valve Banks FIGURE 4- 17. 965X Operation Manual 4-13... -
Page 100: About The Electrical Panels
Frame Node. This section is an overview of the electri- 965X Main Electrical Panel cal components. Refer the machine's electrical prints for in-depth information 965X Main E-Panel The Main Electrical Panel: • Supplies voltages to the machine • Contains the Programmable Logic Controller •... -
Page 101: About Nodes
Outputs Top Ethernet cable is PLC Bottom Ethernet goes to Carriage Node Interconnect Bar Sample of a Frame Node FIGURE 4- 19. Typical Block Diagram of Network Connections Block Diagram of Network Connections FIGURE 4- 20. 965X Operation Manual 4-15... -
Page 102: Graphical Sample Of Node Connections And Power Distribution
Points in the machine Main E Box: Contains Servo Drives Network Connec- tions, power, and Inputs/Outputs originate this box and are connected to Nodes. Frame Node Location of Nodes on the 965X FIGURE 4- 21. 965X Operation Manual 4-16... - Page 104 Contacting KVAL Customer Service Phone and Fax: Mailing address: In the U.S and Canada, call (800) 553-5825 or fax Customer Support Department (707) 762-0485 Kval Incorporated Outside the U.S. and Canada, call (707) 762-7367 825 Petaluma Boulevard South or fax (707) 762-0485 Petaluma, CA 94952 Email: service@kvalinc.com...
Need help?
Do you have a question about the 965X and is the answer not in the manual?
Questions and answers