Kval 960-3 Operation And Service Manual
Strike jamb router with shifting cutter head
Hide thumbs
Also See for 960-3:
- Operation and service manual (68 pages) ,
- Operation and service manual (68 pages)

Related Manuals for Kval 960-3


Summary of Contents for Kval 960-3
- Page 1 Operation and Service Manual Published: 12/01/2020 Innovation, Quality & Honesty 960-3 Strike Jamb Router With Shifting Cutter Head...
- Page 2 Proprietary Notice This Manual is confidential and contains proprietary information and intellectual property of KVAL Inc., and is to be used solely by Customer as an operating manual for KVAL Inc. machines. Neither this Manual nor any of the information contained herein may be reproduced or disclosed under any circumstances without the express written permission of KVAL Inc.
- Page 3 KVAL 960-3 Operation/Service Manual Your Feedback is Welcome: To help us design products that make your job easier and your business more successful, we'd like to gain your perspective about your user experience with our product - that is, the manual, the machinery, the software, etc.
- Page 4 KVAL 960-3 Operation/Service Manual...
-
Page 5: Table Of Contents
ANCHORINGTHE MACHINE TO THE FLOOR....... 1-12 Standard Anchoring Instructions............1-12 Zero-Energy to Start-Up ............1-14 Getting Help from KVAL............1-16 KVAL Return and Warranty Policy ........... 1-17 Send the Item ..................1-17 Acceptance of Return .................1-17 Refund Turnaround Time ..............1-17 Kval Errors ..................1-17 Customer Errors .................1-18... - Page 6 Table of Contents Initial Powering Operations for the 960-3 Line......2-5 How to Power Up the Machine .............2-5 How to Power Down the Machine............2-5 Presets for the 960-3 ............... 2-6 Set the Thickness .................2-6 Set the Backset..................2-6 Set the Strike Depth................2-7 Set the Strike Location................2-8...
- Page 7 Table of Contents Initial Cut on New Chip Out Block..........3-15 Appendix: Router Collet Assembly Basics....... 3-16 Checking Collet Assembly ..............3-16 Appendix: Collet Torque Values ..........3-17 KVAL Edge-SS Manual...
-
Page 8: Introduction To The 960-3
This section describes the method to contact page 1-16 Getting Help from KVAL the KVAL service center for help. The section includes how to get information from the specification plate tor provide to KVAL, ser- vice center hours, and return procedures... -
Page 9: Overview Of The 960-3
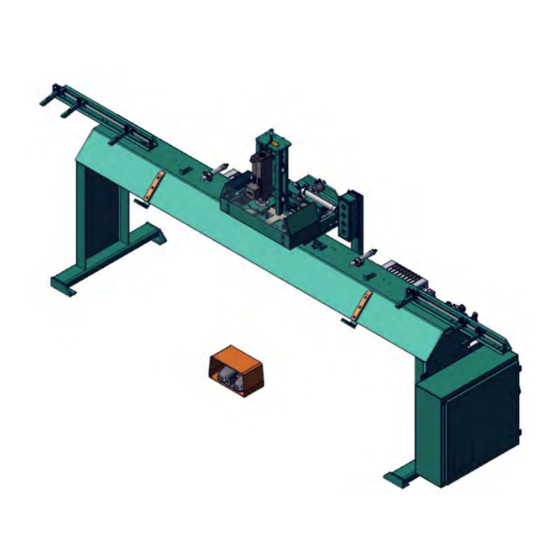
KVAL 960-3 Automatic Strike Jamb Router fast operator can machine 5 jambs per minute with a full lip strike routing pattern. The 960-3 features a fully auto- matic machine cycle that includes clamp-up and ejection. Popular options include pushbutton changeover to a "T"... - Page 10 Overview of the 960-3 Options TABLE 1-2. Options Extra Jamb Index Two extra jamb index stops for machining dead-bolt strikes. Option F Stops Commercial Four additional stops for 6’8”, 7’0” and 8’0” jambs. (Stops included Option H Package on base machine for 6/8 doors ,does not include extra stops for...
-
Page 11: About This Manual
Overview of the 960-3 About this Manual This manual contains operation information and service and maintenance information. It includes identification of machine assemblies, power-up and power-down steps, and informa- tion about using the user interface. The Troubleshooting and Maintenance sections are directed toward qualified ser- vice technicians only. -
Page 12: Safety First
See “Safety Sign-Off Sheet” on page 1-20. Safety Terminology of Labels In addition to the nameplate, KVAL machines may have other warning labels or decals that pro- vide safety information to operators. Safety labels should be clearly visible to the operator and must be replaced if missing, damaged, or illegible. - Page 13 All cylinders on machine are under high pressure and can be very dangerous when activated. Before performing any mainte- nance or repairs on this machine turn off the main air disconnect. Lockout and tagout this connection. See “Lockout Tagout Procedure” on page 1-10. KVAL Operation/Service Manual...
- Page 14 This should be done in accordance with applicable state and/or federal code requirements. Laser Warnings On some machines, laser indicators are used to set boundaries. Follow the manufacturers safety precautions. KVAL Operation/Service Manual...
- Page 15 Safety First! Compliance with Codes and Regulations KVAL advises that you request an on-site state safety review of your installation of this machine. This is to ensure conformance to any additional specific safety and health regula- tions which apply in your geographic area.
-
Page 16: Lockout-Tagout Guidelines
O..OFF! Shut off all power sources and isolating devices P..Place lock and tag E..ENERGY: Release stored energy to a zero-energy state R ..Recheck controls and test to ensure they are in the “OFF” state KVAL Operation/Service Manual... -
Page 17: Lockout Tagout Procedure
Turn Switch to the Lock and Tag out Insert Lock into hole. OFF position Note: When multiple people are working on the machine, each person needs to have a lock on the handle in the extra holes provided. KVAL Operation/Service Manual 1-10... -
Page 18: Lockout Tagout Air Supply
The lock and tag can now be removed (only by the person(s) who placed them), and the machine can be re-energized. The tags must be destroyed and the locks and keys returned to the lockout center. KVAL Operation/Service Manual 1-11... -
Page 19: Anchoringthe Machine To The Floor
When you have set-up and test run your machine to ensure that it is feeding the material properly KVAL recommends anchoring the machine to the floor with ½ Red head, True Bolt Anchors in each of the foot pads. An alternative way to bolting the machine, you may want to use Epoxy and hardened threaded rods to prevent the bolts from vibrating loose. - Page 20 ANCHORINGTHE MACHINE TO THE FLOOR • Insert 1/2”, (hardened) threaded rod into the bottom of the hole using a slow twist- ing motion. This insures the epoxy fills voids and crevices. Hardening begins in 7 minutes at room temperature. KVAL Operation/Service Manual 1-13...
-
Page 21: Zero-Energy To Start-Up
Replace Guards Replace all equipment guards. If part of equipment cannot be properly adjusted after start-up with guard on, contact the KVAL Service team. See “Getting Help from KVAL” on page 1-16. Check Controls Confirm that all switches are in the “OFF”... - Page 22 Be sure to follow the P-R-O- P-E-R lockout/tagout procedures, and that those around you do also. Close the Cage Gate Verify all cage gates are securely closed. Ensure all safety protocols are in effect. KVAL Operation/Service Manual 1-15...
-
Page 23: Getting Help From Kval
Getting Help from KVAL Getting Help from KVAL Before you seek help, first try the troubleshooting procedures. Follow the procedures below. If you are unable to resolve the problem: Locate the machine’s Specification Plate and record the serial number, 3 phase volts, electrical print number, and air print number. -
Page 24: Kval Return And Warranty Policy
KVAL Return and Warranty Policy KVAL Return and Warranty Policy KVAL's goal is to provide customers with high quality products. If, for any reason, you are not completely satisfied with your purchase, please contact us at: Email: parts@kvalinc.com +1 (800) 553-5825 Phone: •... -
Page 25: Customer Errors
Kval provides a warranty to products that are deemed defective. Within 30 days of discovery of said defect, please notify Kval, but no more than one (1) year after delivery will the product be covered under Warranty. The repair, replacement, or payment in the manner described above shall be the exclusive remedy of Buyer for breach of Kval’s warranty or for claims based upon failure... - Page 26 KVAL Return and Warranty Policy Page Intentionally Left Blank KVAL Operation/Service Manual 1-19...
-
Page 27: Safety Sign-Off Sheet
Note: It is recommended you make a copy of this sheet for new operators. If a copy is needed, you may download a PDF at the KVAL website (http:// www.kvalinc.com). You may also contact our Service Department at (800) 553- 5825 or email at service@kvalinc.com. - Page 28 Safety Sign-Off Sheet KVAL Operation/Service Manual 1-21...
-
Page 29: Operation Of The 960-3
Operation of the 960-3 CHAPTER 2 This chapter describes components, assemblies, and the user interface of the KVAL 960-3 Strike The content is geared to help operators understand the basic operation of the Router. 960-3 Chapter 2 at a Glance... -
Page 30: About The 960-3
About the 960-3 About the 960-3 machines closed lip and full-lip face plates. KVAL 960-3 Automatic Strike Jamb Router Options include changeover to a "T" faceplate routing pattern, and end drilling units for sills and head jamb screws. moves in a rectangular pattern for faceplate and then moves in to route for the deeper 960-3 latch hole. -
Page 31: Preset The 960-3
Preset the 960-3 Preset the 960-3 Before processing a jamb, make sure the following presets are set. • Set the Door Thickness: See “Set the Thickness” on page 2-6 • Set Backset:See “Set the Backset” on page 2-6 • Set Strike Width: Factory set for this model. -
Page 32: Process The Jamb
Process the Jamb Process the Jamb Make sure the presets are completed. See “Preset the 960-3” on page 2-3 Make sure air, and power are ON. See “Initial Powering Operations for the 960-3 Line” on page 2-5. At the center of the machine, set the hand, set the... -
Page 33: Initial Powering Operations For The 960-3 Line
Initial Powering Operations for the 960-3 Line Initial Powering Operations for the 960-3 Line This section describes how to power up and to power down the 960-3. How to Power Up the Machine Ensure factory air is applied to each machine and main air supply is turned on. -
Page 34: Presets For The 960-3
Presets for the 960-3 Presets for the 960-3 Before cutting a jamb, ensure the presets are completed. Set the Thickness is located on the machine Set the switch the desired thickness. The Thickness Switch E-Box. thickness values relate to an interior door or exterior door. After setting the thickness adjust the backset. -
Page 35: Set The Strike Depth
Presets for the 960-3 Set the Strike Depth The depth for the strike has two settings. Both depths are set at the factory. • Flip the top spacer away from the top plunge to allow full Strike through the Jamb: plunge. -
Page 36: Set The Strike Location
Presets for the 960-3 Set the Strike Location This section describes the interaction between the machine and various cuts. The specifications, in most cases, are made to order from the factory via customer guidelines. The information here, describes some of the basic setups. - Page 37 Presets for the 960-3 Tape Measure Flip Index Stop Up or Down to set the top index reference, move the bar stop against the set collar and tighten. Move to the opposite end of the machine and set move flip any stop up and out of the away.
-
Page 38: Tour Of The Machine
Set top of jamb to pre Foot Pedal Control: measured stop locations Start Sequence (Clamp) Main E-Box/Control Stop Sequence Panel: Has controls on the face PLC to control Cutting pro- cess of motor Controls and supplies volt- age to machine KVAL Operation/Service Manual 2-10... -
Page 39: About The Shifting Cutter Head
X, Y and Z Axises Bolt Plate Pin (X2): Fixed. Sets the Strike Width Lock Plate Pin (X2): Fixed. Sets The Strike Width Template Note: Width Strike Pins are mirror imaged at the Router Bit Left and Right side KVAL Operation/Service Manual 2-11... -
Page 40: Summary Of The Controls On The Machine
3’s routing sequence consists of clamping the jamb, turning on the routers, cutting the Strike Plate, turning off the routers, un- clamping the jamb. This pedal stops the 960-3’s routing sequence Stop Sequence: and returns the routers to the home position and unclamps the work. -
Page 41: About The Strike Controls
The Right Hand top reference is located at the left side of the machine. The Left Hand top refer- ence is located at the right side of the machine. See Figure below. RH Top Reference LH Top Reference Hand References FIGURE 2-1. KVAL Operation/Service Manual 2-13... -
Page 42: Lock Plate Shape Selector
Lock Plate Shape Selector The Lock Plate is the first cut to be performed. The Lock Plate Selector is the color blue. Switch Selections Full Cut • Off----No Cut • Full---Full Cut • Closed--Closed Cut Closed Cut KVAL Operation/Service Manual 2-14... -
Page 43: Emergency Shutdown And Recovery
If an E-Stop is activated, use the following procedure to recover, after the cause of the emergency stop is resolved: De-activate the E-Stop switch by pulling it out. Push the button on the operator's station Start Machine KVAL Operation/Service Manual 2-15... -
Page 44: About The Electrical Panel
If working on the panel, follow the safety protocol as described in Chapter 1. High Voltage Section Fuses and Control Transformer Input Output Ter- minals 110 V / 24 V Ter- minals Power Supplies KVAL Operation/Service Manual 2-16... -
Page 45: Description Of The Light Tower
Solid: General Error • Flashing: Not Ready to Re-Start (E-Sop Switch is Active) Green: Machine is Operational Off: No Control Power Control Power ON (Green): 24 VDC Control Power ON Ready to Work Light Tower Rev 2 KVAL Operation/Service Manual 2-17... - Page 46 Description of the Light Tower KVAL Operation/Service Manual 2-18...
- Page 47 This chapter describes preventative maintenance steps for KVAL Machinery. The content is geared to guide technicians to keep a regular maintenance schedule of your KVAL machine. Keeping your KVAL machine maintained is an important piece for successful operation of your door production process.
-
Page 48: Maintenance Schedule
Maintenance Schedule Maintenance Schedule KVAL recommends the following maintenance schedule to ensure that the machine operates properly. Cycles refers to the quantity of processed doors. Cleaning curtails build up of sawdust and grime which causes issues with the operation of the machine. Inspecting, finds issues before they become problems. - Page 49 Clean linear bearings and the chrome shaft with a clean dry cloth, then lubricate. Clean Check all air lines & electrical wiring for kinks or rubbing. Check Refill lubricator with an ISO 32 standard hydraulic oil (KVAL part# SYSLUBG) LUBE Six Month Preventive Maintenance Operation Description Wash filter and lubricator bowls with soapy water.
-
Page 50: Maintenance No-Goes
• Do not adjust any and all flow controls from factory settings • Do not remove shim stock • Do not Change or Alter any safety assemblies (E-Stops, Gate Locks, etc) • Do not Change programs in PLC’s or PC’s • Do not Alter Electrical Components KVAL Operation/Service Manual... -
Page 51: Lubrication Schedule
Lubrication Schedule Lubrication Schedule KVAL recommends the following lubrication schedule to ensure that the machine operates prop- erly. Recommended Lubrication Schedule TABLE 3-3. Type of Recommended Schedule Recommended Assembly Lubrication Type Linear Bearing Pillow Block Bearing Every 250 Hours of Machine Operation... -
Page 52: Lubrication Requirements
Closed Pillow Block Hub Style Opened Pillow Block parallel perpendicular mount Greasing Approximatively 1 Gram (one pump from grease gun) of Dura-Lith Grease (KVAL P/N: Lube EP-2). Every 250 hours of operation. Pillow Block Bearings FIGURE 3-2. KVAL Operation/Service Manual... -
Page 53: Flange Bearing Housings
X,Y, or Z direction. Greasing Ball Rail Bearing Approximatively 1 Gram (one pump from grease gun) of Dura-Lith Grease (KVAL P/ Every 250 hours N: Lube EP-2). of operation. Ball Rail Bearings FIGURE 3-4. KVAL Operation/Service Manual... -
Page 54: Sample Of Grease Locations For 960-3
Sample of Grease Locations for 960-3 Sample of Grease Locations for 960-3 This machine is a powerful electro-mechanical Caution motion control system. If servicing this machine, fol- low the safety guidelines. Failure to do so can result in damage to equipment and/or serious injury to person- nel. -
Page 55: Description Of Air Input System
Description of Air Input System Description of Air Input System There are two types of air inputs on KVAL machinery. Not all machines have lubricator option installed. Check your machine or Air prints to verify installation. Air Input with Lubrication The air input system takes in shop air and supplies clean dry air (CDA) and lubricated air to the machine. -
Page 56: Air Line Without Lubricator
Usually 1 drop of oil every other cycle is a good rule of thumb. The approved list of oil for lubricators is as follows: • KVAL P/N SYSLUBG • Chevron AW Hydraulic Oil 32 • G-C lubricants light AW R&O •... - Page 57 Description of Air Input System Changing the Bit on 960-3 High Frequency Motor This Service Note describes the process to change the Router Bit on 960-3 high frequency motor. The process includes removing the motor to access the bit. Follow the steps below.
- Page 58 3/8'' hex bolt from the back plate of the 960-3. b.Loosen the top bolt and left lightly tightened as a safety measure to secure motor. c.Be confident the motor is secure.
- Page 59 Insert bit using the length measured in Step 4. b.Keep motor secure and use a collet wrench and base wrench tighten collet nut. c.Install motor back into machine. Repeat Steps 3, 2, and 1. d.Clean up area. KVAL Operation/Service Manual 3-13...
- Page 60 Bit Adjustment Rod for new drill bit. f.Repeat the adjustments until specifications of machining is satisfied. KVAL Operation/Service Manual 3-14...
-
Page 61: Initial Cut On New Chip Out Block
Initial Cut on New Chip Out Block Initial Cut on New Chip Out Block Making a new chip out block requires two people. one person will operate the 960-3 as normal from the front side. Insert a test jamb When the router moves to the forward position into the jamb, the seconds person quickly butts new Chip Out Block against the jamb and tightens thumb screw. -
Page 62: Appendix: Router Collet Assembly Basics
• Clean the collet parts with a dampened rag. • Use a small brush with either nylon or brass bristles to reach into close areas. These bristles will clean the collet without damaging the metal surfaces. KVAL Operation/Service Manual 3-16... -
Page 63: Appendix: Collet Torque Values
Appendix: Collet Torque Values Appendix: Collet Torque Values KVAL recommends torquing the collets. Torquing adds consistency is important for repeatable machining. Follow the torque tool manufacturers method of torquing. KVAL Operation/Service Manual 3-17... - Page 64 Appendix: Collet Torque Values KVAL Operation/Service Manual 3-18...
- Page 65 Appendix: Collet Torque Values KVAL Operation/Service Manual 3-19...
- Page 66 10 maintenance daily 2, 3 six month 2 weekly 2 pillow block bearing, maintenance schedule 5 power lock out procedure 10 safety guidelines 5 Safety Sign Off Sheet Safety Concerns 20 six light panel description 17 Kval 960-3...
- Page 67 Notes:...
- Page 68 Contacting KVAL Customer Service Phone and Fax: Mailing address: In the U.S and Canada, call (800) 553-5825 or fax Customer Support Department (707) 762-0485 Kval Incorporated Outside the U.S. and Canada, call (707) 762-7367 825 Petaluma Boulevard South or fax (707) 762-0485 Petaluma, CA 94952 Email: service@kvalinc.com...
Need help?
Do you have a question about the 960-3 and is the answer not in the manual?
Questions and answers