Table of Contents
Advertisement
Quick Links
Power-UP
Verify Area is safe, power and air are applied,
E-Stops are out and Fence Gates are closed.
1. Turn the Electrical Disconnect to the ON
position on the Electrical Cabinet.
2. Turn the Control Circuit Switch to the
ON position. (Approximately 3 minute
boot-up)
3. Push the Start button.
4. Home the machine
All Tower Lights Should be Green. See reverse side
for Tower Light Description.
Power-Down
1. Park the Cutter Head
2. Right click the KVAL icon at the taskbar.
Select Exit from the drop down menu
Make sure Window is shutdown before
cutting off power to the machine.
3. Turn the Control Circuit Switch to the
OFF position.
4. Turn the Electrical Disconnect to the
OFF position on the Electrical Cabinet.
Before Processing a Jamb
Home the machine
(Important: Homing sets a starting
reference point for the machine.)
1. Select the Jamb Support Block: Choose the pre-
determined numbered block to match the jamb
style.
2. Select the Jamb Stop Reference: Select the
Jamb Stop placement, Jamb End or Dado.
Load Door Job from Library
1. Select the Libraries Tab at the upper left side of the screen
2. Select the Door Job Library Tab at the upper center screen
3. At the Door Job List double click the desired door job to go
to the Door Job screen
Verify Door Job
EXIT
EXIT
Verify the Door Job specifi-
cations. Look for validation
errors.
Note: For more information about Libraries,
see the KvalCam Manual.
Add Jambs to Queue
1. Enter the quantity of door to be processed in the Door
Qty box at the bottom of the screen
2. Select the Add to Queue Button
Important Notes
After Start Sequence, the operator must exit the cutting
area beyond the Safety Light Curtain within 3 seconds. If not
exited, the Start Sequence will cancel. To restart, press the
Start Sequence again and exit the cutting area within the 3
second rule.
Always Park the Carriage Head during processing breaks
and at shutdown.
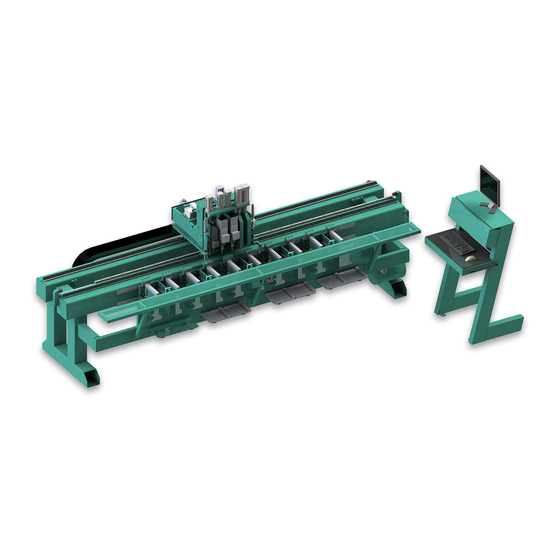
Process a Jamb
1. Extend Clamps: Extend the Door Clamps and Door Stops,
select the Jamb Stop Foot Pedal or Toggle Stop button at the
Main screen.
w
2. Load Jamb: Load the jamb onto the machine Jamb Shelf.
3. Align Jamb: Align the jamb to the Jamb Stop and the Up-
Clamp. Make sure the fit is tight.
Jamb Stop
4. Clamp: Secure the Jamb. Select the Jamb Clamp Foot Ped-
al or Toggle Clamp.
Warning: Keep Hands away from the
Clamps.
5. Start Sequence: Start cutting by pressing the Start Se-
quence button or by selecting the Start Sequence button at
the Main screen. Exit the Cutting area within 3 seconds.
=
OR
6. Continue or End: If continuing processing the jamb, select
the Next Group button, reposition the jamb, and repeat Steps
1-5 above. If completed with this jamb, remove jamb and con-
tinue to next the jamb. If ending the process, park the Cutter
Head.
→ Go to Next Jamb
OR
→ Stop Processing
OR
Up-Clamp
OR
965X Quick Ref 1
Advertisement
Table of Contents

Subscribe to Our Youtube Channel
Related Manuals for Kval 965X


Summary of Contents for Kval 965X
- Page 1 3. Align Jamb: Align the jamb to the Jamb Stop and the Up- Verify Door Job 1. Park the Cutter Head Clamp. Make sure the fit is tight. 2. Right click the KVAL icon at the taskbar. EXIT EXIT Up-Clamp...
- Page 2 Remote Troubleshooting OFF (Clear): Safety Project not Running Kval’s Support Team is able to work remotely with your maintenance staff or contractor to diagnose and troubleshoot machinery Red: Safety PLC Error Call (800)- 553-5825 or start a support ticket Online https://www.kvalinc.com/support.
Need help?
Do you have a question about the 965X and is the answer not in the manual?
Questions and answers