Table of Contents
Advertisement
Quick Links
Advertisement
Table of Contents

Subscribe to Our Youtube Channel
Related Manuals for Bernini Aria Deluxe


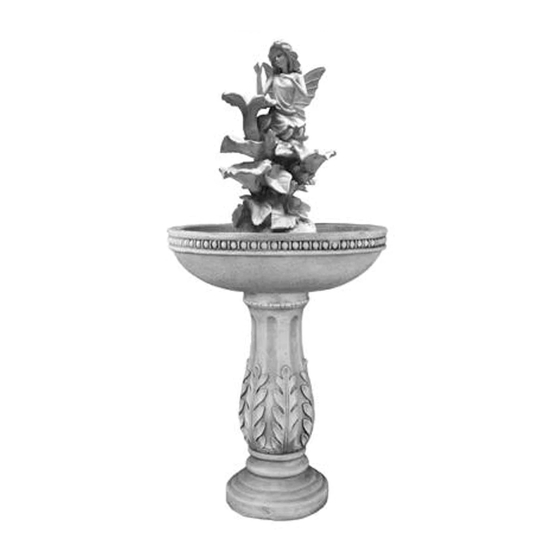
Summary of Contents for Bernini Aria Deluxe
- Page 2 This product comes with a one year limited warranty against materials and workmanship. Please review the list of accessories included with your Bernini™ Fountain on the next page. Please note, images of parts are not to scale with one another. About Aria: Aria is Italian for ‘air’...
- Page 3 Parts to your new Bernini Fountain: ™ Water Pump Assembly Fairy Topper Rechargeable Battery Connection Port Large Bowl Extension Battery Charger Cable Base Battery Compartment Leveling Shim Door...
-
Page 4: Table Of Contents
CONTENTS Step 1: Base & Large Bowl Bowl Locking System Step 2: Aria Fairy Topper Installation Installing The Aria Fairy Topper Step 3: Battery Installation Connecting The Battery: Battery Operation Mode Corded Operation Mode Connecting The Extension Cable Inserting & Removing the Battery Compartment Door Step 4: Setting Up Your Fountain Fill Your Fountain Operating Your Fountain... -
Page 5: Step 1: Base & Large Bowl
Step 1: Step 1: Base & Large Bowl You will need: Large Bowl Base Remember if you need help contact Customer Care: 1+ (619) 449-2392... -
Page 6: Bowl Locking System
At this point, your fountain should look like the image to the right. Go to the next page to continue setting up your new Aria Deluxe Cordless Figure Fountain. Remember if you need help contact Customer Care: 1+ (619) 449-2392... -
Page 7: Step 2: Aria Fairy Topper Installation
Step 2: Aria Fairy Topper Installation You will need: Aria Fairy Topper Assembled Base & Large Bowl Water Pump Assembly Remember if you need help contact Customer Care: 1+ (619) 449-2392... -
Page 8: Installing The Aria Fairy Topper
Installing The Aria Fairy Topper In the next step, you will Step 1: Rest the Aria Fairy Step 2: Firmly press the plug install the Aria Fairy Topper into the pipe in the middle of Topper on the side of the Large the Large Bowl to ensure a onto the Large Bowl. - Page 9 At this point, your fountain should look like the image on the left. Go to the next page to continue setup for your new Aria Deluxe Cordless Figure Fountain. Remember if you need help contact Customer Care: 1+ (619) 449-2392...
-
Page 10: Step 3: Battery Installation
Step 3: Battery Installation You will need: Fountain Assembled Extension Battery Cable Charger Battery Compartment Rechargeable Connection Port Door Battery Remember if you need help contact Customer Care: 1+ (619) 449-2392... -
Page 11: Connecting The Battery: Battery Operation Mode
Connecting The Battery: Battery Operation Mode Please note: This fountain has 2 different modes of operation. The first utilizes the Lithium Battery. The second mode is Corded Operation. This section covers the first mode of operation, Lithium Battery. Step 1: In the open battery compartment, Step 2: Using the cords from inside the you will see two cords hanging down that Base and the cord from the Battery, connect... - Page 12 Connecting The Battery: Battery Operation Mode (Continued) Yellow Yellow Gray Gray Battery Black Black Water Pump Blue Blue ABCD Button Please note: This fountain has 2 different modes of operation. The first utilizes the Lithium Battery. The second mode is corded operation using the included Extension cable.
-
Page 13: Corded Operation Mode
Corded Operation Mode Connecting The Extension Cable (When not using the rechargeable battery) NOTE: While using your fountain in Corded Operation Mode all controls work the same as while using with the Battery. This fountain has 2 different modes of operation. This section covers the second mode of operation, Corded Operation. - Page 14 Corded Operation Mode (Continued) Connecting The Extension Cable (Continued) EXTENSION CABLE & BATTERY DOOR NOTCH CHARGER OPTIONAL SAND CHAMBER Yellow Yellow Extension Cable Gray Gray Black Black Water Pump Blue Blue ABCD Button Remember if you need help contact Customer Care: 1+ (619) 449-2392...
- Page 15 At this point, your fountain should look like the image on the left. Go to the next page to continue setting up your new Aria Deluxe Cordless Figure Fountain. Remember if you need help contact Customer Care: 1+ (619) 449-2392...
-
Page 16: Step 4: Setting Up Your Fountain
Step 4: Setting Up Your Fountain You will need: Water To Fill Your Fountain Fountain Assembled Remember if you need help contact Customer Care: 1+ (619) 449-2392... -
Page 17: Fill Your Fountain
The on-board control panel is located near the top of the base, just below the bowl. See the dia- gram below to see how the all-new on-board controls work for your Bernini™ Fountain. IF YOUR FOUNTAIN IS MAKING A LOUD NOISE, DON’T PANIC! This just means that there are air bubbles stuck in the water pump. - Page 18 Status Light functions (buttons A and B). You can now try your Bernini™ Fountain to see if everything is working correctly! Turn your fountain on and you should see water flowing from the outlet in the vase at the top of the Aria Fairy Topper. If water is not flowing, please refer to the “Try Priming The Water Pump”...
-
Page 19: Troubleshooting And Maintenance
To clean your fountain, drain of all water and disassemble. Use a mild soap and a soft cloth to clean the parts of your Bernini™ Fountain. Your fountain bowl will form a natural patina finish which with time may appear lighter or whiter than the original color. -
Page 20: Water Pump Impeller
The impeller inside of the water pump is what pushes water up through your fountain, allowing you to enjoy the soothing sounds and wonderful sights of your Bernini™ Fountain. After long periods of usage, this part will need to be cleaned to make sure your fountain runs optimally. -
Page 21: Priming The Water Pump
Is your fountain making a loud noise or do you not see water flowing? Try priming the water pump. If you find the water pump is running, but water is not flowing from your fountain, or you hear a loud grinding noise coming from your fountain, not to worry, you can try priming the water pump: Begin by turning your fountain off. -
Page 22: Water Pump Connection
Water Pump Connection If your fountain did not come with the water pump already connected to the tube inside of the Aria Fairy Topper or if the water pump gets disconnected from the Aria Fairy Topper, use these instructions to recon- nect your water pump. - Page 23 (1) year from the date of original purchase. If within one (1) year this product fails due to defect in material or workmanship, Bernini™ will repair, replace or supply any defective part at their option. The purchaser must contact Bernini™ and provide a description of the defective part, including digital pictures if requested, with this original purchase documentation as validation of warranty coverage.
- Page 24 Telephone Number: 1+ (619) 449-2392 Santee, California 92071 World Wide Patents Pending Email: customercare@berninifountains.com On the web: www.berninifountains.com Facebook & Pinterest: Bernini Fountain Company Instagram:@berninifountains Twitter: @yrdllc © Yeiser Research & Development, LLC; 2020. All rights reserved. Made in China Designed in the USA...
Need help?
Do you have a question about the Aria Deluxe and is the answer not in the manual?
Questions and answers