Advertisement
Quick Links
INSTALLATION & OPERATION
GSM Retail Australia Pty Ltd ABN: 53 007 582 475
For Warranty and technical queries: 1300 373 199 Aus Or 0800 764 912 NZ
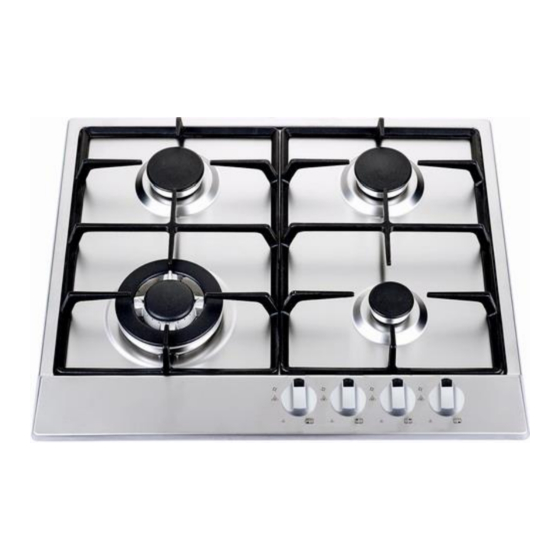
www.belliniappliances.com.au Model: BGT64XP FN81477 60CM Gas Cooktop
INSTRUCTIONS
60cm Gas Cooktop
Model No.
BGT64XP-W
BGT64XP-F
BGT64XP
FINELINE:81477
V6 NOV20
Advertisement

Related Manuals for Bellini BGT64XP-W


Summary of Contents for Bellini BGT64XP-W
- Page 1 INSTALLATION & OPERATION INSTRUCTIONS 60cm Gas Cooktop Model No. BGT64XP-W BGT64XP-F BGT64XP FINELINE:81477 GSM Retail Australia Pty Ltd ABN: 53 007 582 475 For Warranty and technical queries: 1300 373 199 Aus Or 0800 764 912 NZ V6 NOV20 www.belliniappliances.com.au Model: BGT64XP FN81477 60CM Gas Cooktop...
- Page 2 Thank you Thank you for choosing Bellini Appliances. Bellini prides itself on ‘affordable living’ making sure there is no compromise in your favourite room … The Kitchen All Bellini appliances carry a 3 year In Home warranty, be sure to retain your installation and user manual and receipt.
-
Page 3: Table Of Contents
Content Safety instructions‐‐‐‐‐‐‐‐‐‐‐‐‐‐‐‐‐‐‐‐‐‐‐‐‐‐‐‐‐--- 2 Product description‐‐‐‐‐‐‐‐‐‐‐‐‐‐‐‐‐‐‐‐‐‐‐‐‐‐‐‐---5 Installation-------------------------------------------7 Start using your appliance‐‐‐‐‐‐‐‐‐‐‐‐‐‐‐‐‐‐‐‐--11 Maintenance and Troubleshooting ‐‐‐‐‐‐‐‐‐‐-13 Warranty‐‐‐‐‐‐‐‐‐‐‐‐‐‐‐‐‐‐‐‐‐‐‐‐‐‐‐‐‐‐‐‐‐‐‐-‐‐‐‐‐‐‐23 GSM Retail Australia Pty Ltd ABN: 53 007 582 475 For Warranty and technical queries: 1300 373 199 Aus Or 0800 764 912 NZ www.belliniappliances.com.au Model: BGT64XP FN81477 60CM Gas Cooktop... - Page 4 This manual explains the proper installation and use of your appliance, please read it carefully before using even if you are familiar with the product. The manual should be kept in a safe place for future reference. In case of failure, only the Authorized Technical Service may repair this hob.
-
Page 5: Safety Instructions
Children’s Safety The cooking zones will become hot when you cook. Therefore, always keep small children away from the appliance. The appliance is not intended for use by young children or infirm persons without supervision. Young children should be supervised to ensure that they do not play with the appliance. Safety during Use ... - Page 6 AS/NZS 3000 – Electrical Installations (Wiring Rules) Building codes Any other relevant statutory regulations. Check the gas type label on the underside of the hotplate, adjacent to the gas connection to ensure it corresponds to the installation gas supply. If in doubt, contact the supply authority.
-
Page 7: Product Description
Product Description Model Burner* Pan supports Knob Total gas Over view position consumption 1W+2SR+1A With 2 types for Front LPG: BGT64XP* option 30.5MJ/h *BGT64XP and all variations of model 29.5MJ/h NOTE: On completion of the installation of the cooktop to the kitchen bench, the distance from benchtop surface to the highest part of any trivet is 47mm as shown in illustrations. - Page 8 *Note: For burner: W=Triple Ring Wok burner, R=Rapid burner, SR=Semi-Rapid burner, A=Auxiliary burner Accessory Picture Quantity Name ( for reference only, physical unit maybe different) User Manual Sealing tape 1 roll You have additional rating label in accessory bag, suggest Additional 1 set attach it onto a surface where it can be read e.g.
-
Page 9: Installation
Installation Before Installation: Before cutting into any bench tops, ensure the minimum clearances to walls, adjacent surfaces and overhead surfaces required by the relevant gas appliance installation code (see above) will comply. Dimensions are specified in millimetres (mm) Overhead cupboards and range hood = 650 mm. Side and rear clearance = 200 mm to any burner edge. - Page 10 2. Place Burner Box Apply the adhesive sealing tape to the underside lip of the burner box. Shown at G opposite. Place burner box into cutout hole and fit clamping brackets to clamp the hotplate to the bench. 3. Fit Burners And Trivet. Replace burners and ensure they are correctly repositioned over the ignitor (S) and thermocouple (T).
- Page 11 Wiring diagram 4. Gas Connection Install in accordance with relevant gas standards and/or codes of practice applicable. Connect the elbow fitting to the appliance gas manifold connection, and check that seals between the elbow and manifold connection are in place and in good condition. ...
-
Page 13: Start Using Your Appliance
ADJUSTING THE BURNER MINIMUM FLAME HEIGHT: NOTE: This adjustment can only be performed by the installer or an authorised service personnel. The minimum burner flame is factory adjusted for the gas type stated on the gas type label adjacent to the gas connection and should not require adjustment. - Page 14 The hotplates are fitted with mains powered electronic spark ignitors, so must be connected to mains power supply (i.e. nominal 220~240 V ac) to operate. If power is not available, the hotplate will still work but the burners will have to be lit with a match or similar. Depressing the gas control knob of any burner will activate the spark ignition for all burners.
-
Page 15: Maintenance And Troubleshooting
Maintenance & Troubleshooting Cleaning and maintenance should be carried out with the appliance cold especially when cleaning the enamelled parts. Avoid leaving alkaline or acid substances (lemon juice, vinegar etc.) on the surfaces. STAINLESS STEEL The stainless steel hob of the hotplate must be cleaned regularly (e.g. weekly) to ensure long life expectancy of the hotplate. - Page 16 TROUBLESHOOTING Servicing of the hotplates must only be done by an authorised service representative (see back of this booklet) and the hotplate must not be modified. Power must be disconnected before any servicing or maintenance is conducted. DO NOT MODIFY THIS APPLIANCE. It is recommended the hotplate serviced by an authorized person at least every 2 years.
-
Page 17: Warranty
Consumer until the expiry of three (3) year (Warranty Period). If within the Warranty Period a manufacturing defect is discovered in the Bellini product or it fails to perform to the Company’s specifications as a result of some defect in materials, components or workmanship (Defect) then the Company will, at its option, repair the Bellini product or supply a replacement Bellini product free of charge. - Page 18 1.10 If you are required to transport the Bellini product to the Company or its service agent, you must ensure it is safely disconnected by a qualified tradesman and securely packed and insured.
Need help?
Do you have a question about the BGT64XP-W and is the answer not in the manual?
Questions and answers