Advertisement
啊哈
90cm Built In Induction
Cooktop
Installation and User manual
Content
Safety instructions---------------------------------- 2
Product description--------------------------------- 4
Installation---------------------------------------------5
Start using your appliance--------------------------8
Maintenance and troubleshooting----------------16
Warranty------------------------------------------------ 18
For warranty service call 1300 373 199(Australia)
or 0508 123108(New Zealand) to connect you to
the nearest authorised service centre
20140414 issue 2
BDI904SFBG
BDI904SFBG-F
Advertisement
Table of Contents

Related Manuals for Bellini BDI904SFBG-F


Summary of Contents for Bellini BDI904SFBG-F
-
Page 1: Table Of Contents
Installation and User manual Content Safety instructions---------------------------------- 2 Product description--------------------------------- 4 Installation---------------------------------------------5 Start using your appliance--------------------------8 Maintenance and troubleshooting----------------16 Warranty------------------------------------------------ 18 For warranty service call 1300 373 199(Australia) or 0508 123108(New Zealand) to connect you to the nearest authorised service centre BDI904SFBG BDI904SFBG-F... -
Page 2: Safety Instructions
Safety instructions This manual explains the proper installation and use of your appliance, please read it carefully before using even if you are familiar with the product. The manual should be kept in a safe place for future reference. In case of failure, only the Authorized Technical Service may repair this hob. - Page 3 Young children should be supervised to ensure that Safety when cleaning they do not play with the appliance. For cleaning, the appliance must be switched To avoid small children and pets unintentionally off and cooled down. switching the appliance on, we recommend For safety reasons, the cleaning of the activation of the child safety device.
-
Page 4: Product Description
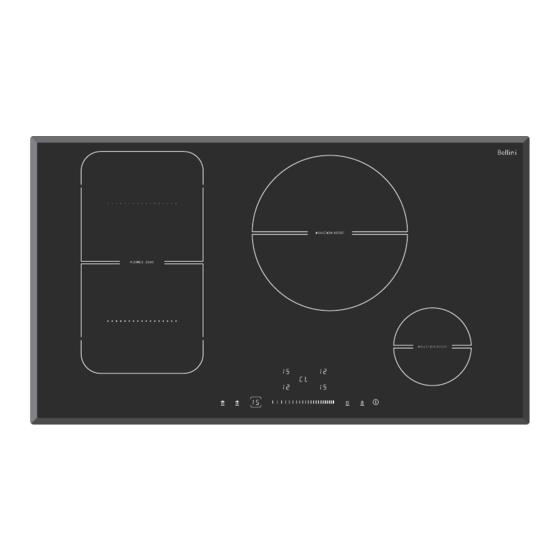
Product description Zone 1. max. 1800/3000 W 220x400mm Zone 2. max. 1800/3000 W 220x400mm Zone 3. max. 3000/4000 W 280mm Zone 4. max. 1400/2000 W 140mm Zone 5. max. 3000/4000 W 220x400mm 1. Heating zone selection controls 2.Timer control 3.Boiling cue control 4. -
Page 5: Installation
Installation Before you install the hob, make sure that the work surface is square and level, and no structural members interfere with space requirements the work surface is made of a heat-resistant material and at least 30mm thick. if the hob is installed above an oven, the oven has a built-in cooling fan the installation will comply with all clearance requirements and applicable standards and regulations a suitable isolating switch providing full disconnection from the mains power supply is incorporated in the permanent wiring, mounted and positioned to comply with the local wiring rules and regulations. - Page 6 1. Cupboard Cutting L(mm) W(mm) H(mm) D(mm) A(mm) B(mm) X(mm) 50 mini Important Under any circumstances, make sure the Induction cooker hob is well ventilated and the air inlet and outlet are not blocked. Ensure the Induction cooker hob is in good work state. As shown below Note: The safety distance between the hotplate and the cupboard above the hotplate should be at least 760mm.
- Page 7 The power supply cable must not touch any hot parts and must be positioned so that its temperature will not exceed 75˚C at any point. Check with an electrician whether the domestic wiring system is suitable without alterations. Any alterations must only be made by a qualified electrician.
-
Page 8: Start Using Your Appliance
Start using your appliance Description Explanation These show the above touch control sensor is controlling which zone of the appliance. Zone indicators Control to Increase/decrease power or Power setting of the zones, from 0 to 15, for example, this display increase/decrease of timer shows lower-right-hand zone power selected at level 15. - Page 9 Start cooking Power on the unit, the buzzer beeps once, all displays sh ow “ CL “ , indicating that the induction hob has entered the state of standby mode. Touch the ON/OFF control. Place a suitable pan on the cooking zone that you wish to use, make sure the bottom of the pan and the surface of the cooking zone are clean and dry Touching the heating zone selection control , and a indicator next to the key will flash.
- Page 10 : : Example To set it as 95 minute minder Example To set it as 95 minute timer Make sure the cooktop is turned on. Touch the heating zone selection control that Note: you can use the minute minder even if you want to set the timer for.
-
Page 11: Using The Keep Warm Function
Using the Boost function: Using the Keep Warm function: Actived the boost function Actived the keep warm function 1. Touching the heating zone selection control 1. Touching the heating zone selection control 2. Touching the boost control ,the zone indicator show “b” and the power reach Max. 2. -
Page 12: Flexible Area
FLEXIBLE AREA : As big zone • This area can be used as a single zone or as two 1. To activate the flexible area as a single big different zones, accordingly to the cooking needs zone, simply press the dedicated keys. anytime. - Page 13 Using the boiling cue control : You can use the function to boil water and it will 2. a: Touching the slider control, then the cooking zone will revert to the level you select. boiling water. remind you of the Actived the boiling cue function 1.
- Page 14 Cooking tips: Heat setting Suitability • delicate warming for small amounts of food 1 - 2 • melting chocolate, butter, and foods that burn quickly • gentle simmering • slow warming • reheating 3 - 5 • rapid simmering • cooking rice •...
- Page 15 To choose proper pan You appliance can tell whether the pan you are using is suitable or not. If the power indicator is flashing, that means pan is not suitable and won’t heat up. Following up below points will help you choose proper pan. 1.
-
Page 16: Maintenance And Troubleshooting
Maintenance & Troubleshooting Caution: Before maintenance or cleaning is carried out, the range hood should be disconnected from the main power supply. Ensure that the range hood is switched off at the wall socket and the plug removed. Spills and splashes will not harden and stick to the glass, as it hardly heats up. Both Vitro-ceramic and induction rings should however be cleaned of any spills or splashes as quickly as possible. -
Page 17: Error Code
Error code If an abnormality comes up, the induction hob will enter the protective state automatically and display corresponding protective codes: Code Possible causes What to do Please contact the supplier. F1-F6 Temperature sensor failure Please contact the supplier. F9-FA Temperature sensor of the IGBT failure. -
Page 18: Warranty
Consumer until the expiry of two (2) year (Warranty Period). If within the Warranty Period a manufacturing defect is discovered in the Bellini product or it fails to perform to the Company’s specifications as a result of some defect in materials, components or workmanship (Defect) then the Company will, at its option, repair the Bellini product or supply a replacement Bellini product free of charge. - Page 19 1.10 If you are required to transport the Bellini product to the Company or its service agent, you must ensure it is safely disconnected by a qualified tradesman and securely packed and insured. The Company does not accept any responsibility for loss or damage of the Bellini product prior to it being received by the Company or its service agent.
Need help?
Do you have a question about the BDI904SFBG-F and is the answer not in the manual?
Questions and answers