Advertisement
Quick Links
INSTALLATION & OPERATION
GSM Retail Australia Pty Ltd ABN: 53 007 582 475
For Warranty and technical queries: 1300 373 199 Aust OR 0508123108 NZ www.belliniappliances.com.au
Model: BIA64EGP-W, BIA64EGP-F, BIA64EGP FINELINE: 60cm Induction Cooktop
INSTRUCTIONS
60cm Induction Cooktop
Model No.
BIA64EGP-W
BIA64EGP-F
BIA64EGP
FINELINE:0081479
V.3 June19
Advertisement

Related Manuals for Bellini BIA64EGP-W


Summary of Contents for Bellini BIA64EGP-W
- Page 1 60cm Induction Cooktop Model No. BIA64EGP-W BIA64EGP-F FINELINE:0081479 BIA64EGP V.3 June19 GSM Retail Australia Pty Ltd ABN: 53 007 582 475 For Warranty and technical queries: 1300 373 199 Aust OR 0508123108 NZ www.belliniappliances.com.au Model: BIA64EGP-W, BIA64EGP-F, BIA64EGP FINELINE: 60cm Induction Cooktop...
- Page 2 Thank you Thank you for choosing Bellini Appliances. Bellini prides itself on ‘affordable living’ making sure there is no compromise in your favourite room … The Kitchen All Bellini appliances carry a 3-year In Home warranty, be sure to retain your installation and user manual and receipt.
- Page 3 Content 3…………………………………..…………………Safety instructions 4-6…………………………………..………………Installation 7-9…………………………………..………………Description of the appliance 10…………………………………..………………..Fault code 11…………………………………..………………..Pots and pans and how to use them 12-13…………………………………..…………..Safety reminding and Maintenance and cleaning 14…………………………………..…………………Troubleshooting 15…………………………………..…………………Environmental note...
-
Page 4: Safety Instructions
Safety instructions Important This appliance generates magnetic field in the direct vicinity. ATTENTION: People with PACEMAKERS must ensure that their pacemaker has been designed in conformity with the norms in force. It is recommended that the manufacture or your doctor is consulted to verify any incompatibility. Important This appliance generates short-range magnetic field therefore people with other types of electrical medical equipment, such as hearing aids for the deaf,... - Page 5 A steam cleaner is not to be used. Metallic objects such as knives, forks, spoons and lids should not be placed on the hob surface since they can get hot. The appliance is not intended to be operated by means of an external timer or separate remote-control system.
- Page 6 Installation Preparing the unit for a built-in appliance 1. Drill a hole on the table surface according to the size shown in the drawing. For the purpose of the installation and use, a minimum of 50mm space shall be preserved around the hole. Be sure the thickness of the table surface should be at least 30mm.please select heat- resistant table material to avoid larger deformation caused by the heat radiation from the cooker.
-
Page 7: Installing The Hob
Carry out all cutting of the unit and work surface then carefully remove shavings or sawdust before inserting the appliances. To ensure a correct ventilation of the hob please comply with the dimensions shows in figures. Always refer to the manufacturer for specific instructions, Make sure the surface is level and square and that no part interferes with the space required for installation. - Page 8 Fix the brackets on the front side and rear side by screw. Put the induction hob in the cutout cabinet. Attention: The electric hob is recommended to be installed by professional. Please never conduct the operation by yourself. The wall and the heating area above the table surface shall withstand heat. ...
- Page 9 complies with safety regulations. 4. The cable must not be bent or compressed. 5. The cable must be checked regularly and only replaced by a properly qualified person. Electrical principle diagram...
-
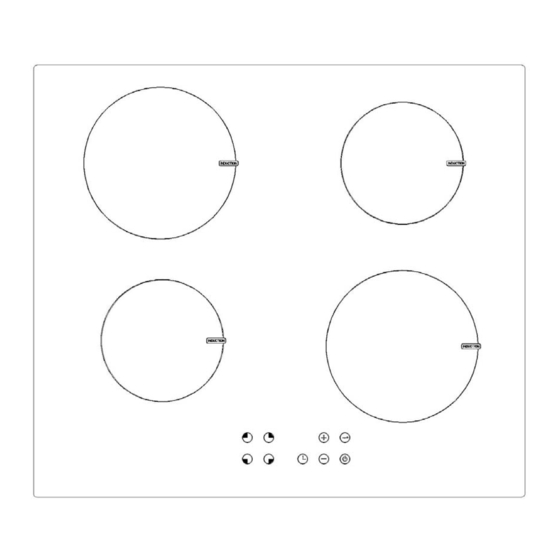
Page 10: Description Of The Appliance
Description of the appliance Control Panel Schematic diagram of the control panel Instruction ON/OFF: Turn ON or OFF the appliance. CHILD LOCK: Press the button one time to lock keys (the indicator light keep bright) and hold for a while to unlock, When it is activated, none of the other buttons can be activated except for ON / OFF. - Page 11 The left bottom burner. The right bottom burner. Timer: Setting the time as you need. Display instructions 1) Display rule of the LED light A. Switch indicator light: The indicator light will flash in standby state, and will remain on in other states.
- Page 12 the “+” button, the power level increased by one unit; each press of the “-” Each press of button, the power level reduced by one unit; Power level:0,1,2,3,4,5,6,7,8,9. Max power level: 9, Min power level: 1, 0 level close the power output. In the working process, various faults are detected, and if occurs, the appliance will enter into fault...
-
Page 13: Fault Code
FAULT CODE Fault Possible Cause Description Code No pan or pot, or their If no suitable pan or pot is placed on size, material, etc. is after 60s, the hob will turn off not suitable, or not automatically; if suitable pan or pot placed precisely in is placed within 60s, the hob will the middle of the... - Page 14 Pots and pans and how to use them Attention The pots and pans that can be used on this hob must be made of ferromagnetic material. They can be made of enamoured steel, cast iron or special pans of stainless steel for induction.
- Page 15 Safety reminding A dedicated power protection Never use the hob in high Never wash the hob with water air switch must be incorporeted temperature environment. derectly. Steam cleaner is in the fixed wiring in accordance not to be used. with the wiring rules. Never have the hob to work for sealed foods such as the appliance is not...
-
Page 16: Maintenance And Cleaning
Maintenance and cleaning 1. Please shut off the power and pull out the plug before cleaning of the appliance. 2. Clean the appliance until it cools down completely. 3. To remove dirt, please select illustrious detergent. 4. After removing dirt, please use neat wet cloth to clean the unit. 5. -
Page 17: Troubleshooting
Do not use these products: Abrasive powders or detergents, spray products for ovens, whitening products, sponges with abrasive surfaces, steel wool balls or synthetic ones. These products could seriously damage your hob. Troubleshooting Faults Causes Remedies appliance appliance Check that the appliance is does not work the powered, plant... -
Page 18: Environmental Note
Environmental note Note: Before discarding an old appliance, switch off and disconnect it from the power supply. Cut off and render any plug useless. Cut the cable off directly behind the appliance to prevent misuse. This should be undertaken by a competent person. This product must not be disposed together with domestic waste. - Page 19 Consumer until the expiry of three (3) year (Warranty Period). 1.6 If within the Warranty Period a manufacturing defect is discovered in the Bellini product or it fails to perform to the Company’s specifications as a result of some defect in materials, components or workmanship (Defect) then the Company will, at its option, repair the Bellini product or supply a replacement Bellini product free of charge.
- Page 20 1.10 If you are required to transport the Bellini product to the Company or its service agent, you must ensure it is safely disconnected by a qualified tradesman and securely packed and insured. The Company does not accept any responsibility for loss or damage of the Bellini product prior to it being received by the Company or its service agent.
Need help?
Do you have a question about the BIA64EGP-W and is the answer not in the manual?
Questions and answers