Dräger Medical Evita 2 dura Operating Instructions Manual
Intensive care ventilator
Hide thumbs
Also See for Evita 2 dura:
- Instructions for use manual (148 pages) ,
- Addendum to operating instructions (36 pages)

Related Manuals for Dräger Medical Evita 2 dura


Summary of Contents for Dräger Medical Evita 2 dura
- Page 1 M E D I C A L Evita 2 dura Intensive Care Ventilator Operating Instructions Software 4.n...
- Page 2 NOTICE Proprietary Information This document contains information in which Draeger Medical, Inc. claimed proprietary rights. The information may not be reproduced in whole or in part except as authorized in writing by Dräger. This informa- tion is the property of Draeger Medical, Inc., it is provided solely for the use intended.
- Page 3 Working with these Operating Instructions Working with these Operating Instructions Header line – the title... peration of the main chapter tartin The title of the respective sub-section is printed underneath the main header – to help you find your way Starting Up quickly from subject to subject.
- Page 4 At a Glance – New Features of Evita 2 dura Software 4.n At a Glance – New Features of Evita 2 dura Software 4.n Entering the humidifier type used Additional weaning parameter – »Heated (active) humidifier« available as SW 4.n plus upgrade In addition to the parameter occlusion pressure P 0.1,...
-
Page 5: Table Of Contents
Contents Contents Important Safety Information READ THIS FIRST !......12 Operator's Responsibility for Patient Safety..........12 Limitation of Liability................12 Warranty....................13 Definitions....................14 Summary of WARNINGS and CAUTIONS..........14 Precautions During Preparation..............15 Precautions During Operation..............17 Precautions During Configuration.............. 19 Precautions During Care................ - Page 6 Contents Contents Preparation ...................33 Assembly of Components................34 Installing the Expiratory Valve..............34 Mounting a Flow Sensor................34 Installing an O Sensor Capsule..............35 Precautions When Using Heat/Moisture Exchangers......36 Potential Hazards from Use of Expiratory Bacteria Filters......36 Installing a Heated Humidifier..............37 Ventilating Adults and Children...............
- Page 7 Contents Contents Setting Alarm Limits.................73 Parameter Adjustment Ranges..............73 In the Event of an Alarm................74 Alarm Categories..................74 Silencing Audible Alarms................75 Using Help....................75 Displaying Waveforms and Measured Values..........76 Measured Values Overview............... 77 Freezing Waveforms..................78 Special Functions..................79 Manual Inspiration / Inspiration Hold............79 Manual Expiration / Expiration Hold............79 Nebulizing Aerosols...................
- Page 8 Contents Contents Care ...................... 105 Dismantling.................... 106 Removing Components................106 Disinfecting/Cleaning................109 Ventilator With Mobile Stand, Circuit Support Arm, Gas Supply Hoses, and Temperature Sensor.......... 110 Components of Reusable Patient Circuit and Expiratory Valve....110 Disinfecting/Cleaning/Sterilizing Schedule..........111 Assembling.................... 112 Assembling the Expiratory Valve..............
- Page 9 Contents Contents Theory of Operation ................ 143 Ventilation Modes.................. 144 Volume Controlled Ventilation with PLV........... 144 Sigh (Intermittent PEEP)................145 SIMV.......................146 Pressure Support..................147 PCV+......................148 MMV....................... 149 Flow Measurement................151 Automatic Leak Compensation..............152 Rapid Shallow Breathing Index RSB............154 Negative Inspiratory Force NIF..............154 Inspiratory O Concentration During Nebulizing of Aerosols....155 References.....................156...
- Page 10 This page intentionally left blank...
- Page 11 Important Safety Information Contents Important Safety Information Contents Operator's Responsibility for Patient Safety..........12 Limitation of Liability................12 Warranty....................13 Definitions....................14 Summary of WARNINGS and CAUTIONS..........14 Precautions During Preparation..............15 Precautions During Operation..............17 Precautions During Configuration.............. 19 Precautions During Care................19 Precautions During Maintenance...............
-
Page 12: Important Safety Information
Important Safety Information Operator's Responsibility for Patient Safety Limitation of Liability Operator's Responsibility Limitation of Liability for Patient Safety Draeger Medical, Inc.'s liability, whether arising out of or For correct and effective use of the product and in related to manufacture and sale of the goods, their instal- order to avoid hazards, it is mandatory to carefully lation, demonstration, sales representation, use, perfor- read and to observe all portions of this manual. -
Page 13: Warranty
Important Safety Information Warranty Warranty All Dräger products are guaranteed to be free of defects for a period of one year from date of delivery. The following are exceptions to this warranty: 1. The defect shall be a result of workmanship or material. -
Page 14: Definitions
NOTE: A NOTE provides additional information WARNING ! intended to avoid inconveniences during operation. The Evita 2 dura ventilator must only be used under the supervision of qualified medical personnel in order to provide immediate corrective action in case of a malfunction... -
Page 15: Precautions During Preparation
Important Safety Information Summary of WARNINGS and CAUTIONS Precautions During Preparation WARNING ! WARNING ! Do not use wireless or cellular phones within Always install expiratory valve that has been 33 feet (10 m) of the equipment. cleaned and disinfected. Radio communication devices may cause malfunction in electromedical equipment. - Page 16 Evita 2 dura screen when the nurse call is connected. Only highest priority alarms (!!!) will activate the nurse call.
-
Page 17: Precautions During Operation
CAUTION ! WARNING ! Do not place containers of liquids on top of the Evita 2 dura ventilator. Liquids getting into the In case of malfunction of any of the built-in ventilator can cause equipment malfunction and monitoring a substitute is recommended in damage. - Page 18 Evita 2 The integrated nebulizer function of dura ventilator. Liquids getting into the ventilator Evita 2 dura is designed for nebulizers with a can cause equipment malfunction and damage. nebulizing flow of 6 L/min at 29 psi (2 bar), for example nebulizer 84 12 935 (white central body).
-
Page 19: Precautions During Configuration
Important Safety Information Summary of WARNINGS and CAUTIONS Precautions During Configuration Precautions During Care WARNING ! WARNING ! Configuration of ventilation modes and default Always follow accepted hospital procedures parameters should only be performed by staff for handling equipment contaminated with authorized by a hospital protocol. -
Page 20: Precautions During Maintenance
Important Safety Information Summary of WARNINGS and CAUTIONS Precautions During Maintenance CAUTION ! Certain components of the ventilator consist of materials that are sensitive to certain organic WARNING ! solvents sometimes used for cleaning and disin- fecting (e.g., phenols, halogen releasing To avoid any risk of infection, clean and compounds, oxygen releasing compounds, disinfect ventilator and accessories before... -
Page 21: Intended Use
Intended Use Contents Intended Use Contents Intended Medical Applications..............22 Available Ventilation Modes............... 22 Mandatory Ventilation Monitoring............... 23 Back-up Ventilation With an Independent Manual Ventilation Device (Resuscitation Bag)................... 23 Restrictions of Use...................23... -
Page 22: Intended Medical Applications
Intended Use Intended Medical Applications Intended Medical Application Pressure Support, Evita 2 dura is a long term ventilator to be used in the Supp. Pressure supported spontaneous intensive care of adults and children with a body weight of breathing. at least 3 kg. -
Page 23: Mandatory Ventilation Monitoring
Evita 2 dura includes monitoring for: WARNING ! – airway pressure, P – expiratory minute volume, MV The Evita 2 dura ventilator must only be used under the supervision of qualified medical – inspiratory O concentration, FiO personnel in order to provide immediate –... - Page 24 This page intentionally left blank...
-
Page 25: Operating Concept
Operating Concept Contents Operating Concept Contents Ventilator Controls................... 26 Controls Related to Ventilation..............26 Controls for Screen Functions..............27 Keys for Routine and Auxiliary Functions............27 Power Switch....................28 »Standby« Key...................28 Screen Pages...................29 »Additional Settings«..................30 »Alarms«....................30 »Measured values«..................30 »Calibration/Configuration«................31 Color Screen.................... 32... -
Page 26: Ventilator Controls
Operating Concept Ventilator Controls Ventilator Controls Controls Related to Ventilation 1 Keys for selecting modes of ventilation: Evita 2 dura – CMV – SIMV – PCV+ as well as – other modes 2 Keys for selecting/adjusting ventilation parameters: – Tidal volume VT –... -
Page 27: Controls For Screen Functions
Operating Concept Control Elements Controls for Screen Functions 1 Menu selection keys for operating screen menus. Evita 2 dura 2 Central "turn-and-push" dial knob for selecting and setting options displayed on the screen. To select/set, turn dial knob To confirm, press dial knob. -
Page 28: Power Switch
»Standby« Key Located separately, away from other keys. Evita 2 dura For keeping ventilator in standby for switching on ventilation. To switch to standby: 1 Press and hold down »Standby« key for at least 3 seconds. -
Page 29: Screen Pages
Operating Concept Screen Pages Screen Pages All screen pages are based on two general layouts: – a main page, displaying all important ventilation characteristics at a glance – the application-specific pages for functions and settings. Important functions are displayed in the same location in both screen layouts: –... -
Page 30: Alarms
Operating Concept Screen Pages The menu keys along the right-hand edge of the screen select application screen pages for the following specific Evita 2 dura situations: – Additional Settings – Alarms – Measured values – Measuring maneuvers (available option) –... -
Page 31: Calibration/Configuration
Operating Concept Screen Pages »Calibration/Configuration« The following functions are performed within this screen: Sensors – Calibrating sensors for O and flow – Switching monitoring functions on and off Ventilator – Adjusting audible alarm volume – Adjusting screen contrast – Setting date and time –... -
Page 32: Color Screen
Operating Concept Color Screen Color Screen (Available Option) To support on-screen information by representation in color. For alarm messages = Warning level alarm yellow = Caution or Advisory level alarm blue = inactive alarm Example: Alarm "Apnea !!!" For menu keys: green = selectable black = selected Example: »Ventilator + + «... -
Page 33: Preparation
Preparation Contents Preparation Contents Assembly of Components................34 Installing the Expiratory Valve..............34 Mounting a Flow Sensor................34 Installing an O Sensor Capsule..............35 Precautions When Using Heat/Moisture Exchangers......36 Potential Hazards from Use of Expiratory Bacteria Filters......36 Installing a Heated Humidifier..............37 Ventilating Adults and Children............... -
Page 34: Assembly Of Components
Preparation Assembly of Components Assembly of Components Installing the Expiratory Valve WARNING ! Always install expiratory valve that has been cleaned and disinfected. NOTE: Refer to page 112 for re-assembly of a disassembled expiratory valve. Push patient block fully into mounting receptacle. Check that it is properly engaged by gently pulling on the port. -
Page 35: Installing An O 2 Sensor Capsule
Preparation Assembly of Components Installing an O Sensor Capsule – when using the system for the first time – when the display reads: measurement inop – when calibration can no longer be performed. 1 Turn port downwards or to the left. 2 Use coin to loosen screw and remove protective cover. -
Page 36: Precautions When Using Heat/Moisture Exchangers
Preparation Precautions When Using Heat/Moisture Exchangers Potential Hazards from Use of Expiratory Bacteria Filters Precautions When Using Heat/ Potential Hazards from Use of Moisture Exchangers Expiratory Bacteria Filters The use of a heat/moisture exchanger (HME, artificial The use of an expiratory bacteria filter is not mandatory. nose) in the patient connection can increase breathing Use of bacteria filters in the expiratory side of the patient resistance considerably. -
Page 37: Installing A Heated Humidifier
NOTE: The following descriptions asssumes that patient circuit has been attached on the left-hand side CAUTION ! Do not place containers of liquids on top of the Evita 2 dura ventilator. Liquids getting into the ventilator can cause equipment malfunction and damage. -
Page 38: Ventilating Adults And Children
Preparation Ventilating Adults and Children Ventilating Adults and Children Upward from 100 mL – 2000 mL tidal volume V Patient mode: »Adults« WARNING ! Do not use a heat/moisture exchanger (HME) simultaneously with a nebulizer or heated humidifier! Risk of increased breathing resistance due to condensation Connecting the Patient Circuit WARNING ! -
Page 39: Installing A Temperature Sensor
Preparation Ventilating Adults and Children Installing a Temperature Sensor WARNING ! It is strongly recommended to use the electro- nic temperature monitoring feature of the ven- tilator if no proximal airway temperature moni- toring is performed by the humidifier used. 1 Push sensor into the rubber sleeve on the inspiratory side of the Y-piece as far as it will go. -
Page 40: Ventilating Infants
Preparation Ventilating Infants Ventilating Infants Up to 300 mL tidal volume V Patient mode »Ped.« WARNING ! Do not use a heat/moisture exchanger simultaneously with a nebulizer or heated humidifier! Risk of increased breathing resistance due to condensation Installing an Infant Patient Circuit 1 Prepare the humidifier following its Operating Instruc- tions, using infant size patient circuit connectors. -
Page 41: Supplies And Connections
"hospital grade" receptacle. Always disconnect supply before servicing. For operation with DC power supply accessory "Inte- grated battery supply 12/24 V - Evita 4/Evita 2 dura DC", part no. 84 13 034, and additional battery (option) either... -
Page 42: Temporary Interruption Of Power Supply
Supply pressures must be between 43.5 and 87 psi (3 to 6 bar) Screw high pressure Air and O hoses to sockets on Air O the back panel of Evita 2 dura and insert their probes into wall terminals. -
Page 43: Before Using For The First Time
Liquids getting into the ventilator can cause equipment malfunction and damage. Selecting a Screen Language Evita 2 dura (US version) leaves the factory programmed with American English screen texts. Among others, e.g. Spanish and French can be selected as your screen language. -
Page 44: Evita Remote (Available Option)
Operating Manual. Connecting Insert connector of the remote control pad cable into the » « receptacle on the back panel of Evita 2 dura. The connector may be plugged or unplugged at any time without affecting ventilator function. - Page 45 All lights in the remote pad will light up for 5 seconds: – red indicator light – yellow indicator light – yellow indicators in the keys. Evita 2 dura now checks the remote control pad. In case of a fault, an advisory message will be displayed, see page 118, "Troubleshooting".
-
Page 46: Nurse Call (Available Option)
Preparation Nurse Call (Available Option) Nurse Call (Available Option) Connection on the rear panel of Evita 2 dura intended for the transmission of alarm messages with highest priority (alarm level) to a central hospital alarm system. WARNING ! Installation of the Evita nurse call kit should only be performed by DraegerService or factory trained and authorized personnel. -
Page 47: Checks Of Readiness For Operation
, Flow) - the »device check« has been completed successfully. Evita 2 dura supports this »device check« with a built-in checklist that guides the user through the tests of readi- ness for operation in a dialog fashion. The following tests are performed during the device... -
Page 48: Preparing For The Check Procedure
Insert the elbow connector into the Y-piece only when Evita 2 dura advises you on screen to do so. Preparing the infant test lung 84 09 742 for use with the infant patient circuit... -
Page 49: Starting Ventilator Check
Starting Ventilator Check To switch ventilator on, press power switch on the back panel until it clicks into position. Evita 2 dura now runs a self test. Wait until the 10-second test has been completed. After the self-test: 1 Hold down »Standby« key for about 3 seconds to switch Evita 2 dura to standby. - Page 50 Activate the »Start« screen key = press dial knob Evita 2 dura starts running through the dialog-oriented tests. The test procedure is semi-automatic. During the ventilator check, the user is instructed by Evita 2 dura to perform specific actions on the ventilator.
-
Page 51: Ventilator
Preparation Checks of Readiness for Operation Ventilator Expiratory valve 1 Correctly inserted and seated? Turn dial knob to select »Yes« screen key. Press dial knob to confirm. Flow sensor 2 Correctly seated? Turn dial knob to select »Yes« screen key. Press dial knob to confirm. - Page 52 Preparation Checks of Readiness for Operation Air-O crossover valve Turn dial knob to select »Yes« screen key. Press dial knob to confirm. Connect adult test lung to Y-piece. Press dial knob to confirm with »Yes« screen key. Remove O connector from wall supply terminal. The ventilator now checks the function of the Air/O crossover valve.
-
Page 53: Patient Circuit Performance
Preparation Checks of Readiness for Operation Lamps/LEDs Do all lamps/LEDs light up? Turn dial knob to select »Yes« screen key. Press dial knob to confirm. Flow sensor calibration Press dial knob to confirm with »Yes« screen key. sensor calibration Press dial knob to confirm with »Yes« screen key. Patient Circuit Performance Press the »Check jj«... - Page 54 Preparation Checks of Readiness for Operation Compliance The ventilator calculates system compliance in mL/cmH This calculated system compliance is used for automatic correction of volume-controlled ventilator breaths and of measured values from flow monitoring. After changing the patient circuit: Repeat leak test. Resistance The ventilator calculates inspiratory and expiratory resistance in cmH...
- Page 55 Evita 2 dura is now ready for operation. Either: leave Evita in standby mode and preset ventilation mode and ventilation parameters as needed, 1 immediately start up Evita 2 dura by pressing »Standby« key, Evita 2 dura 2 switch off Evita for later use.
- Page 56 A leakage flow up to 300 mL/min at a pressure of 60 cmH O is acceptable. After the leak test, Evita 2 dura determines compliance and resistance of the patient circuit. Evita 2 dura uses the calculated compliance value to...
-
Page 57: Operation
Operation Contents Operation Contents Precautions During Operation..............58 Starting Up....................59 Switching On..................... 59 Patient Mode....................59 Selecting the Patient Mode.................60 Starting Ventilation..................61 Setting Ventilation Modes.................62 CMV, CMV Assist..................63 SIMV, SIMV/P ................... 65 Supp. PCV+ , PCV+/P ................. 66 Supp. CPAP, CPAP/P ................. -
Page 58: Precautions During Operation
Do not place containers of liquids (such as WARNING ! infusion bags or bottles) on top of or over the Evita 2 dura ventilator. Liquids getting into the If a fault is detected in the ventilator and its ventilator can cause equipment malfunction and life support functions are in doubt, ventilation damage. -
Page 59: Starting Up
After power outages or periods of standby, the settings in effect immediately before the interruption of ventilation will be used again. Patient Mode For factory delivered ventilators, Evita 2 dura offers the following patient modes after power-up. – »Adults« = adult patient –... -
Page 60: Selecting The Patient Mode
(e.g. NeoFlow),Evita 2 dura will prevent restora- tion of previous setting by not showing the »Prev. patient« key. Evita 2 dura will also not allow previous settings if the ventilator was configured in such a way that the previous patient mode is not available any more. -
Page 61: Starting Ventilation
30 seconds in the patient mode last used and with the previously selected ventilation mode and respective ventilation parameters. The Evita 2 dura screen then displays the main screen page. The user may check and correct the settings in the... -
Page 62: Setting Ventilation Modes
Setting Ventilation Modes Setting Ventilation Modes To set ventilation parameters: 1 Press appropriate parameter key. Evita 2 dura The yellow LED in the key will light up. 2 Turn dial knob to set desired value. Press dial knob to confirm value. -
Page 63: Cmv, Cmv Assist
Operation Setting Ventilation Modes Continuous Mandatory Ventilation Volume controlled ventilation with fixed, mandatory Insp. minute volume MV and user-adjustable tidal volume V pause and rate f. Used for patients without spontaneous breathing. plat Set a ventilation pattern for CMV with parameters: Tidal volume »V T«... - Page 64 Operation Setting Ventilation Modes Intermittent PEEP (Sigh) – for prophylactic treatment of atelectasis. Switching on and setting an intermittent PEEP will increase end-expiratory pressure increases for two ventilator breaths every 3 minutes by the value set for intermittent PEEP. CMV can be configured with the additional ventilation parameter P for pressure limited ventilation.
-
Page 65: Simv, Simv/P Supp
Apnea enti ati n breathing. If breathing stops, Evita 2 dura will trigger an alarm after ri e time ri e time the set alarm time (T > ) and will start volume... -
Page 66: Pcv+ , Pcv+/P Supp
Operation Setting Ventilation Modes SIMV can be configured with the additional ventilation parameter P for pressure limited ventilation. Activate »P pressure limiting«, see page 100. Set value of Pmax with »Pinsp.« parameter key. Pressure Limited Ventilation (PLV)* – for manually limiting pressure peaks using the P pressure limit. - Page 67 Apnea ventilation – for automatic switching to volume controlled mandatory ventilation if the patient stops breathing. If spontaneous breathing stops, Evita 2 dura will trigger an alarm after the set alarm time (T > ) and will start apnea...
-
Page 68: Cpap, Cpap/P Supp
Operation Setting Ventilation Modes –––––––––––––––––––––––––––––––––––––––––––––––– To activate: Press menu key »Other Modes«. If PCV + has been selected with the cursor: Assist Keep menu key »Other Modes« menu key pressed for approximately 3 seconds, press dial knob. Else: Select PCV + by turning dial knob. - Page 69 Apnea Ventilation – for automatic switch to volume controlled mandatory ventilation if the patient stops breathing. If breathing stops, Evita 2 dura will trigger an alarm after the set alarm time (T > ) and will start volume apnea controlled ventilation with the set ventilation parameters: Breath rate »f...
-
Page 70: Mmv, Mmv/P Supp
Operation Setting Ventilation Modes MMV*, MMV/P Supp. Mandatory Minute Volume Ventilation Pressure Support The overall minute volume is preset to a mandatory level, Pressure Support which can be adjusted via tidal volume V and breath rate f. short long rise time rise time The patient can breathe spontaneously, thereby PEEP... -
Page 71: Apnea Ventilation
«, no expiratory flow was measured Apnea and/or no sufficient inspiratory gas delivery was performed. In the event of an apnea, Evita 2 dura will trigger an Apnea a arm de ay alarm after the set alarm delay time (T > ) and will... - Page 72 Operation Setting Ventilation Modes –––––––––––––––––––––––––––––––––––––––––––––––– To set apnea ventilation: Press »Settings« menu key. Turn dial knob to select »Apnea vent.« screen key. Press dial knob to activate backup apnea ventilation. The "LED" in »CPAP/P « screen key changes Supp. color from green to yellow. PCV + ventilation Assist mode is now active.
-
Page 73: Setting Alarm Limits
Operation Setting Alarm Limits Setting Alarm Limits Press »Alarms« key. Display screen »Limits« (example): This page displays all the adjustable alarm limits. < = lower alarm limit > = upper alarm limit Example: Setting upper alarm limit for f spont Turn dial knob to select screen field f with cursor. -
Page 74: In The Event Of An Alarm
1 The red or yellow light will flash. 2 An alarm message will be displayed in the top right- hand corner of the screen. Evita 2 dura determines the priority of the alarm message, marks the text with exclamation marks, and generates the different audible alarm sequences. -
Page 75: Silencing Audible Alarms
In the Event of an Alarm Once a fault condition has been remedied, the audible alarm will be switched off. Caution and Advisory Evita 2 dura messages will disappear automatically. Warning messages (!!!) will then appear in the color of the status field and must always be acknowledged: 1 Press »Alarm Reset«... -
Page 76: Displaying Waveforms And Measured Values
A group of six selectable measured values are displayed in the right-hand field, with two selectable waveforms in the left-hand field. To select a second group of 6 measured values: Evita 2 dura 1 Press the »Values « key. To select another pair of waveforms: 2 Press the »Waves... -
Page 77: Measured Values Overview
The measured value MV shows leakage in L/min. leak This value is determined by Evita 2 dura by comparing delivered inspiratory minute volume to minute volume measured on the expiratory side. Evita 2 dura uses the value for MV... -
Page 78: Freezing Waveforms
Operation Displaying Waveforms and Measured Values Freezing Waveforms To study waveform(s) in more detail: 1 Press »Freeze « key. Evita 2 dura For displaying new waveform(s) again: 1 Press »Freeze « key again. -
Page 79: Special Functions
Used to determine the weaning parameter NIF 2 Press and hold »Exp. hold« key. Expiration is maintained as long as the key is held down and Evita 2 dura determines the value of NIF. After 15 seconds, the ventilator will automatically inter- rupt expiration. -
Page 80: Nebulizing Aerosols
Special Functions Nebulizing Aerosols During ventilation in adult mode Nebulizer may be used in all ventilation modes. Evita 2 dura administers the medicated aerosols synchro- nized with inspiration, while automatically maintaining the preset minute volume. Depending on the O concentration set, the ventilator supplies the nebulizer with air, oxygen, or a mixture of air and oxygen. - Page 81 Use. WARNING ! The integrated nebulizer function of Evita 2 dura is designed for nebulizers with a nebulizing flow of 6 L/min at 29 psi (2 bar), for example nebulizer 84 12 935 (white central body). Other nebulizers may cause...
- Page 82 Operation Special Functions 1 Connect nebulizer hose onto the nipple in the front of the Evita 2 dura ventilator unit. Evita 2 dura Fill nebulizer in accordance with its respective Instructions for Use. WARNING ! Consider effects of aerosols on sensors, filters,...
-
Page 83: Pre-/Post-Oxygenation For Bronchial Suction
Evita 2 dura offers a program for elevated oxygenation during the removal of secretions. Evita 2 dura ventilates patients in the set ventilation mode with elevated oxygen concentrations for 180 s. Pre-oxy- genation levels are 100 Vol.% oxygen when in adult mo- de and a concentration 25 % higher than the setting when in pediatric mode (example: if 60 Vol.% O... - Page 84 (example): Execute suction and reconnect 120 s If suction is terminated and the ventilator reconnected within the allowed time window, Evita 2 dura returns to ventilating and post-oxygenation, see below. The MV < and P >...
-
Page 85: Selecting Standby Mode
NOTE: No ventilation takes place in standby mode! Uses of Standby: – to select the patient mode – to perform the ventilator check – to maintain Evita 2 dura ready for operation – to preset ventilation parameters and alarm limits. Switching to standby Evita 2 dura 1 Hold down »Standby«... -
Page 86: Calibrations
Operation Calibrations Calibrations NOTE: The last calibration values remain stored until the next calibration, even when the ventilator is switched off. Calibration of the pressure sensors for measuring airway pressure is performed automatically. An automatic calibration of flow and O sensor is performed daily. -
Page 87: Manually Calibrating The Flow Sensor
(e.g. when operating a nebulizer from an external gas source and not from the Evita 2 dura nebulizer gas supply), Evita 2 dura is able to take this flow into account and to increase the thresholds for flow sensor moni- toring. - Page 88 Simulatoneously, Evita 2 dura displays the message: Confirm value with Press dial knob to confirm. Evita 2 dura cancels compensation of an external flow if it exceeds 12 L/min, or if the flow measuring function of Evita 2 dura is inoperable.
-
Page 89: Switching Off Monitor Functions
Operation Switching Monitor Functions Off/On Switching Monitor Functions Off/On e.g. if a spent sensor cannot be replaced immediately. WARNING ! In case of malfunction of any of the built-in monitoring a substitute is recommended in order to maintain an adequate level of moni- toring. - Page 90 This page intentionally left blank.
-
Page 91: Configuration
Configuration Contents Configuration Contents System Settings..................92 Adjusting Volume of the Audible Alarm............. 92 Adjusting Screen Contrast............... 92 Country-Specific Settings ..............93 Selecting the Language................93 Setting Date and Time................93 Selecting Units of Measurement............... 94 Interface....................94 Configuring the External Interface............. 94 Screen ....................95 Selecting Measured Values Combinations for Display.......95 Selecting Waveforms to be Displayed............ -
Page 92: System Settings
Configuration System Settings System Settings Adjusting Volume of the Audible Alarm Press »Calib./Config.« menu key. Press »Device jj« menu key. The »System« menu appears. Display (example): Turn dial knob to select »Volume« screen field. Press dial knob to activate. Turn dial knob to set the desired volume. Press dial knob to confirm. -
Page 93: Country-Specific Settings
Configuration Country-Specific Settings Country-Specific Settings Selecting the Language Evita 2 dura is delivered with the language preset to the local language in the customer's country (English with American nomenclature for North America). The following languages may be selected: – English (European nomenclature) –... -
Page 94: Selecting Units Of Measurement
Set Temp. and CO (option) in the same fashion. Interface Configuring the External Interface Evita 2 dura offers the following interface protocols: – Printer (HP Deskjet 500 and compatible) – MEDIBUS (Dräger communications protocol for medical devices) – LUST (List-controlled universal interface driver program, compatible with the Evita RS 232 interface as of software version 7.n of the original Evita venti-... -
Page 95: Screen
Baud rate Screen Selecting Measured Values Combinations for Display Evita 2 dura displays a group of 6 selectable measured values in the right-hand field of the main page. An alternative second group of values can be displayed by pressing the »Values «... -
Page 96: Selecting Waveforms To Be Displayed
Turn dial knob to select the other measured value, e.g. »PEEP«. Press dial knob to confirm. Selecting Waveforms to be Displayed Evita 2 dura shows two waveforms in the left-hand field of the main page. A different pair of waveforms can be selected by pressing the »Waves «... - Page 97 Configuration Screen Display (example): To replace a waveform display by another: Turn dial knob to select the respective field, press dial knob to activate. The list from which to select all available waveforms is displayed on the right-hand side of the screen. Display example: Replacing P Turn dial knob to select the other waveform (»Flow«), press dial knob to confirm.
-
Page 98: Ventilation Defaults At Start-Up
Configuration Ventilation Defaults at Start-Up Ventilation Defaults at Start-Up – To preset patient-specific parameters »V « and »f« at start-up. – To preset ventilation parameters active at ventilator start-up. – To preset alarm limits active at ventilator start-up. – To preset the default ventilation mode. The »Ventilation«... -
Page 99: Start-Up Defaults For Ventilation Parameters
Configuration Ventilation Defaults at Start-Up Patient-specific defaults V , f: Factory-set Hospital-specific settings* Patient mode Tidal volume Ventilator rate Tidal volume Ventilator rate f bpm f bpm Pediatric ................Adult ................* Hospital selected values may be entered into the last columns for reference. Start-Up Defaults for Ventilation Parameters –... -
Page 100: Activating/Deactivating Pressure Limit P Max
Configuration Ventilation Defaults at Start-Up Default ventilation parameters: PEEP Ramp Trigger insp Psupp. L/min Vol.% Factory setting Hospital- specific ................................setting* * Hospital selected values may be entered into the last columns for reference. To restore the factory-set defaults: Turn dial knob to select »Basic settings«... -
Page 101: Apnea Ventilation On/Off
Configuration Ventilation Defaults at Start-Up To set a value for Pmax: Evita 2 dura Press »Pinsp« parameter key. Turn dial knob to set the desired value, press dial knob to confirm. Apnea Ventilation On/Off Selects apnea backup ventilation to be ready for use at start-up. -
Page 102: Leak Compensation On/Off
Configuration Ventilation Defaults at Start-Up Leak Compensation On/Off Using the automatic leak compensation, the ventilator will compensate leaks of up to 100% of the set tidal volume in all volume controlled ventilation modes. The selection made for "Leak compensation On/Off" will remain stored and effective upon restarting the ventilator. - Page 103 Configuration Ventilation Defaults at Start-Up Default alarm limits Ventilation parameters Factory-set defaults Hospital-set defaults* ..+50 % total L/min total ..–20 % total > ..> + 100 % ..> ..Apnea > fspont ..* Hospital selected values may be entered into the last column for reference. No lower alarm limit for airway pressure P needs to be set, because it is automatically linked to the PEEP...
-
Page 104: Default Ventilation Mode At Start-Up
Configuration Ventilation Defaults at Start-Up Default Ventilation Mode at Start-Up After switching on, Evita 2 dura starts up in the ventilation mode displayed in the screen key selected here. Factory default setting is CMV. If you need a different start-up ventilation mode: Press »Calib./Config.«... -
Page 105: Care
Care Contents Care Contents Dismantling...................106 Removing Components................106 Disinfecting/Cleaning................109 Ventilator With Mobile Stand, Circuit Support Arm, Gas Supply Hoses, and Temperature Sensor......... 110 Components of Reusable Patient Circuit and Expiratory Valve....110 Disinfecting/Cleaning/Sterilizing Schedule..........111 Assembling................... 112 Assembling the Expiratory Valve............. 112 Before Reusing on a Patient..............112 Maintenance.................. -
Page 106: Dismantling
Nebulizer (available option) 1 Remove nebulizer hose from nebulizer and from its nipple in the front of Evita 2 dura. 2 Remove nebulizer from adult patient circuit, 2 remove nebulizer from pediatric circuit. 3 Remove tapered adapter (ISO Ø15 / Ø11) from nebulizer entry port. - Page 107 Care Disinfecting/Cleaning Ventilation circuit Remove patient circuit from connection ports. For reusable circuits, remove Y-piece and water traps from circuit and collecting jars from water traps. For reusable circuits, prepare circuit segments, water traps and their collecting jars, and the Y-piece for disinfection and cleaning in an automatic parts washer.
- Page 108 Care Disinfecting/Cleaning Disassemble expiratory valve only if badly soiled Unscrew cover lid by hand and remove together with the diaphragm. CAUTION ! Do not disassemble expiratory valve beyond removing diaphragm! NOTE: Expiratory valve may be disinfected and cleaned in parts washer equipment and may also be autoclaved. Humidifier Disassemble and prepare for disinfection/sterilization according to its Operating Instructions.
-
Page 109: Disinfecting/Cleaning
Care Disinfecting/Cleaning Disinfecting/Cleaning CAUTION ! Certain components of the ventilator consist of materials that are sensitive to certain organic solvents sometimes used for cleaning and disin- fecting (e.g., phenols, halogen releasing compounds, oxygen releasing compounds, strong organic acids, etc.). Exposure to such substances may cause damage that is not always immediately recognized. -
Page 110: Ventilator With Mobile Stand, Circuit Support Arm, Gas Supply Hoses, And Temperature Sensor
Care Disinfecting/Cleaning Ventilator With Mobile Stand, Circuit Support Arm, Gas Supply Hoses, and Temperature Sensor Wipe disinfect with a disinfectant based on the suggested active ingredients. Comply with the manufacturer's instructions. Cooling-air filter, Air-intake filter In the event of soiling or after 4 weeks at the latest clean or replace, see page 114. -
Page 111: Disinfecting/Cleaning/Sterilizing Schedule
Sterilizing cleaning Autoclaving at Steam 93 °C,10 minutes 134 °C, 10 minutes intervals Wiping Immersion Evita 2 dura ventilator after each patient outside mobile stand, circuit support arm, after each patient outside gas supply hoses Patient circuit, Y-piece, as needed... -
Page 112: Assembling
Care Assembling Before Reusing on a Patient Assembling Assembling the Expiratory Valve The parts must be entirely dry to prevent malfunctioning. Hold cover lid by its flange and place diaphragm on lid collar. Be careful to install diaphragm with proper orientation. From below, insert lid with diaphragm on top into the housing. -
Page 113: Maintenance
Care Maintenance Maintenance Maintenance Intervals sensor capsule Replace sensor capsule in event of display message: CAUTION ! measurement inop The device must be inspected and serviced at or if calibration is impossible. regular six months intervals. A record must be For disposal of sensor capsule, kept on this preventive maintenance. -
Page 114: User Replaceable Parts
Care Maintenance User-Replaceable Parts Replacing cooling air filter – In the event of soiling or after 4 weeks at the latest clean or replace. Replace after 1 year at the latest. 1 Remove cooling-air filter from its holder in the back of the ventilator. -
Page 115: Disposal Of Ventilator
Disposal of Ventilator – at the end of its useful life Prepare disposal of Evita 2 dura by an authorized waste disposal/recycling company after consulting with local environmental and public health authorities. Follow all local, state, and federal regulations with respect to environmental protection when disposing of the ventilator. - Page 116 This page intentionally left blank...
-
Page 117: Troubleshooting
Troubleshooting Contents Troubleshooting Contents Troubleshooting..................118... -
Page 118: Troubleshooting
Troubleshooting Troubleshooting Alarm messages in the alarm display field are displayed In the table below, the messages are listed in alpha- in hierarchical order. betical order. If, for example, two faults are detected at the same time, The table is intended to help you to identify the cause of the more urgent of the two is displayed. - Page 119 Expiratory valve faulty. Faulty assembly Replace expiratory valve. of expiratory valve. External flow Evita 2 dura is taking into account To switch external flow compensation externally supplied flow when monitoring off, see page 88. flow sensor function.
- Page 120 Troubleshooting Message Cause Remedy !!! FiO high sensor not calibrated. Calibrate O sensor, page 86. Faulty mixer function. Call DraegerService. !!! FiO sensor not calibrated. Calibrate O sensor, page 86. Faulty mixer function. Call DraegerService. !!! Flow measurement inop Flow sensor faulty. Calibrate flow sensor, page 87, and replace if necessary.
- Page 121 »Alarm Reset« key. Call DraegerSer- vice at your earliest convenience. NOTE: The original ventilator functions of Evita 2 dura are not affected, the correct function of nurse call or remote control pad, however, are not warranted: Remove nurse call or remote control pad, respectively.
- Page 122 Troubleshooting Message Cause Remedy !! Nebulization interrupted Only in pediatric mode. Nebulization is Select another breathing mode. only possible in pressure-controlled Or activate AutoFlow. ventilation or with AutoFlow. Restart Nebulization. Acknowledge the alarm with »Alarm Reset». Flow sensor not ready for measure- Switch on flowmonitoring or calibrate ment.
- Page 123 Leak or disconnection. Check that hose system connections are leakproof. !!! Airway obstruction ? Evita 2 dura is able to only apply a very Check patient condition, check tube small volume with each ventilator breath, e.g. due to a blocked tube.
- Page 124 This page intentionally left blank...
-
Page 125: What's What
What's What Contents What's What Contents Control Panel..................126 Front Connections................. 127 Back Panel.....................128 Labels....................129 Abbreviations and Symbols ..............130... -
Page 126: Control Panel
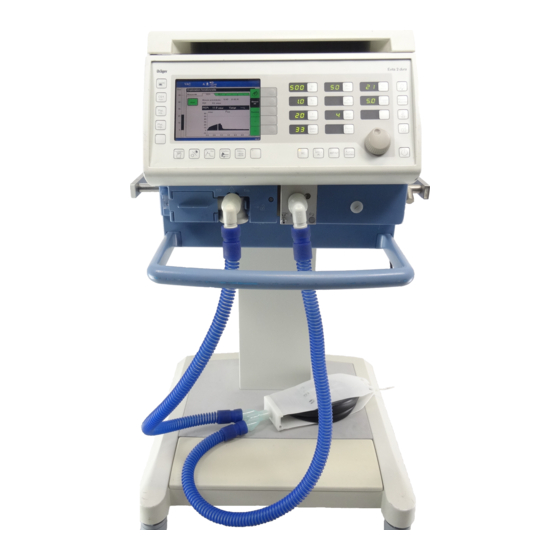
What's What Control Panel Control Panel 21 20 19 18 17 15 14 13 12 13 Key for PCV+ ventilation mode Screen for displaying application-specific screen pages 14 Key for SIMV ventilation mode Menu keys for displaying the application-specific 15 Key for CMV ventilation mode screen pages 16 Key reserved for additional functions in the future Parameter keys with numeric displays indicating... -
Page 127: Front Connections
What's What Front Connections Front Connections 1 Flow sensor 2 Expiratory valve with expiratory port 3 Latch for expiratory valve 4 Gas supply port for pneumatic nebulizer 5 Inspiratory port 6 Connections for optional pressure measurement (not yet used) 7 Locking screw for protective cover (behind it: O sensor and air intake filter) 8 Park bracket for Y-piece... -
Page 128: Back Panel
What's What Back Panel Back Panel 14 13 13 Connector »SpO « for SpO measurement 1 Cooling fan 14 Connector »COM1 RS232C« for RS 232 interface, 2 Power switch with protective cover e.g. printer 3 Connectors »COM2«, »COM3« for RS 232 and analog interfaces (available option) 15 Fuses 16 Power cord connector... -
Page 129: Labels
What's What Labels Labels Main CAUTION/WARNING label DANGER This label can be found on the left side of the ventilator. RISK OF EXPLOSION IF USED IN THE PRESENCE OF FLAMMABLE ANESTHETICS WARNING ! DISCONNECT SUPPLY BEFORE SERVICING REPAIRS ON THIS EQUIPMENT TO BE PERFORMED ONLY BY DraegerService OR ITS AUTHORIZED SERVICE CENTERS CAUTION... -
Page 130: Abbreviations And Symbols
What's What Abbreviations and Symbols Abbreviations and Symbols Abbreviation Definition APRV Airway Pressure Release Ventilation Spontaneous breathing at continuous positive airway pressure with short-term pressure release breaths per minute body Wt Body weight (kg) BTPS Body Temperature, Pressure. Saturated Measured values based on the condition in the patient's lungs, with body temperature 37 ºC, water vapor- saturated gas, atmospheric pressure Compliance... - Page 131 What's What Abbreviations and Symbols Abbreviation Definition Minute Volume Spontaneous minute volume Leaking minute volume Leak Negative Inspiratory Force Maximum inspiratory effort Setpoint for inspiratory oxygen concentration [Vol.%] P 0.1 Occlusion pressure at 100 ms Set value of pressure support supp.
- Page 132 What's What Abbreviations and Symbols Abreviation Definition * CO production [L/min] (optional) Serial dead space (optional) Setpoint for tidal volume Setpoint for tidal volume of apnea ventilation TApnea Expiratory tidal volume Inspiratory tidal volume Inspiratory tidal volume during a pressure support breath TP.S.
- Page 133 What's What Abbreviations and Symbols Symbol Definition Switch aerosol nebulizer on / off ” 2 ↑ ↑ ↑ ↑ Switch oxygenation program for bronchial suction on / off Suction Start manual inspiration ” Exp. Manually extend expiration hold ⁄ Switch help function on / off ”...
- Page 134 This page intentionally left blank...
-
Page 135: Technical Data
Technical Data Contents Technical Data Contents Environmental Conditions............... 136 Settings....................136 Performance Data.................. 137 Measured Value Displays............... 137 Monitoring....................139 Operating Data..................140 Ventilator Interfaces................141 Performance Standards................142 Materials Used..................142... -
Page 136: Environmental Conditions
Technical Data Environmental Conditions Settings Environmental Conditions During operation 10 to 40 °C (50 to 104 °F) Temperature Atmospheric pressure 700 to 1060 hPa Rel. humidity 0 to 90 % During storage –20 to 60 °C (-4 to 140 °F) Temperature Atmospheric pressure 500 to 1060 hPa... -
Page 137: Performance Data
Technical Data Performance Data Measured Value Displays Performance Data Control principle time-cycled, volume-constant Intermittent PEEP rate 2 cycles every 3 minutes Nebulization of aerosols for 30 minutes Bronchial suction Disconnection detection automatic Reconnection detection automatic Preoxygenation max. 3 minutes Active suction phase max. - Page 138 Technical Data Measured Value Displays O2 measurement in main flow (inspiratory side) Inspiratory O concentration FiO Range 15 to 100 Vol.% Resolution 1 Vol.% ±3 Vol.% Accuracy Flow measurement Minute Volume MV Spontaneously breathed minute volume MV spon Range 0 to 99 L/min, BTPS* Resolution 0.1 L/min ±8 % of measured value...
-
Page 139: Monitoring
Technical Data Monitoring Computed value displays Compliance C Range 0.7 to 200 mL/cmH Resolution range of 0.7 to 99.9 mL/cmH 0.1 mL/cmH range of 100 to 200 mL/cmH 1 mL/cmH ±20 % of measured value Accuracy Resistance R Range 3 to 200 cmH O/L/s Resolution range of 3 to 99.9 cmH... -
Page 140: Operating Data
60 Vol.% and over: ±6 Vol.% Insp. breathing gas temperature Alarm at upper limit if temperature reaches 40 ºC. (Evita 2 dura can also be used without temperature sensor if the sensor is not connected when switching on). Tachypnea monitoring Alarm during spontaneous breathing, if a preset spontaneous breathing rate has been exceeded. -
Page 141: Ventilator Interfaces
Technical Data Ventilator Interfaces Gas supply gauge pressure 43.5 psi (3 bar) –10 % to 79.75 psi (5.5 bar) at 60 L/min (peak flow 200 L/min) connection thread DISS, male (oxygen) Air gauge pressure 43.5 psi (3 bar) –10 % to 79.75 psi (5.5 bar) at 60 L/min (peak flow 200 L/min) Air connection thread DISS, male (air) -
Page 142: Performance Standards
Performance Standards Voluntary Performance Standards The Evita 2 dura ventilator is designed to comply with ISO 5369 "International Standard for Medical Ventilation Equipment - Lung Ventilators" as well as ASTM F 1100 "Standard Specification for Ventilators for Use in Critical Care". -
Page 143: Theory Of Operation
Theory of Operation Contents Theory of Operation Contents Ventilation Modes................. 144 Volume Controlled Ventilation with PLV..........144 Sigh (Intermittent PEEP).................145 SIMV..................... 146 Pressure Support................... 147 PCV+.....................148 PCV+ (BIPAP )................ 149 Assist Assist MMV......................150 Flow Measurement................151 Automatic Leak Compensation............... 152 Rapid Shallow Breathing Index RSB............154 Negative Inspiratory Force NIF............... -
Page 144: Ventilation Modes
Evita 2 dura performs this function by reducing the inspi- ratory flow upon reaching the set P value. If the set tidal volume V... -
Page 145: Sigh (Intermittent Peep)
»slow« alveoli is only marginally improved. In the Evita 2 dura, the sigh operates during expiration with an intermittent PEEP. Mean airway pressure is higher, and a longer filling time can be expected. -
Page 146: Simv
SIMV time, which would result in an undesirable increase in the effective IMV rate. Evita 2 dura therefore extends the subsequent time allowed for spontaneous breathing by the missing time difference ∆ T – thus preventing an increase in SIMV rate. -
Page 147: Pressure Support
Evita 2 dura supports the insufficient spontaneous breathing of the patient with a high peak flow. With a slow pressure rise Evita 2 dura begins gently with regular inspiratory flow. The patient has to contribute more to the breathing effort, and breathing muscle tone improves. -
Page 148: Pcv
Theory of Operation Ventilation Modes PCV+ Pressure Support Ventilation Plus (intern.: BIPAP)* The PCV+ ventilation mode is a pressure/time-cycled ventilation mode in which the patient can always breathe fast slow pressure assist rise time rise time spontaneously. PCV+ is therefore often described as a fast slow time-cycled alternation between two CPAP levels.**... -
Page 149: Pcv+ Assist (Bipap Assist )
Theory of Operation Ventilation Modes Using PCV+ As with CMV, the time pattern is set using the basic mandatory Spontaneous synchronized PCV+ breath breathing PCV+ breath setting parameters of ventilator rate f and inspiratory time T . The lower pressure level is set with the para- meter PEEP, while the upper level is set with P insp When switching modes from CMV to PCV+, only the... -
Page 150: Mmv
After an apnea, this positive balance is progressively reduced to zero by Evita 2 dura within a maximum of 7.5 seconds. Hence, the response time of Evita 2 dura before... -
Page 151: Flow Measurement
Theory of Operation Flow Measurement In this case, Evita 2 dura triggers an apnea alarm that is cancelled again as soon as the mandatory ventilator breaths have been applied. If the IMV is set to a longer period than the alarm limit T >... -
Page 152: Automatic Leak Compensation
Example: 500 mL tidal volume NTPD become 564 mL BTPS when warmed to 37 ºC and humidified to 100 % relative humidity. Evita 2 dura controls tidal volume in such a way that the set value of tidal volume is applied under BTPS condi- tions in the lung. - Page 153 Unlimited volume compensation is not appropriate. Evita 2 dura will compensate volume losses up to 100% of the set tidal volume VT. Due to technical tolerances small leakage minute...
-
Page 154: Rapid Shallow Breathing Index Rsb
NIF down to –20 cmH O is very likely to fail. Evita 2 dura determines the value of the NIF index during a manually extended expiration. While the »Exp. hold« key is pressed, the patient system is closed after an expi- ration and Evita measures the maximum inspiratory patient effort. -
Page 155: Inspiratory O 2 Concentration During Nebulizing Of Aerosols
Inspiratory O Concentration During Nebulizing of Aerosols The integrated nebulizer function of Evita 2 dura is designed for nebulizers with a nebulizing flow of 6 L/min at 29 psi (2 bar), for example nebulizer 84 12 935 (white central body). Other nebulizers may... -
Page 156: References
Theory of Operation References References (1) Baum, M., Benzer, H., Putensen, Ch., Koller, W., Putz, G.: Biphasic Positive Airway Pressure (BIPAP) – eine neue Form der augmentierenden Beatmung Anaesthesist 38 (1989), 452-458 (2) Luger, Th.J., Putensen, Ch., Baum, M., Schreithofer, D., Morawetz, R.F., Schlager, A.: Entwöhnung eines Asthmatikers mit Biphasic Positi- ve Airway Pressure (BIPAP) unter kontinuierlicher... -
Page 157: Ordering Information
Ordering Information Contents Ordering Information Contents Ordering Information................158... -
Page 158: Ordering Information
84 14 702 EvitaRemote 84 14 472 Mask Ventilation (NIV) 84 14 474 For mounting humidifier Software 4.0 plus Evita 2 dura 84 14 470 Mounting brackets (for Fisher Paykel MR 730) 84 11 074 For CO measurement (option) - Page 159 This page intentionally left blank...
-
Page 160: Index
Index Index Index bbreviations............130 lectrical power supply..........41 Accessories............12, 158 Equipment check............47 Adaptive minimum ventilation (MMV)....70, 150 Evita Remote..............44 Adult ventilation............38 Exchange parts............158 Advisory messages............ 74 Exp. hold..............79 Aerosol, nebulizing............. 80 Expiratory valve.......... 34, 110, 112 Alarm, audible............ - Page 161 Index Nebulizer............80, 155 echnical data............135 Nebulizing............80, 155 Telephones, wireless, cellular.......15, 23 Neonatal ventilation (upgrade kit)......59, 158 Temperature sensor........... 39 New features, since last software version.....4 Time, of day............... 93 NIF (Negative Inspiratory Force) index....79, 154 Trigger............... 63 Note, definition............14 Troubleshooting............
- Page 162 This page intentionally left blank...
- Page 163 This page intentionally left blank...
- Page 164 These Operating Instructions apply only to Evita 2 dura with Serial No.: If no Serial No. has been filled in by Dräger these Operating Instructions are provided for general information only and are not intended for use with any specific machine or device.
Need help?
Do you have a question about the Evita 2 dura and is the answer not in the manual?
Questions and answers