
Related Manuals for King Industrial MA-1050ST


Summary of Contents for King Industrial MA-1050ST
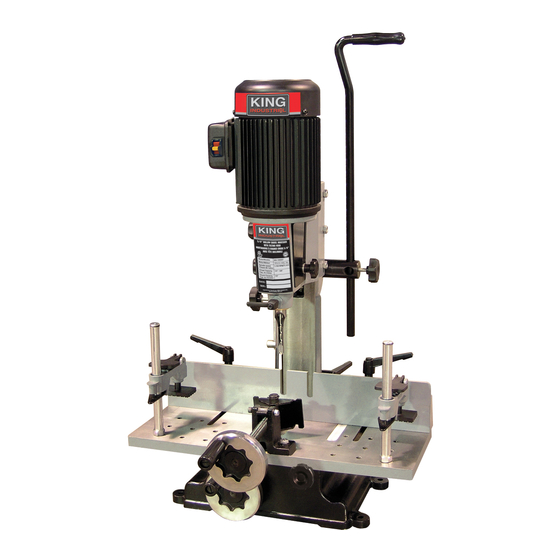
- Page 1 5/8” HOLLOW CHISEL MORTISER WITH TILTING HEAD Head tilts 0 right and left MODEL: MA-1050ST INSTRUCTION MANUAL COPYRIGHT © 2007 ALL RIGHTS RESERVED BY KING CANADA TOOLS INC.
-
Page 2: Warranty Information
WARRANTY INFORMATION 2-YEAR KING CANADA TOOLS LIMITED WARRANTY OFFERS A 2-YEAR LIMITED WARRANTY FOR THIS HOLLOW CHISEL MORTISER FOR INDUSTRIAL USE. PROOF OF PURCHASE Please keep your dated proof of purchase for warranty and servicing purposes. REPLACEMENT PARTS Replacement parts for this product are available at our authorized King Canada service centers across Canada. LIMITED TOOL WARRANTY King Canada makes every effort to ensure that this product meets high quality and durability standards. - Page 3 GENERAL & SPECIFIC SAFETY RULES 1. KNOW YOUR TOOL footwear is recommended. Wear protective hair covering to Read and understand the owners manual and labels affixed to the contain long hair. Roll up long sleeves above the elbows. tool. Learn its application and limitations as well as its specific 12.
- Page 4 SPECIFICATIONS & ELECTRICAL INFORMATION MODEL MA-1050ST Chisel capacity 1/4” - 5/8” 1/2” Chuck capacity Maximum chisel stroke 6-1/2” Maximum distance fence to center chisel 3” Maximum distance chisel to table (with head in extended position) 9-1/2” Under table hold down capacity 5-3/4”...
- Page 5 SETTING-UP & GETTING TO KNOW YOUR HOLLOW CHISEL MORTISER WARNING: For your own safety, never connect the hollow chisel cloth soaked in kerosene. Do not use acetone, gasoline, or lacquer mortiser to a power source until all assembly steps are complete, and thinner;...
-
Page 6: Controls And Adjustments
CONTROLS & ADJUSTMENTS Turning Mortiser On/Off WARNING: For your own safety, never connect the hollow chisel mortiser to a power source until you have read and understood safety, adjustments and operational instructions in this manual. The ON-OFF switch (A) Fig.3 is located on the motor and operating positions are clearly marked. - Page 7 CONTROLS & ADJUSTMENTS Adjusting Sliding Table Position The sliding table (A) Fig.7 is very convenient if you plan on making multiple cuts in the same workpiece, it allows you to move the sliding table over instead of unclamping and repositioning your workpiece. To move the the sliding table to the right or left, turn the lower handwheel (B).
- Page 8 CONTROLS & ADJUSTMENTS Adjusting the Working Height Capacity The working height capacity can be increased by 3”, we recommend you get help to do this, it could be very difficult to do this adjustment by yourself. To make this adjustment, loosen the two large lock handles (A) Fig.11, then tighten the small lock handle (B) to widen the gap in the column sleeve casting.
- Page 9 CHISEL & BIT INSTALLATION/ADJUSTMENT Chisel and Bit Installation WARNING: Make sure switch is in the OFF position and power cord is unplugged before performing checks, adjustments, or setup procedures. Loosen the two lock knobs (A) Fig.15 on both sides of the head and lower the covers (B) to expose the chuck (C).
-
Page 10: Troubleshooting
OPERATION, MAINTENANCE & TROUBLESHOOTING Quick Setting the Fence/Chisel/Mortise Position hollow chisel mortising and is caused by material chip friction and the A quick set method for achieving the correct position of the fence is as resins in the stock being burned off. Bluing of the chisel after the initial follows: use is not indicative of a dull chisel, it is indicative of too much heat which will lead to premature dulling and resin buildup on the cutting...
Need help?
Do you have a question about the MA-1050ST and is the answer not in the manual?
Questions and answers