Advertisement
Quick Links
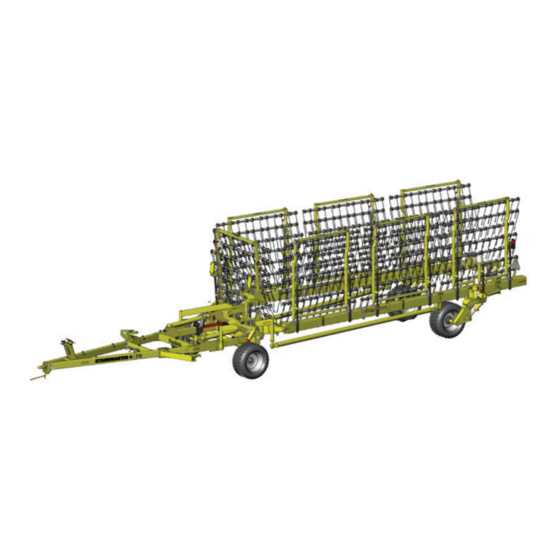
QUICK-START GUIDE
STRAWMASTER
for
* Refer to operators manual for complete safety and operation info.
A
Connect Hydraulics
B
Backing Into Field Position
Note: Ensure there is plenty of room behind
and to the sides of the Strawmaster
before backing into field position.
1) 1)
1)
Remove the front Center Beam Transport Pins (2),
Cylinder Lock Bars (2), and Endwheel Transport Bars (2)
and place in storage locations.
Transport Pin
Transport Pin
Store
Store
Store
Store
Cylinder
Cylinder
Lock
Lock
2)
Activate the steering cylinders to slightly angle open the
transport wheels, but no more than 20º.
3)
Back-up slowly. The wings will open up. Ensure there is lots of
room behind and to the sides. Back-up evenly so you don't
damage the transport wheels.
IMPORTANT: Be sure to back-up evenly to avoid
serious damage to the transport wheels.
*
+
WHEELS............................
1
TRANSPORT.....................
2
TINE ANGLE
3
LATCH & ENDWHEEL......
4
IMPORTANT: Before working in field, lock the function to avoid accidental operation.
1) 1)
3) 3)
4
2) 2)
BACK-UP SLOWLY/EVENLY to avoid
serious damage to transport wheels.
Store
Store
Remove
Remove
Remove
Remove
4
REMEMBER! You must complete Product
Registration to be eligible for Warranty.
(Option)
4
4
4)
As wings are almost fully opened, FULLY ROTATE the end
wheels into field position BEFORE completely open.
Transport
Transport
Bar
Bar
Remove
Remove
5)
Activate the LATCH hydraulics to fully secure the truss arms
into place. Make sure truss arm LATCHES ARE FULLY
ENGAGED before lowering harrow sections into field position.
IMPORTANT: To prevent serious damage, ensure both
latches have fully engaged and then LOCK-OUT
the Latch & Endwheel circuit before operating.
6)
Ensure the TRAILER HEIGHT is raised to MAXIMUM
then lower the harrow sections into field position using the
Transport Cylinders.
7)
Adjust Tine Angle and Trailer Height settings.
WARRANTY
Wheel Height Cylinders
Transport Cylinders
..........
Harrow Section Cylinders
Latch/Steering Cylinders
3
3
3
1
1
7)
7)
2
4
4
4) 4)
FULLY ROTATE end wheels
BEFORE latching truss arm clamps.
5) 5)
Make sure truss arm LATCHES ARE
FULLY ENGAGED
harrow sections into field position.
6) 6)
When lowering harrow sections, keep
TRAILER HEIGHT AT MAXIMUM.
Open
Open
2
7) 7)
3
3
3
3
1
4
before lowering
4
2
1
4
Closed
Closed
4
and
1
143431 v1.0
Advertisement

Related Manuals for Degelman STRAWMASTER Plus


Summary of Contents for Degelman STRAWMASTER Plus
- Page 1 QUICK-START GUIDE WARRANTY STRAWMASTER REMEMBER! You must complete Product * Refer to operators manual for complete safety and operation info. Registration to be eligible for Warranty. WHEELS......Connect Hydraulics Wheel Height Cylinders TRANSPORT..... Transport Cylinders TINE ANGLE ..(Option) Harrow Section Cylinders LATCH &...
- Page 2 Setting Tine Angle, Pressure & Frame Tine Angle Adjustment There are no standard angles for running the tines, the operator Strawmaster may have either Manual or Hydraulic Tine Adjustment. may adjust the tine angles as needed to achieve desired results. Note: Manual models - Use the manual jacks Actual settings will vary...
Need help?
Do you have a question about the STRAWMASTER Plus and is the answer not in the manual?
Questions and answers