Advertisement
Quick Links
Advertisement

Related Manuals for Neve 1073SPX


Summary of Contents for Neve 1073SPX
- Page 1 1073SPX Single Microphone Preamplifier & EQ User Manual 527-413 Issue 1.0...
-
Page 2: Important Safety Instructions
© 2017 AMS Neve Ltd own the copyright of all information and drawings contained in this manual which are not to be copied or reproduced by any means or disclosed in part or whole to any third party without written permission. - Page 3 1073SPX Channel Amplifier Introduction ..................... 4 Configuring the 1073SPX ........................4 Front Panel ............................5 Rear Panel ............................7 Rack Mount Instructions ........................7 Troubleshooting ........................... 8 Specifications ............................9 1073SPX Block Diagram ........................10 1073SPX Recall Sheet......................... 11...
- Page 4 The 1073SPX accommodates a 1073 ® in a stand-alone 1U rack-mount unit. At its core, the 1073SPX retains the same class-A design as the original 1073, but includes many additional features to ensure the unit sits comfortably in the modern studio environment.
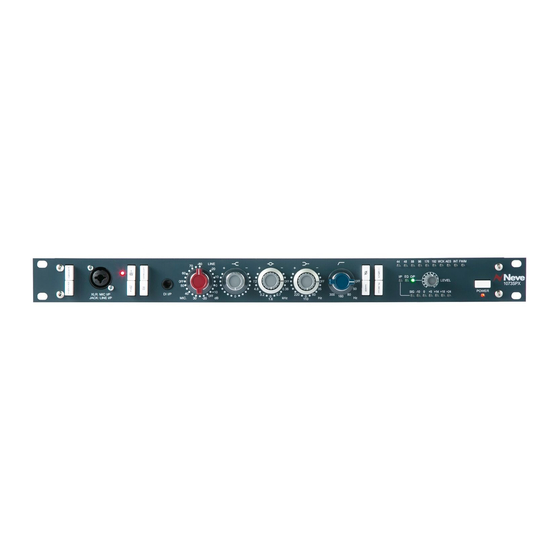
- Page 5 Front Panel POWER: Switches the unit on or off. The adjacent LED lights when the unit is ON FRONT: Switches the audio input to the front mic/line combo connector. NOTE: The DI input always overrides the Mic input, whether the FRONT switch is pressed or not.
- Page 6 Phase: Reverses the phase of the output signal. In the default position, absolute phase is preserved through the unit. Switches the equalisation circuit into the signal path. INS: Switches the insert loop into the signal path. PRE: Positions the insert loop before the equalisation circuit (pre-EQ). In the default position (switch not depressed) the insert loop is positioned immediately after the equalisation circuit (post EQ).
- Page 7 Rear Panel +48V DC: Connect the accompanying power supply (PS10501) to power the unit. Fuse: Always use the correct fuse rating, as indicated beside the fuse holder. Fuse Rating: T500mA, 250v 20mm, Ø 5mm. MIC I/P: Balanced microphone input. LINE I/P: Balanced line input.
- Page 8 Troubleshooting No audio at the line output Check all connections to the unit. For example, check that all necessary inputs and outputs are plugged into the same channel. Check the setting of the LEVEL control. Turn clockwise to increase the output level Check the setting of the gain control.
- Page 9 Dimensions Stand-alone Width Height Depth Approx. Weight Modules mm (inches) mm (inches) mm (inches) kg (lbs) 1073SPX Unit 480 (19) 44 (1.75) 310 (12) 5 (11) Modules Power 1073SPX Unit , 250mA ±20mA excluding digital module. Negative Earth Specifications ...
Need help?
Do you have a question about the 1073SPX and is the answer not in the manual?
Questions and answers