Table of Contents
Advertisement
Quick Links
VPort P16-1MP-M12-IR Series
Quick Installation Guide
Moxa Americas:
Toll-free: 1-888-669-2872
Tel:
1-714-528-6777
Fax:
1-714-528-6778
Moxa Europe:
Tel:
+49-89-3 70 03 99-0
Fax:
+49-89-3 70 03 99-99
Moxa India:
Tel:
+91-80-4172-9088
Fax:
+91-80-4132-1045
Moxa IP Camera
Edition 3.0, February 2017
Technical Support Contact Information
www.moxa.com/support
2017 Moxa Inc. All rights reserved.
Moxa China (Shanghai office):
Toll-free: 800-820-5036
Tel:
+86-21-5258-9955
Fax:
+86-21-5258-5505
Moxa Asia-Pacific:
Tel:
+886-2-8919-1230
Fax:
+886-2-8919-1231
P/N: 1802000161022
*1802000161022*
Advertisement
Table of Contents

Subscribe to Our Youtube Channel
Related Manuals for Moxa Technologies Vport P16-1MP-M12-IR Series

Summary of Contents for Moxa Technologies Vport P16-1MP-M12-IR Series
- Page 1 VPort P16-1MP-M12-IR Series Quick Installation Guide Moxa IP Camera Edition 3.0, February 2017 Technical Support Contact Information www.moxa.com/support Moxa Americas: Moxa China (Shanghai office): Toll-free: 1-888-669-2872 Toll-free: 800-820-5036 Tel: 1-714-528-6777 Tel: +86-21-5258-9955 Fax: 1-714-528-6778 Fax: +86-21-5258-5505 Moxa Europe: Moxa Asia-Pacific:...
-
Page 2: Package Checklist
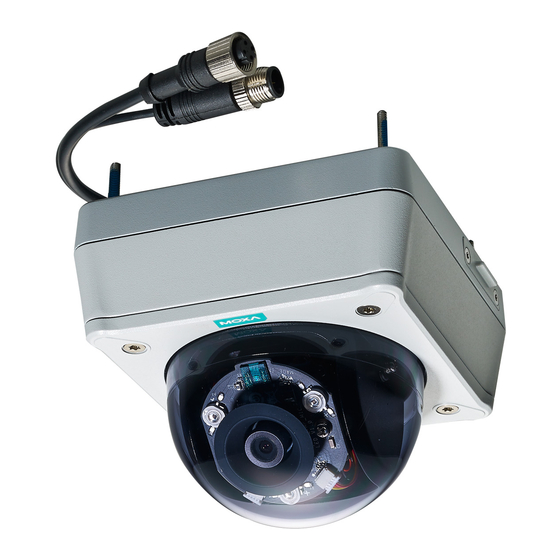
Overview The rugged VPort P16-1MP-M12-IR cameras provide an HD (720P, 1280 x 720) video image, and feature an H.264/MJPEG IP dome, giving them the versatility and ruggedness to excel in many different installations and environments for mobile IP video surveillance applications. In addition, the cameras feature EN 50155 compliance, vandal-proofing (EN 62262 IK10), a -25 to 55°C or -40 to 70°C (TX models) operating temperature, rugged M12 Ethernet port, built-in microphone, digital input, PoE power... - Page 3 Sticker for camera mounting positions • Quick Installation Guide (printed) • Documentation and software CD (includes User’s Manual, Quick Installation Guide, and Utility) • Warranty card NOTE Check the model name on the VPort’s side label to determine if the model name is correct for your order. NOTE This product must be installed in compliance with your local laws and regulations.
- Page 4 • 1 10/100BaseT(X) port with M12 D-code connector • IP66 rain and dust protection, with dehumidifying membrane • PoE (Power-over-Ethernet, IEEE 802.3af) supported • EN 62262 IK10 level vandal resistance • -25 to 55°C (EN 50155, Class T1), or -40 to 70°C (EN 50155. Class TX) operating temperature for rolling stock environments •...
-
Page 5: Digital Input
• Dome cover: The VPort P16-1MP-M12-IR comes with a vandal-proof PC dome cover, which complies with EN 62262 (IEC 62262) class IK10. IR LED illuminator: VPort P16-1MP-M12-IR is equipped with 3 IR • (infra-red) LED illuminators for low light environments. These IR LED illuminators will turn on or off according to the light sensor configuration in the product’s web-based manager. - Page 6 • Built-in microphone: The VPort P16-1MP-M12-IR is equipped with a built-in microphone to receive external sounds. The sound will be digitized and compressed as an audio stream for network transmission with the video stream. NOTE The color of the dome cover can be customized based on your installation environment.
-
Page 7: Hardware Installation
Calibration for tuning the horizontal lens position (0 to 350°): • After tuning the horizontal lens position, mark the position with this calibration for future replacement or mass installations. • 2 screws for fixing the horizontal lens position: There are 2 screws for fixing the horizontal lens position. - Page 8 Step 3: Remove the inner black casing. Step 4: Place the VPort P16 over the holes Panel Mount Flush Mount Screw the hex nuts, gaskets, and Position the camera lens over the washers to fix the camera, and hole, and hide the VPort P16’s body then connect the M12 cables.
-
Page 9: Software Installation
Step 6: Fix the inner black case and top cover to complete the installation. Panel Mount Flush Mount Re-screw the 4 top cover screws. Screw the 4 flush mount top screws (provided with the accessory) on the top cover. NOTE Because of the anti-vibration design, for onboard environments 8 kgf-cm torque is required for all mounting screws. - Page 10 3. Double click the selected VPort, or use the IE web browser to access the VPort’s web-based manager (web server). Non DHCP Server Network Environments If your VPort P16 is connected to a network that does not have a DHCP server, then you will need to configure the IP address manually.
-
Page 11: Wiring Requirements
Step 4: Access the homepage of VPort P16’s web-based manager. After installing the ActiveX Control component, the homepage of the VPort 16’s web-based manager will appear. Check the following items to make sure the system was installed properly: 1. Video Images 2. -
Page 12: Specifications
You should also pay attention to the following: • Use separate paths to route wiring for power and devices. If power wiring and device wiring paths must cross, make sure the wires are perpendicular at the intersection point. • You can use the type of signal transmitted through a wire to determine which wires should be kept separate. - Page 13 Auto Electronic Shutter 1/30 to 1/25000 sec. S/N Ratio 50 dB (Gamma, Aperture, AGC, OFF; DNR ON) Built-in Level 1-8 AGC Control 2X, 4X, 8X, 16X, 32X, 64X Flickerless Control Automatic/50 Hz/60 Hz Black Level Control High/Medium/Low Auto Exposure Level ±5 Image Rotation Flip, Mirror, and 180°...
- Page 14 Power Requirements Input Power-over-Ethernet (IEEE 802.3af) Consumption Maximum 8 W Physical Characteristics Housing Metal, PC dome cover, IP66-rated Dimensions 125 x 125 x 120.7 mm (5.6 x 5.6 x 4.8 in) Weight 870 g Installation Surface (ceiling) or flush (recessed) mounting Environmental Limits Operating Temperature Standard Models: -25 to 55°C (-13 to 131°F)
- Page 15 Security • Password: User level password protection • Filtering: By IP address • Encryption: HTTPS, SSH Minimum Viewing System Requirements • CPU: Pentium 4, 2.4 GHz • Memory: 512 MB of memory • OS: Windows XP/2000 with SP4 or above, Windows Vista, Windows 7 •...
Need help?
Do you have a question about the Vport P16-1MP-M12-IR Series and is the answer not in the manual?
Questions and answers