
Related Manuals for OHIOSTEEL 1000P-SD


Summary of Contents for OHIOSTEEL 1000P-SD
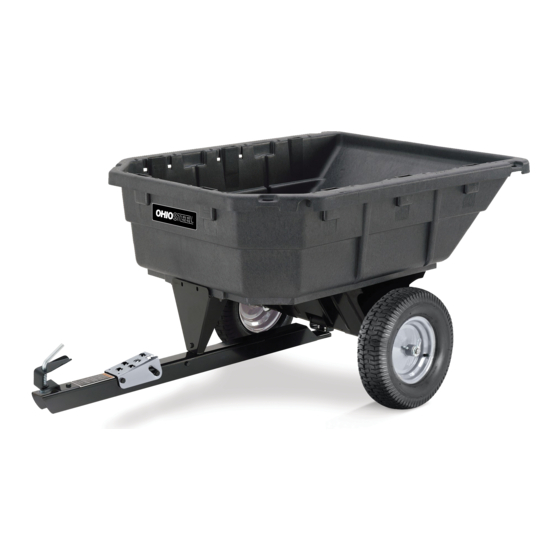
- Page 1 1000P-SD 15 cu ft POLY SWIVEL DUMP CART U.S. Patent No. 8,496,298 & 9,242,588 READ AND FOLLOW ALL SAFETY RULES AND OPERATING INSTRUCTIONS BEFORE USING THIS EQUIPMENT 6004145 - REV C 09/19...
-
Page 2: Safety Rules
Safety Rules This is the safety alert symbol. It is used to alert you to potential personal injury hazards. Obey all safety messages that follow this symbol to avoid possible injury or death. Read and understand all safety rules and operating instructions before using this tractor attachment. -
Page 3: Warranty
Paint that is worn or faded due to normal use or exposure. To arrange for product repair visit ohiosteel.com/customer-support and fill out the warranty repair form. You can also call 1-800-652-2321, ext. 212 to speak to our Customer Service Team This warranty gives you specific legal rights, and you may also have other rights which may vary from state to state. -
Page 4: Tools Required For Assembly
Carton Contents 2 (x1) 1 (x1) 4 (x12) 3 (x12) 5 (x1) (x1) 6 (x1) 22 (x2) 24 (x4) 23 (x1) 25 (x2) 26 (x2) TOOLS REQUIRED FOR ASSEMBLY: • 1/2" Wrench or Socket • Grease Gun... - Page 5 Assembly Instructions Hold Poly Body (1) on side as shown. Insert Hex Bolts (3) as shown. Flip Poly Body (1) to expose bolts. Tape Tape Tape TIP: Bolt heads can be secured with tape to aid in asembly. Install Undercarriage (2) over top of Hex Bolts. Install and tighten all Locknuts (4).
- Page 6 Assembly Instructions Attach Front Support (5) to Poly Body (1) and tighten Lock Nuts (4). Center Spacer (23) inisde Swivel Clevis (10) on Drawbar Assembly. Insert Axle (6) halfway into Undercarriage (2). Push Axle (6) through Swivel Clevis (10) and Spacer (23) and then through rest of Undercarriage (2).
- Page 7 Assembly Instructions Slide in order: 1" Washers (24), 2" Spacers (25) and then Wheels (22) onto Axle (6) and secure with Hairpins (26). Depress Foot Pedal (14), insert Drawbar Assembly into Front Support (5) . When Drawbar is locked in place, flip cart upright onto wheels.
- Page 8 Operating Instructions Before Using Dump Cart: Apply grease to wheels using grease gun until grease can be seen squeezing out from both sides of the wheel. Check tire pressure and inflate to 28 psi if needed. Read all Safety Rules found on page 1. How to Use Dump Cart: Attach Dump Cart to your tractor using the supplied hitch pin.
- Page 9 Do-It-Yourself Accessories 35.13 31.63 USE 1/2" PLYWOOD 35.25 USE STANDARD 2 X 4 34.00 13.00 45.00 13.00 13.00 USE NOMINAL GRADE C 1 X 3...
-
Page 10: Exploded View
Spring Washer 3-1/8" Spacer Swivel Clevis 1" SAE Flat Washer 6004324 6001663-BG 1/2" USS Washer 2" Spacer 3/8" USS Flat Washer Hairpin Cotter, 2-5/16" 3/8-16 C-Lock Nut REPLACEMENT BUSHINGS 6000810 (SET OF 4) Foot Pedal ohiosteel.com/partsstore OHIO STEEL INDUSTRIES 1-800-652-2321... - Page 11 Designed And Tested In Columbus, Ohio Manufactured In The U.S.A. From Domestic And Imported Components MODEL # 1000P-SD 2575 Ferris Road Columbus, OH 43224 (800) 652-2321 www.OHIOSTEEL.com (800) 652-2321...
Need help?
Do you have a question about the 1000P-SD and is the answer not in the manual?
Questions and answers