Page 1
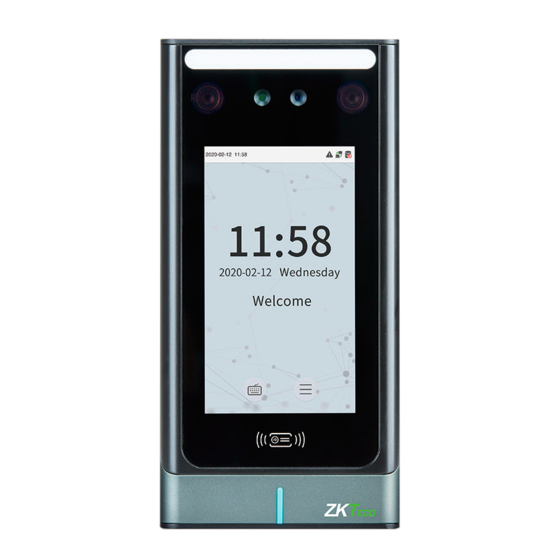
ProFace X [TD] User Manual User Manual SpeedFace M1/M2 Date: October 2020 Doc Version: 1.0 English Thank you for choosing our product. Please read the instructions carefully before operation. Follow these instructions to ensure that the product is functioning properly. The images shown in this manual are for illustrative purposes only.
Page 3
SpeedFace M1/M2 User Manual relating to the use of the information contained in or referenced by this manual, even if ZKTeco has been advised of the possibility of such damages. This manual and the information contained therein may include technical, other inaccuracies or typographical errors.
Page 4
User Manual About the Company ZKTeco is one of the world’s largest manufacturers of RFID and Biometric (Fingerprint, Facial, and Finger- vein) readers. Product offerings include Access Control readers and panels, Near & Far-range Facial Recognition Cameras, Elevator/floor access controllers, Turnstiles, License Plate Recognition (LPR) gate controllers and Consumer products including battery-operated fingerprint and face-reader Door Locks.
Page 5
SpeedFace M1/M2 User Manual Document Conventions Conventions used in this manual are listed below: GUI Conventions For Device Convention Description <> Button or key names for devices. For example, press <OK> Window names, menu items, data table, and field names are inside square brackets.
SpeedFace M1/M2 User Manual Table of Contents INSTRUCTIONS TO USE ........................7 1.1 S ..............7 TANDING OSITION ACIAL XPRESSION AND TANDING OSTURE 1.2 P ............................8 EGISTRATION 1.3 F ............................9 EGISTRATION 1.4 S ............................10 TANDBY NTERFACE 1.5 V ............................
Page 7
SpeedFace M1/M2 User Manual 7.3 B ............................52 CHEDULES 7.4 P ..........................53 UNCH TATES PTIONS 7.5 S ........................... 54 HORTCUT APPINGS DATA MANAGEMENT ........................55 8.1 D ..............................55 ELETE ACCESS CONTROL ..........................57 9.1 A ........................... 58 CCESS...
SpeedFace M1/M2 User Manual Instructions to use Standing Position, Facial Expression and Standing Posture Recommended distance The distance between the device and a user whose height is within 1.55m-1.85m is recommended to be 0.3 to 2m. Users may slightly move forwards and backwards to improve the quality of facial images captured.
SpeedFace M1/M2 User Manual Note: During enrollment and verification, please keep natural facial expression and standing posture. Palm Registration Place your palm in the palm multi-mode collection area, such that the palm is placed parallel to the device. Make sure to keep space between your fingers.
SpeedFace M1/M2 User Manual Face Registration Try to keep the face in the center of the screen during registration. Please face the camera and stay still during face registration. The page looks like shown below: Face registration and authentication methods Instructions to register a face •...
SpeedFace M1/M2 User Manual • If eyeglasses have been changed, authentication may fail. If the face without glasses has been registered, authenticate the face without glasses. If only the face with glasses has been registered, authenticate the face with the previously worn glasses again.
Page 12
SpeedFace M1/M2 User Manual 3) ★The switch of punch state can be done directly by using the screen shortcut keys. Click anywhere on the screen without icons, and six shortcut keys appear, as shown in the figure below: Press the corresponding shortcut key to select the current punch state, which is shown in green. Please refer to "7.5 Shortcut Key Mappings"...
SpeedFace M1/M2 User Manual Virtual Keyboard Note: The device supports the input of Chinese and English characters, numbers, and symbols. Click [En] to switch to the English keyboard. Press [123] to switch to the numeric and special character keyboard, and click [ABC] to return to the alphabetic keyboard. Click the input box, and the virtual keyboard appears.
SpeedFace M1/M2 User Manual Verification Mode 1.6.1 Palm Verification 1:N (One to Many) Palm Verification mode This verification mode compares the palm image collected by the palm module with all the palm data template in the device. The device will automatically distinguish between the palm and face verification mode. Place the palm in the area that can be collected by the palm module, so that the device will automatically switch to palm verification mode.
Page 15
SpeedFace M1/M2 User Manual If the user has registered the badge, face and password in addition to palm, and the verification method is set to Password/Badge/Face/Palm, the following screen will appear. Select the palm icon to enter palm verification mode.
SpeedFace M1/M2 User Manual 1.6.2 Facial Verification 1:N (One to Many)Facial Verification Conventional verification This verification mode compares the acquired facial images with all the face data registered in the device. The following is the pop-up prompt box of the comparison result.
Page 17
SpeedFace M1/M2 User Manual 1:1 (One to One) Facial Verification This Verification mode compares the face captured by the camera with the facial template related to the entered user ID. Press on the main interface and enter the 1:1 (One to One) facial verification mode.
Page 18
SpeedFace M1/M2 User Manual If an employee registers palm, badge and password in addition to the face, and the verification method is set to Password/Badge/Face/Palm, the following screen will appear. Select the icon to enter the face verification mode. After successful verification, the prompt box "successfully verified” will appear.
SpeedFace M1/M2 User Manual If the verification is failed, it will prompt “Please adjust your position!”. 1.6.3 Badge Verification 1:N (One to Many)Badge Verification This verification mode compares the badge number in the badge induction area with all the badge number data registered in the device;...
Page 20
SpeedFace M1/M2 User Manual 1:1 (One to One) Badge Verification Click the button on the main screen to open the 1:1 (One to One) badge verification mode. Input the user ID and press [OK]. If an employee registers palm, face and password in addition to badge, and the verification method is set to Password/Badge/Face/Palm, the following screen will appear.
SpeedFace M1/M2 User Manual 1.6.4 Password Verification The Password Verification mode compares the entered password with the registered User ID and Password. Click the button on the main screen to open the 1:1 (One to One) password verification mode. Input the user ID and press [OK].
SpeedFace M1/M2 User Manual 1.6.5 Combined Verification To increase the security, this device offers the option of using multiple forms of verification methods. A total of 12 different verification combinations can be used, as shown below: Note: 1) "/" means “or”, and "+" means “and”.
SpeedFace M1/M2 User Manual Main Menu Press on the initial interface to enter the main menu, as shown below: Menu Description To add, edit, view, and delete the basic information about a user. User Mgt. To set the permission scope of the custom role and enroller, that is, the rights to User Role operate the system.
SpeedFace M1/M2 User Manual User Management Add Users Click User Mgt. on the main menu. Click New User. Register a User ID and Name Enter the User ID and Name. Notes: 1) A username may contain 17 characters. 2) The user ID may contain 1 to 9 digits by default.
Page 29
SpeedFace M1/M2 User Manual Setting the User Role There are two types of user accounts: Normal user and Super admin. If there is already a registered administrator, the normal users have no rights to manage the system and may only access authentication verifications.
Page 31
SpeedFace M1/M2 User Manual Register password Click Password to open the password registration page. Enter a password and re-enter it. Click OK. If the two entered passwords are different, the prompt "Password not match” will appear. Note: The password may contain one to eight digits by default.
SpeedFace M1/M2 User Manual Search for Users Click the search bar on the user list and enter the retrieval keyword (The keyword may be an ID, surname or full name).The system will search for the users related to the information.
SpeedFace M1/M2 User Manual Edit Users Select a user from the list and click Edit to enter the edit user interface. Note: The operation of editing a user is the same as that of adding a user, except that the user ID cannot be modified when editing a user.
SpeedFace M1/M2 User Manual User Role If you need to assign some specific permissions to certain users, you may edit the “User Defined Role” under the User Role menu. You may set the permission scope of the custom role (up to 3 roles) and enroller, that is, the permission scope of the operation menu.
Page 35
SpeedFace M1/M2 User Manual Note: During the privilege assignment, the main menu is on the left and its sub-menus are on the right. You only need to select the features in sub-menus. If the device has a role enabled, you may assign the roles you set to users by clicking User Mgt.
SpeedFace M1/M2 User Manual Communication Settings Communication Settings are used to set the parameters of the Network, PC connection, Wirless Network, Cloud server, and Wiegand. Tap COMM. on the main menu. Network Settings When the device needs to communicate with a PC over the Ethernet, you need to configure network settings and ensure that the device and the PC are connecting to the same network segment.
SpeedFace M1/M2 User Manual The factory default address is 0.0.0.0. Please set the value as per the requirements. TCP COMM. Port The factory default value is 4370. Please set the value as per the requirements. Dynamic Host Configuration Protocol, which is to dynamically allocate IP DHCP addresses for clients via server.
SpeedFace M1/M2 User Manual Wireless Network ★ Wi-Fi is short for Wireless Fidelity. The device provides a Wi-Fi module, which can be built in the device mould or externally connected, to enable data transmission via Wi-Fi and establish a wireless network environment.
SpeedFace M1/M2 User Manual 5.3.1 Adding Wi-Fi Network If the desired Wi-Fi network is not in the list, you can add the Wi-Fi network manually. Tap Page Down and Add Wi-Fi Network. Enter the parameters of Wi-Fi network. (The added network must exist.) After adding, find the added Wi-Fi network in list and connect to the network in the above way.
SpeedFace M1/M2 User Manual Menu Descriptions Short for Dynamic Host Configuration Protocol, which involves allocating DHCP dynamic IP addresses to network clients. IP Address IP address of the Wi-Fi network. Subnet Mask Subnet mask of the Wi-Fi network. Gateway Gateway address of the Wi-Fi network.
SpeedFace M1/M2 User Manual Wiegand Setup The menu is used to set the Wiegand Input & Output parameters. Click Wiegand Setup on the Comm. Settings interface. Wiegand Input Menu Descriptions Wiegand Format Values range from 26 bits, 34 bits, 36 bits, 37 bits, and 50 bits.
Page 42
SpeedFace M1/M2 User Manual Definitions of various common Wiegand formats: Wiegand Format Definitions ECCCCCCCCCCCCCCCCCCCCCCCCO Consists of 26 bits of binary code. The 1 bit is the even parity bit of the 2 to 13 Wiegand26 bits, while the 26 bit is the odd parity bit of the 14 to 25 bits.
Page 43
SpeedFace M1/M2 User Manual ESSSSSSSSSSSSSSSSCCCCCCCCCCCCCCCCCCCCCCCCCCCCCCCCO Consists of 50 bits of binary code. The 1 bit is the even parity bit of the 2 to 25 Wiegand50 bits, while the 50 bit is the odd parity bit of the 26 to 49 bits.
SpeedFace M1/M2 User Manual System Settings The System Settings is used to set the related system parameters to optimize the performance of the device. Click System on the main menu interface. Date and Time Click Date Time on the System interface.
SpeedFace M1/M2 User Manual Access Logs Setting Click Access Logs Setting on the System interface. Menu Description Whether to capture and save the current snapshot image during verification. There are 5 modes: No Photo: No photo is taken during user verification.
SpeedFace M1/M2 User Manual Face comparison To set the facial template matching time interval as needed. The valid time Interval (s) range is 0~9 seconds. Face Parameters Click Face on the System interface. Menu Description Under 1:N (One to Many) verification mode, the verification will only be successful when the similarity between the acquired facial image and all registered facial templates is greater than the set value.
Page 47
SpeedFace M1/M2 User Manual During face enrollment, 1:N (One to Many) comparison is used to determine whether the user has already registered before. Face Enrollment When the similarity between the acquired facial image and all registered facial Threshold templates is greater than this threshold, it indicates that the face has already been registered.
SpeedFace M1/M2 User Manual Used when WDR is turned off. This helps reduce flicker when the device’s Anti-flicker Mode screen flashes at the same frequency as the light. Used to update or view the Major Version and Minor Version of the face Face Algorithm algorithm, and to pause the update of the facial template .
SpeedFace M1/M2 User Manual Detection Management Click Detection Management on the System interface. Menu Description To enable or disable the mask detection function. Enable mask When it’s enabled, the device will identify whether the user is wearing a mask detection or not during verification.
SpeedFace M1/M2 User Manual Personalize Settings You may customize the interface settings, audio, and bell. Click Personalize on the main menu interface. Interface Settings You can customize the display style of the main interface. Click User Interface on the Personalize interface.
SpeedFace M1/M2 User Manual Language To select the language of the device. When there is no operation, and the time exceeds the set value, the device will Menu Screen automatically go back to the initial interface. You can disable the function or set Timeout (s) the value between 60 and 99999 seconds.
SpeedFace M1/M2 User Manual Bell Schedules Click Bell Schedules on the Personalize interface. Add a bell Click New Bell Schedule to enter the adding interface: Menu Description Bell Status Set whether to enable the bell status. Bell Time At this time of day, the device automatically rings the bell.
SpeedFace M1/M2 User Manual Punch States Options Click Punch States Options on the Personalize interface. Menu Description Select a punch state mode, which can be: Off: To disable the punch state key function. The punch state key set under Shortcut Key Mappings menu will become invalid.
SpeedFace M1/M2 User Manual Shortcut Keys Mappings Users may define shortcuts as attendance status or functional keys. On the main interface, when the shortcut keys are pressed, the corresponding attendance status or function interface will quickly display. Click Shortcut Key Mappings on the Personalize interface.
SpeedFace M1/M2 User Manual Data Management The Data Management is used to delete the relevant data in the device. Click Data Mgt. on the main menu interface. Delete Data Click Delete Data on the Data Mgt. interface. Menu Description Delete Access Records To delete the attendance data/access records conditionally.
Page 57
SpeedFace M1/M2 User Manual Delete User Photo To delete all the user photos in the device. Delete Wallpaper To delete all the wallpapers in the device. Delete Screen Savers To delete the screen savers in the device. Note: When deleting the access records, attendance photos, or block listed photos, you may select Delete All or Delete by Time Range.
SpeedFace M1/M2 User Manual Access Control Access Control is used to set the schedule of a door opening, locks control and other parameter settings related to access control. Click Access Control on the main menu interface. To gain access, the registered user must meet the following conditions: The current door unlock time should be within any valid time zone of the user time period.
SpeedFace M1/M2 User Manual Access Control Options This option is used to set the parameters of the control lock of the device and the related parameters. Click Access Control Options on the Access Control interface. Menu Description Whether to turn on the gate control mode or not. When set to ON, on this...
SpeedFace M1/M2 User Manual Door available time To set a time period for the door, so that the door is accessible only during period this time period. When setting up the master and slave, the status of the master can be set to out or in.
SpeedFace M1/M2 User Manual Notes: 1) When the ending time is earlier than the starting time, such as 23:57~23:56, it indicates that access is prohibited all day; when the ending time is later than the starting time, such as 00:00~23:59, it indicates that the interval is valid.
SpeedFace M1/M2 User Manual Edit a Holiday On the Holidays interface, select a holiday item to be modified. Click Edit to modify holiday parameters. Delete a Holiday On the Holidays interface, select a holiday item to be deleted and click Delete. Click OK to confirm the deletion.
Page 64
SpeedFace M1/M2 User Manual Click the door-unlocking combination to be set. Click the up and down arrows to input the combination number, then press OK. Examples: The door-unlocking combination 1 is set as (01 03 05 06 08), indicating that the unlocking combination 1 consists of 5 people, and the 5 individuals are from 5 groups, namely, access control group 1 (AC group 1), AC group 3, AC group 5, AC group 6, and AC group 8, respectively.
SpeedFace M1/M2 User Manual Anti-Passback Setup It is possible that users may be followed by some persons to enter the door without verification, resulting in security problem. So, to avoid this situation, Anti-Passback option is developed. Once it is enabled, the check-in record must match with check- out record so as to open the door.
SpeedFace M1/M2 User Manual Duress Options Settings If a user activated the duress verification function with specific authentication method(s), when he/she is under coercion during authentication with such method, the device will unlock the door as usual, but at the same time a signal will be sent to trigger the alarm.
SpeedFace M1/M2 User Manual Attendance Search When the identity of a user is verified, the record will be saved in the device. This function enables users to check their access records. Click Attendance Search on the main menu interface. The process of searching for attendance and blocklist photos is similar to that of searching for event logs.
Page 68
SpeedFace M1/M2 User Manual 1. Enter the user ID to be searched and click OK. If 2. Select the time range in which the records you want to search for records of all users, click OK you want to search for.
SpeedFace M1/M2 User Manual Autotest To automatically test whether all modules in the device function properly, which include the LCD, Audio, Camera and real-time clock (RTC). Click Autotest on the main menu interface. Menu Description Test All To automatically test whether the LCD, audio, camera and RTC are normal.
SpeedFace M1/M2 User Manual System Information With the system information option, you can view the storage status, the version information of the device, and so on. Click System Info on the main menu interface. Menu Description Device Displays the current device's user storage, palm, password and face storage, administrators, access records, attendance and blocklist photos, and user photos.
SpeedFace M1/M2 User Manual Connect to ZKBioAccess Software 13.1 Set the Communication Address Device side Click COMM.> Ethernet in the main menu to set the IP address and Gateway of the device. (Note: The IP address should be able to communicate with the ZKBioAccess server, preferably in the same network segment with the server address.)
SpeedFace M1/M2 User Manual 13.2 Add Device to the Software You can add a device by searching. The process is as follows: 1) Click Access Control >Device >Search Device, to open the Search interface. Click Search, and it will prompt [Searching……].
SpeedFace M1/M2 User Manual Appendix 1 Requirements for Live Collection and Registration of Visible Light Face Images It is recommended to perform registration in an indoor environment with an appropriate light source without underexposure or overexposure. Do not point towards outdoor light sources like door or window or other strong light sources.
SpeedFace M1/M2 User Manual Requirements for Visible Light Digital Face Image Data The digital photo should be straight-edged, colored, half-portrayed with only one person, and the person should be uncharted and not in uniform. Persons who wear eyeglasses should remain to put on eyeglasses for photo capturing.
Thank you for choosing this hybrid biometric recognition product, which was designed and manufactured by ZKTeco. As a world-renowned provider of core biometric recognition technologies, we are constantly developing and researching new products, and strive to follow the privacy laws of each country in which our products are sold.
SpeedFace M1/M2 User Manual Eco-friendly Operation The product's "eco-friendly operational period" refers to the time period during which this product will not discharge any toxic or hazardous substances when used in accordance with the prerequisites in this manual. The eco-friendly operational period specified for this product does not include batteries or other components that are easily worn down and must be periodically replaced.
Need help?
Do you have a question about the SpeedFace M1 and is the answer not in the manual?
Questions and answers