Table of Contents
Advertisement
Advertisement
Table of Contents

Related Manuals for Anetic Aid AT4


Summary of Contents for Anetic Aid AT4
-
Page 3: Table Of Contents
14. Disposal of Waste Electrical & Electronic Equipment (WEEE) © Anetic Aid Ltd. All rights reserved; this document is not to be reproduced in whole or in part without the permission of the copyright owners. The company reserves the right to modify or improve the equipment referred to. -
Page 4: Introduction
Introduction These instructions are intended to assist you with the operation of the AT4 Tourniquet and it is important that the instructions are read thoroughly and understood before using the equipment. It is also important to check the tourniquet before use to ensure there is no loss or change in performance;... -
Page 5: Summary Of Warnings, Cautions And Side-Effects
The AT4 should always be moved by pulling the handle; it should not be moved by pushing. When the electrically powered AT4 is not in use it should be connected to the mains electrical supply to recharge the battery;... -
Page 6: Symbols
Symbols The following symbols have been used on the AT4 tourniquet control panel; Symbol: Title: Description: Press to turn ON, Green indicator. ON / OFF To turn OFF press and hold until pressure displays are blank. Press once to pause audible alarms for 3 AUDIBLE ALARM PAUSE minutes;... - Page 7 Date of manufacture as YYYY:MM DATE OF MANUFACTURE Name and address of manufacturer is MANUFACTURER adjacent. The AT4 should not be pushed as it is more Do Not Push stable when pulled by the handle. CAUTION: Within the USA Federal law restricts Rx ONLY this device to sale by or on the order of a physician.
-
Page 8: Getting Started
The unit will have been supplied with a T3.15A fuse in a clear plastic bag with the operating instructions; this needs to be fitted during commissioning. Lay the AT4 on its back, and fit the fuse in the fuse holder indicated by the fuse symbol on the underside of the AT4. -
Page 9: Product Functions
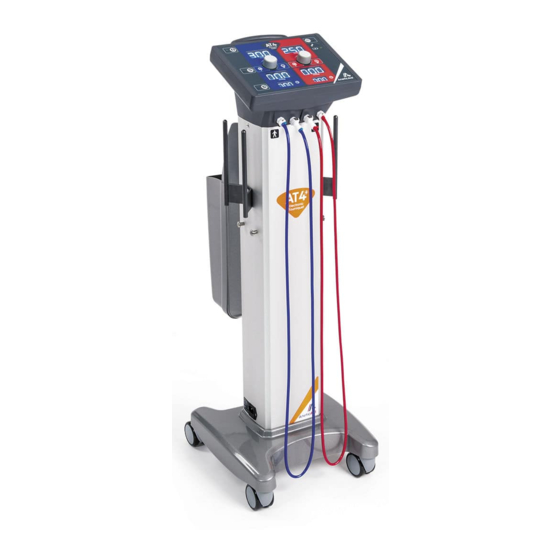
Product Functions Control Panel Cuff Supply Hose Storage Connectors Cuff Supply Hose Connectors Cuff Supply Hose Pulling Handle Cuff Hooks Storage Facility Additional Storage Facility Locating Pins IEC Socket MDM/992043/10/120121 Page 6... -
Page 10: Controls And Operation
The red and blue cuff hoses should be connected to the connectors in the front of the AT4 ready for use below the appropriate red or blue segment of the front panel. There are two connections to pressurise the cuff and two which are for stowage of the cuff end of the hose when not in use. -
Page 11: General Operation
If the AT4 is not turned off it will automatically shut down if the cuffs have not been inflated for 15 minutes. When not in use it is recommended that the AT4 be left connected to the mains to ensure that the battery is fully charged and ready for Use. -
Page 12: Ivra Operation
15 minutes. When not in use it is recommended that the AT4 be left connected to the mains to ensure that the battery is fully charged and ready for Use. -
Page 13: Alarms And Warning Indicators
O rings and then restarting the AT4 a service should be requested. The AT4 has integral calibration and leak detection monitoring and an alarm which is not cleared by the above procedure may indicate failure of a pressure sensor or a leak in the internal pneumatic circuit. -
Page 14: Handling
If required to be lifted up a step or over a threshold the AT4 should be lifted by the cuff hooks on the side of the unit. Do not lift the AT4 by the control panel as this may result in damage. -
Page 15: Cleaning And Disinfecting
Wipe the AT4 and its detachable hoses/cables using a cloth dampened with detergent diluted with water as per the manufacturer’s instructions. Apply the liquid to the cloth and squeeze out surplus liquid. Do not apply liquid directly to the AT4 or its detachable parts. -
Page 16: Installation Of Battery
After cleaning disinfect the AT4 and its detachable hoses and cables using a cloth dampened with disinfectant which is indicated for use on plastic and metal and is diluted as per the manufacturer’s instructions. Apply the liquid to the cloth and squeeze out surplus liquid. -
Page 17: Expected Battery Life
EN IEC 62353:2007. The electrically powered AT4 contains a lead acid battery pack which will require to be replaced every two years. The device is class I electrical safety with a protective earth, it is NOT classified as an applied part. -
Page 18: Disposal Of Waste Electrical & Electronic Equipment (Weee)
Anetic Aid Ltd or their approved Distributor. Anetic Aid Ltd will repair or replace, at their discretion, any components found to be defective or at variance with the manufacturer’s specification within this time at no cost to the purchaser. - Page 19 This page has been left blank. MDM/992043/10/120121...
- Page 20 This page has been left blank.
Need help?
Do you have a question about the AT4 and is the answer not in the manual?
Questions and answers