Table of Contents

Related Manuals for TERSUS Oscar Ultimate


Summary of Contents for TERSUS Oscar Ultimate
- Page 1 User Manual Version V1.0-20190613 User Manual For Oscar Ultimate ©2019 Tersus GNSS Inc. All rights reserved. Sales & Technical Support: sales@tersus-gnss.com & support@tersus-gnss.com More details, please visit www.tersus-gnss.com...
-
Page 2: Revision History
User Manual for Surveying GNSS Receiver v1.0 Revision History Version Revision Date Change Summary 20190613 Initial Release 1 / 66... -
Page 3: Table Of Contents
User Manual for Surveying GNSS Receiver v1.0 Table of Content Revision History........................1 Table of Content........................2 List of Figures........................... 4 List of Tables..........................7 Notices............................8 Introduction......................11 Overview......................11 Receiver Features..................12 Devices in the package..................12 Surveying GNSS Receiver...................13 1.3.1 1.3.2 Battery and Charger..................19 1.3.3 TC20 Controller....................20... - Page 4 User Manual for Surveying GNSS Receiver v1.0 Operations of TC20 Controller..............43 2.5.1 Insert SIM card and T-Flash card..............43 2.5.2 T-Flash Card....................45 2.5.3 Using of Touch Screen.................. 46 Technical Specifications..................47 Surveying GNSS Receiver...................47 TC20 Controller....................49 Typical Applications....................51 Base Station Operation..................51 Rover Operation....................57 Static Survey....................
-
Page 5: List Of Figures
Figure 1.1 Surveying GNSS Receiver – Ultimate..........13 Figure 1.2 Surveying GNSS Receiver – Advanced..........13 Figure 1.3 Surveying GNSS Receiver – Basic............13 Figure 1.4 Buttons and Display on Oscar Ultimate........14 Figure 1.5 Bottom of Surveying GNSS Receiver..........18 Figure 1.6 BN20 Battery.................. 19 Figure 1.7 CN20 Charger................ - Page 6 User Manual for Surveying GNSS Receiver v1.0 Figure 2.5 Oscar as a rover without radio antenna........32 Figure 2.6 Device functional group..............35 Figure 2.7 Connect Oscar via Bluetooth............36 Figure 2.8 Base configuration................. 37 Figure 2.9 Rover configuration................37 Figure 2.10 Link status of Base..............38 Figure 2.11 Link status of Rover..............
- Page 7 User Manual for Surveying GNSS Receiver v1.0 Figure 4.14 Rover configuration – Radio............61 Figure 4.15 Rover configuration – CORS Network........62 Figure 4.16 Link status of Rover using PDA network........62 Figure 4.17 Static Survey configuration............64 6 / 66...
- Page 8 Table 2.1 Devices to set Oscar as a base.............31 Table 2.2 Devices to set Oscar as a rover............ 32 Table 2.3 Button configuration for Oscar Ultimate and Advanced.....33 Table 2.4 Button configuration for Oscar Basic..........34 Table 3.1 Surveying GNSS Receiver Performance..........47 Table 3.2 Pin Definition of the serial data port..........
-
Page 9: Notices
Class A digital device (FCC Part 15B and Part 15C). The Class A limits are designed to provide reasonable protection against harmful interference in a residential installation. CE Marking Tersus GNSS Inc. declares that Surveying GNSS Receiver is in compliance with the essential requirements... - Page 10 The following notices apply to all three versions of Oscar GNSS receivers. Changes or modifications to this equipment not expressly approved by Tersus could void the user’s authority to operate this equipment or even has risk to damage the receivers.
-
Page 11: Table 0.1 Document / Software Used In This User Manual
Mission Planner A popular Ground Station software Planner/ Support If there is any problem and the information needed cannot be found in the product documentation, request technical support using the Tersus website at www.tersus-gnss.com, or mail to support@tersus-gnss.com 10 / 66... -
Page 12: Introduction
User Manual for Surveying GNSS Receiver v1.0 1. Introduction This chapter includes overview, receiver features, and devices in the package. Overview Surveying GNSS Receiver generation GNSS system. It supports calibration-free tilt compensation function which is immune to magnetic disturbances, leveling pole is not required. Easy configuration with 1.54 inch big interactive screen on Ultimate and Advanced versions. -
Page 13: Receiver Features
User Manual for Surveying GNSS Receiver v1.0 Receiver Features The Surveying GNSS Receiver has following features: Supports constellations & frequencies GPS L1, L2 Supports 410-470MHz UHF radio, 4G network, Wi-Fi, Bluetooth, NFC. Tilt compensation without calibration, immune to magnetic disturbances. ... -
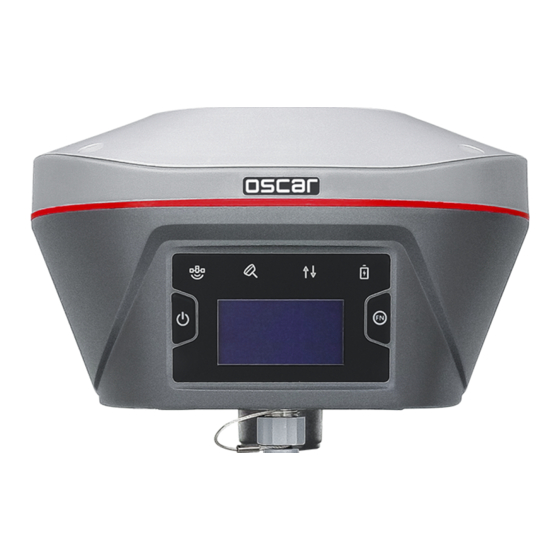
Page 14: Figure 1.4 Buttons And Display On Oscar Ultimate
Power ON/OFF Function OLED Display Figure 1.4 Buttons and Display on Oscar Ultimate Buttons There are two buttons on each version of Surveying GNSS Receiver ]: Power ON/OFF button. When the device is off, long press it for 2 seconds to power on the receiver. When the device is on, long press it for 3 seconds to power off the Receiver. -
Page 15: Table 1.2 Detailed Description For Led Indicators
User Manual for Surveying GNSS Receiver v1.0 Combination Function of the two buttons Press and hold the FN button, continuously touch the ON/OFF button 5 times to reset the GNSS module and make it re-search the satellites. Detailed LED flash status related to this operation refers to the LED flash patterns table. LED Indicators There are four LED indicators and one OLED display screen on Ultimate version and Advanced version. -
Page 16: Table 1.3 Possible Led Flash Patterns
User Manual for Surveying GNSS Receiver v1.0 Green LED indicates static survey mode. Static Survey Yellow LED. Steady yellow indicates fixed solution, Solution flashing indicates status floating solution, off light for other solutions. Blue indicates Bluetooth status. Bluetooth LED Flash Patterns The possible flash patterns of various states of receiver operation are listed in the table below. - Page 17 User Manual for Surveying GNSS Receiver v1.0 Fixed solution Correction data LED is steady yellow for Ultimate and Advanced versions, Solution status LED is steady yellow for Basic version. Floating solution Correction data LED flashes yellow at 1Hz for Ultimate and Advanced versions, Solution status...
-
Page 18: Figure 1.5 Bottom Of Surveying Gnss Receiver
User Manual for Surveying GNSS Receiver v1.0 Receiver Ports The bottom of Oscar receiver is shown as below. TNC port Mini USB port Serial Data port SIM slot Figure 1.5 Bottom of Surveying GNSS Receiver Table 1.4 Receiver ports on the bottom side Icon Connector Name... -
Page 19: Battery And Charger
User Manual for Surveying GNSS Receiver v1.0 1.3.2 Battery and Charger Oscar equips smart lithium batteries which can detect electricity and display the power level intelligently. The Surveying GNSS Receiver can also be powered by external power source via serial data port. The built-in large capacity battery is detachable, two batteries support up to 16 hours of field work in RTK mode. -
Page 20: Figure 1.8 Cn20 Charger With Two Bn20 Batteries
User Manual for Surveying GNSS Receiver v1.0 Place two BN20 batteries in the slot of CN20 charger. Figure 1.8 CN20 Charger with two BN20 batteries Insert the DC Jack connector of the adapter to the CN20 charger, then make the adapter plug in the local AC outlet (100~240V AC) to start charging. Figure 1.9 CN20 Charger Adapter Note: the product is not suitable for shipment with this adapter Charge the battery completely before using it for the first time. -
Page 21: Tc20 Controller
User Manual for Surveying GNSS Receiver v1.0 1.3.3 TC20 Controller The Tersus TC20 Controller is a rugged smart phone with design of 4.3'' touch screen and an alphanumerical keypad. Equipped with powerful processor, it is perfect to adapt with Tersus Survey software. With professional IP67 rating, it is robust and reliable for harsh operating conditions. -
Page 22: Figure 1.10 Four Sides Of Tc20 Controller
User Manual for Surveying GNSS Receiver v1.0 Power on: Press and hold the power button for 3 seconds Power off: Press and hold the power button for 3 seconds, select ‘power off’ in the menu option. Figure 1.10 Four sides of TC20 controller FCC ID:2AMDJ-TC20 Menu Key: Select to show the available menu in current screen. -
Page 23: Figure 1.11 Tc20 Lithium Battery
User Manual for Surveying GNSS Receiver v1.0 Accessories of TC20 Controller: TC20 Lithium Battery (3.7V/6500mAh) Figure 1.11 TC20 Lithium battery TC20 Charger (5V/1A) Figure 1.12 TC20 Charger Mini USB Cable Figure 1.13 Mini USB cable Functions: 1. Connect to the USB port of computer for data downloading; 2. -
Page 24: Other Accessories
User Manual for Surveying GNSS Receiver v1.0 1.3.4 Other Accessories Other accessories may be packed according to customer requirement. The GNSS antenna connector is used to install Oscar to a tripod. Figure 1.14 GNSS Antenna Connector The height measure accessory is used to determine the height of Oscar with higher accuracy. -
Page 25: Figure 1.17 Extension Pole
User Manual for Surveying GNSS Receiver v1.0 extension pole to heighten Oscar and avoid bending the 410-470MHz radio antenna. Figure 1.17 Extension pole The 30W Radio for Oscar below is to be installed via Serial Data Port, and it can help Oscar transmitting signals farther than internal radio. Figure 1.18 30W Radio for Oscar When using 30W radio for Oscar as a base, a high gain radio antenna and a telescopic pole are needed which are shown as below. -
Page 26: Figure 1.20 Telescopic Pole For Radio Antenna
User Manual for Surveying GNSS Receiver v1.0 Figure 1.20 Telescopic pole for radio antenna When using Oscar as a rover, a ranging pole is needed. Figure 1.21 Ranging Pole The bracket for TC20 Controller is to fix the TC20 Controller on the ranging pole. -
Page 27: Figure 1.23 Carrying Case
User Manual for Surveying GNSS Receiver v1.0 A yellow carrying case is to store all the devices and accessories except ranging pole, high gain radio antenna and telescopic pole. Figure 1.23 Carrying Case 26 / 66... -
Page 28: General Operations
User Manual for Surveying GNSS Receiver v1.0 2. General Operations This chapter includes setting up, configuration and other related operations. Setting up Oscar 2.1.1 Insert the battery Open the battery cover, notice the metal contact on the bottom and put one battery inside align the metal contact position. - Page 29 User Manual for Surveying GNSS Receiver v1.0 DO NOT damage the rechargeable Lithium-ion battery. A damaged battery can cause an explosion or fire, and can result in personal injury and/or property damage. To prevent injury or damage: DO NOT use or charge the battery if it appears to be damaged. Signs of damage include, but are not limited to, discoloration, warping, and leaking battery fluid.
-
Page 30: Insert The Sim Card
User Manual for Surveying GNSS Receiver v1.0 2.1.2 Insert the SIM card Insert the SIM card with the contacts facing outside which is shown as below. Figure 2.3 Insert the SIM card To eject the SIM card, slightly push it in to trigger the spring-loaded release mechanism. -
Page 31: Fix Oscar On A Tripod Or Ranging Pole
User Manual for Surveying GNSS Receiver v1.0 2.1.3 Fix Oscar on a Tripod or Ranging Pole Surveying GNSS Receiver has a standard 5/8’’ x 11 UNC female connector and it can be fixed on a tripod or a ranging pole to be a base or rover according to customer requirement. -
Page 32: Figure 2.5 Oscar As A Rover Without Radio Antenna
User Manual for Surveying GNSS Receiver v1.0 Figure 2.5 Oscar as a rover without radio antenna Table 2.2 Devices to set Oscar as a rover Device Name Quantity Items in the figure Surveying GNSS Receiver 1, details refer to section 1.3.1 Ranging pole 2, details refer to section 1.3.4 Bracket for TC20... -
Page 33: Oscar Configuration
1.4, Table 1.1, and related context. There are OLED display for Ultimate and Advanced versions, and no display for Basic version. Therefore the button configurations are different which are listed below. Table 2.3 Button configuration for Oscar Ultimate and Advanced Action Button operation... -
Page 34: Table 2.4 Button Configuration For Oscar Basic
User Manual for Surveying GNSS Receiver v1.0 Table 2.4 Button configuration for Oscar Basic Action Button operation Description Turn on the receiver Press power button for 2s All six LEDs light up and remain for 3s, then all go off and battery LED is steady red if battery level is >30%. -
Page 35: Configure Via Tc20 Controller
Oscar via Nuwa app which is installed in TC20 controller. The general operations of Nuwa app refer to User Manual for Nuwa App which can be downloaded on Tersus official website. Figure 2.6 Device functional group When Surveying GNSS Receiver is powered on, to connect Oscar, put TC20 Controller near the NFC logo on Oscar, the TC20 controller pair Bluetooth with Oscar automatically;... -
Page 36: Figure 2.7 Connect Oscar Via Bluetooth
User Manual for Surveying GNSS Receiver v1.0 Figure 2.7 Connect Oscar via Bluetooth Select [Bluetooth] for the Connect Type. Click [Connect Config] to search and pair the Bluetooth address of Oscar. Select [Oscar] for the Antenna to use the internal antenna of Oscar. Then click [Connect] to enable the communication between TC20 Controller and Oscar. -
Page 37: Figure 2.8 Base Configuration
User Manual for Surveying GNSS Receiver v1.0 Figure 2.8 Base configuration Figure 2.9 Rover configuration Fill in the detailed information of base configuration or rover configuration, then click [OK] and back to the work mode list, select this configuration to start data transmission for base or rover which are shown as below. -
Page 38: Figure 2.10 Link Status Of Base
User Manual for Surveying GNSS Receiver v1.0 Figure 2.10 Link status of Base 37 / 66... -
Page 39: Configure Via Web Interface
User Manual for Surveying GNSS Receiver v1.0 Figure 2.11 Link status of Rover 2.2.3 Configure via Web Interface To be updated. 38 / 66... -
Page 40: Data Download
User Manual for Surveying GNSS Receiver v1.0 Data Download Downloading data stored in Oscar to an office computer is very simple as Oscar can be used as an USB storage device when connecting with a computer. Before connecting Oscar to a computer, ensure Oscar is powered on. Use the Mini USB Cable in the package to connect Oscar to the USB port of a computer which is shown as below. -
Page 41: Firmware Upgrade
User Manual for Surveying GNSS Receiver v1.0 Firmware Upgrade There are two methods to upgrade firmware for Surveying GNSS Receiver: wired upgrade and wireless upgrade. 2.4.1 Wired Upgrade Before connecting Oscar to a USB memory stick, ensure Oscar is powered on and the updated firmware is stored in the USB memory stick. -
Page 42: Wireless Upgrade
User Manual for Surveying GNSS Receiver v1.0 2.4.2 Wireless Upgrade This method is using Nuwa app to assist the firmware upgrade. To be updated. 41 / 66... -
Page 43: Operations Of Tc20 Controller
User Manual for Surveying GNSS Receiver v1.0 Operations of TC20 Controller 2.5.1 Insert SIM card and T-Flash card 1. Remove the back cover: Loosen the screws on the back side – to rotate the screws anti-clockwise until open the bake cover as shown in Figure 2.14 Figure 2.14 Remove the back cover 2. -
Page 44: Figure 2.16 Put The Sim Card In The Holder
User Manual for Surveying GNSS Receiver v1.0 Figure 2.16 Put the SIM card in the holder 4. Insert T-Flash card: Open T-Flash card holder and insert T-Flash card into the slot, then close T-Flash card holder as shown in Figure 2.17 Figure 2.17 Insert T-Flash card 43 / 66... -
Page 45: T-Flash Card
User Manual for Surveying GNSS Receiver v1.0 5. Insert the back cover: Insert the back cover and rotate screws clockwise to lock the back cover as shown in Figure 2.18 Figure 2.18 Insert the back cover Note: Please power off the phone before plug in or pull out the SIM card. 2.5.2 T-Flash Card 1. -
Page 46: Using Of Touch Screen
User Manual for Surveying GNSS Receiver v1.0 Figure 2.19 Select USB function 2.5.3 Using of Touch Screen Single Click: To select an icon. For example, click dial to open the keypad which will be displayed on the screen. Double Click: To zoom-in or zoom-out. For example, to zoom-in or out of a photo, click twice when viewing a photo or browsing on the internet. -
Page 47: Technical Specifications
Kinematic 15mm+0.5ppm (Vertical) Initialization (typical) <10s Initialization Reliability >99.9% Tilt Compensation ≤2cm Accuracy (within 30° ) System & Data Operating System Linux Storage built-in 16GB/8GB RTK Format CMR, CMR+, RTCM 2.X/3.X Software Support Tersus Nuwa, MicroSurvey FieldGenius 46 / 66... - Page 48 User Manual for Surveying GNSS Receiver v1.0 Communication Cellular 2G/3G/4G Wi-Fi 802.11b/g/n Bluetooth USB OTG USB 2.0 x1 Serial Ports RS232 x1 Power Internal Radio Frequency 410MHz ~ 470MHz Distance (Typical) Radio Protocols TrimTalk450, TrimMark 3, South, Transparent, Satel Electrical Description Input Voltage +9 ~ 28 VDC Power Consumption...
-
Page 49: Tc20 Controller
User Manual for Surveying GNSS Receiver v1.0 Figure 3.1 Serial Data port of Oscar Table 3.2 Pin Definition of the serial data port Connector Pin No. Pin Definition TC20 Controller Table 3.3 TC20 technical specification System Operating System Android 6.0 MTK MT6735 Quad-Core 1.3GHz Memory 2GB RAM + 16GB ROM... - Page 50 User Manual for Surveying GNSS Receiver v1.0 GNSS Signals supported A-GPS Communication Wi-Fi IEEE 802.11a/b/g/n/ac Cellular Mode Dual SIM Dual Standby SIM1 & SIM2 FDD-LTE 800 / 1800 / 2100 / 2600MHz TD-LTE 1900 / 2300 / 2500 / 2600MHz WCDMA 850 / 900 / 1900 / 2100MHz GSM 900 / 1800 MHz Bluetooth...
-
Page 51: Typical Applications
User Manual for Surveying GNSS Receiver v1.0 4. Typical Applications This chapter introduces typical applications of Surveying GNSS Receiver, and solutions for some possible issues. Base Station Operation Figure 4.1 Oscar as a Base – Network Mode Table 4.1 Devices in Figure 4.1 Device Name Surveying GNSS Receiver Height measure accessory... -
Page 52: Figure 4.2 Oscar As A Base - Internal Radio
User Manual for Surveying GNSS Receiver v1.0 GNSS antenna connector Tribrach Tripod Figure 4.2 Oscar as a Base – Internal Radio Table 4.2 Devices in Figure 4.2 Device Name Surveying GNSS Receiver Height measure accessory 410-470MHz radio antenna Extension pole Tribrach Tripod 51 / 66... -
Page 53: Figure 4.3 Oscar As A Base - External 30W Radio
User Manual for Surveying GNSS Receiver v1.0 Figure 4.3 Oscar as a Base – External 30W Radio Table 4.3 Devices in Figure 4.3 Device Name Surveying GNSS Receiver Height measure accessory Serial-5pin to 30W-Radio-DC-5pin & Bullet-DC 30W Radio for Oscar GNSS antenna connector Tribrach Tripod... - Page 54 4. Select [BASE Mode] and press power button to enter connection options; 5. If using Tersus Network, select [Tersus Network] and press power button to enter Network Settings; Set the format, server and press power button to confirm.
-
Page 55: Figure 4.4 Base Setting Interface
User Manual for Surveying GNSS Receiver v1.0 5. Back to the main interface of Nuwa app, click [Device] -> [Connect] under an opened project. 6. Select [Oscar] for the Device Type, select [Bluetooth] for the Connect Type, click [Connect Config] to search and pair the Bluetooth address of Oscar, select [Oscar] for the Antenna and click [Connect] to enable communication between the android controller and Oscar. -
Page 56: Figure 4.6 Base Configuration - Radio
User Manual for Surveying GNSS Receiver v1.0 Figure 4.6 Base configuration – Radio Figure 4.7 Base configuration – UART 9. After filling the information for the above configuration, click [OK]. Select this configuration in the work mode list and click [Start] to start data transmission for base which is shown as below. -
Page 57: Rover Operation
User Manual for Surveying GNSS Receiver v1.0 Rover Operation Figure 4.9 Oscar as a Rover – Network Mode Table 4.4 Devices in Figure 4.9 Device Name Surveying GNSS Receiver Ranging pole Bracket for TC20 TC20 Controller 56 / 66... -
Page 58: Figure 4.10 Oscar As A Rover - Internal Radio
User Manual for Surveying GNSS Receiver v1.0 Figure 4.10 Oscar as a Rover – Internal Radio Table 4.5 Devices in Figure 4.10 Device Name Surveying GNSS Receiver Radio antenna for Oscar Bracket for TC20 Ranging pole TC20 Controller Detailed steps of button operation: 1. - Page 59 4. Select [Rover Mode] and press power button to enter connection options; 5. If using Tersus Network, select [Tersus Network] and press power button to enter Network Settings; Set the Base ID, server and press power button to confirm.
-
Page 60: Figure 4.11 Rover Setting Interface
8. Edit rover configuration for Surveying GNSS Receiver under different data link selections. The Receiver Network and PDA Network have three protocol options respectively: Ntrip, TCP and Tersus Caster Service (TCS). Figure 4.12 Rover configuration – TersusNetwork 59 / 66... -
Page 61: Figure 4.13 Rover Configuration - Pdanetwork
User Manual for Surveying GNSS Receiver v1.0 Figure 4.13 Rover configuration – PDANetwork Note: Select PDANetwork when it is using cellular or Wi-Fi network of a PDA such as TC20 Controller. Figure 4.14 Rover configuration – Radio 60 / 66... -
Page 62: Figure 4.15 Rover Configuration - Cors Network
User Manual for Surveying GNSS Receiver v1.0 Figure 4.15 Rover configuration – CORS Network 7. After filling the information for the above configuration, click [OK]. Select this configuration in the work mode list and click [Start] to start data transmission for rover which is shown as below. Figure 4.16 Link status of Rover using PDA network 61 / 66... -
Page 63: Static Survey
User Manual for Surveying GNSS Receiver v1.0 Static Survey Before performing static survey, ensure one battery and one SIM card are installed in Surveying GNSS Receiver. Detailed steps of button operation: 1. Long press power button to power on Oscar; 2. -
Page 64: Figure 4.17 Static Survey Configuration
User Manual for Surveying GNSS Receiver v1.0 4. Back to the main interface of Nuwa app, click [Device] -> [Connect] under an opened project; 5. Select [Oscar] for the Device Type, select [Bluetooth] for the Connect Type, click [Connect Config] to search and pair the Bluetooth address of Oscar, select [Oscar] for the Antenna and click [Connect] to enable communication between the android controller and Oscar. -
Page 65: Issues And Solutions
Issues and Solutions This section lists possible issues and effective solutions to solve them. Please read this section contacting Tersus Technical Support. 1. Surveying GNSS Receiver cannot receive satellite signals. Solution: Change the survey environment, and restart Oscar in an open space. -
Page 66: Terminology
User Manual for Surveying GNSS Receiver v1.0 5. Terminology Alternating Current BeiDou Navigation Satellite System Direct Current eMMC Embedded Multi Media Card GLONASS GLObal NAvigation Satellite System GNSS Global Navigation Satellite System Global Positioning System Global System for Mobile Communications Light Emitting Diode OLED Organic Light-Emitting Diode... - Page 67 Proprietary Notice All Information in this document is subject to change without notice and does not reflect the commitment on Tersus GNSS Inc. No part of this manual may be reproduced or transmitted by all means without authorization of Tersus GNSS Inc.
- Page 68 FCC Statement: Any Changes or modifications not expressly approved by the party responsible for compliance could void the user’s authority to operate the equipment. This device complies with part 15 of the FCC Rules. Operation is subject to the following two conditions: (1) This device may not cause harmful interference, and (2) This device must accept any interference received, including interference that may cause undesired operation.
Need help?
Do you have a question about the Oscar Ultimate and is the answer not in the manual?
Questions and answers