Table of Contents
Advertisement
Quick Links
Moisture meter
Operating Manual
humimeter LM5
Leather moisture meter
for measuring the moisture content of finished
leather products
78,0 °F | 6,16 % | 456 kg/m
| -27,3 td | 0,64 aw | 51,9 %r.H. | 14,8 % abs | 100,4 g/m
| 09 m/s | 4,90 Ugl | 1
3
2
Always read this operating manual before using the humimeter LM5!
Advertisement
Table of Contents

Subscribe to Our Youtube Channel
Related Manuals for Schaller humimeter LM5


Summary of Contents for Schaller humimeter LM5
- Page 1 78,0 °F | 6,16 % | 456 kg/m | -27,3 td | 0,64 aw | 51,9 %r.H. | 14,8 % abs | 100,4 g/m | 09 m/s | 4,90 Ugl | 1 Always read this operating manual before using the humimeter LM5!
-
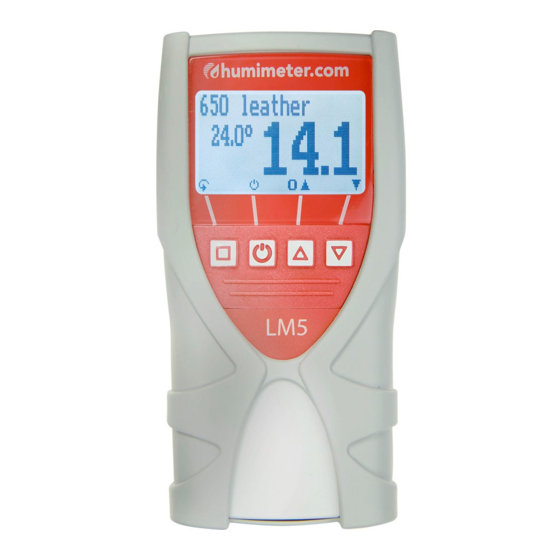
Page 2: Your Humimeter Lm5 At A Glance The Main Unit
LM5 Operating Manual Your humimeter LM5 at a glance The main unit Name USB port (optional) Display Keypad Rubber protection cover Page 2... -
Page 3: Rear Of The Main Unit
Rear of the main unit Name Sensor surface Battery compartment The display Name Product type Moisture content in % (see "6.2 How moisture content is defined") Display symbols Temperature display Page 3... -
Page 4: The Display Symbols
LM5 Operating Manual The display symbols Symbol Name Symbol Name Enter Change input level Down Back Change menu Enter numbers Enter data Enter letters View measurements Continue / go right Delete measurements Left On/off button, display light Save measured value The menus The device has three different menus: product selection, Data Log and main menu. - Page 5 Data Log menu Name Change menu Display illumination / device on/off Save measured value Show the last recorded values Main menu The main menu comprises the following menu items: • Edit Logs: Manual Logs, Clear Logs • Print Logs: Last Log, All Logs, Clear Logs •...
-
Page 6: Table Of Contents
LM5 Operating Manual Table of contents ��������������2 Your humimeter LM5 at a glance The main unit ......................2 Rear of the main unit ....................3 The display .......................3 The display symbols ....................4 The menus .......................4 1 � �������������������9 Introduction Information about this operating manual ..........9 Limitation of liability ................9... - Page 7 Preparing a measurement ..............15 Taking a measurement ................15 Simplified user ..................16 5.3.1 Activating/Deactivating the simplified user ..........16 5.3.2 Using the simplified user ...............16 Hold function - Freezing the displayed values ........17 5.4.1 Activating the Hold function in the Options menu .........17 5.4.2 Using the Hold function ................17 Saving individual readings ..............18...
- Page 8 LM5 Operating Manual Deactivating options ................32 Selecting °C/°F ..................32 Changing the Userlevel .................33 9.7.1 Changing from the advanced to the simplified user ......33 9.7.2 Changing from the simplified user to the advanced user .......33 Reducing the device's power consumption ..........34 9.8.1...
-
Page 9: Introduction
Introduction Information about this operating manual This operating manual is designed to enable you to use the humimeter LM5 safely and effectively. It is part of the device, has to be stored nearby and must be easily acces- sible to users at all times. -
Page 10: Symbols Used In This Manual
LM5 Operating Manual Symbols used in this manual All of the safety information provided in this manual is shown with a corresponding symbol. ATTENTION It is essential to observe this warning. Non-compliance can lead to damage to property or equipment. -
Page 11: For Your Safety
For your safety The device complies with the following European directives: • Restriction of Hazardous Substances in Electrical and Electronic Equipment (RoHS) • Electromagnetic compatibility (EMC) The device corresponds to state-of-the-art technology. However, it is still associated with a number of residual hazards. These hazards can be avoided through strict observance of our safety information. -
Page 12: General Safety Information
• In case of damages or loose parts on the device, remove the batteries and con- tact Schaller GmbH or your dealer. All of the device’s technical features have been inspected and tested before delivery. Every device has a serial number. Do not remove the tag with the serial number. -
Page 13: Inserting Batteries
• Rubber protection cover • Operating manual Optional accessories: • humimeter USB data interface module - USB stick with software and USB cable • Battery operated portable thermal printer (only possible together with humimeter USB data interface module) - Described in a separate operating manual •... -
Page 14: Using The Device - Basics
LM5 Operating Manual Using the device - Basics Switching the device on • Press the button for 3 seconds. » The display will then show the status indicator (figure 6). » After inserting the batteries, the device switches on automatically. -
Page 15: The Measuring Process
The measuring process Preparing a measurement To do so: The device has to have nearly the same temperature than the product being measured. It is recommended to let your humimeter device adjust to the surrounding temperature of the leather before the measurement. -
Page 16: Simplified User
LM5 Operating Manual Information - Measuring accuracy This rapid and non-destructive measuring procedure allows you to quickly take moisture readings at a number of different points. When saving the individual readings, the device will automatically calculate the readings' average (see "5.6... -
Page 17: Hold Function - Freezing The Displayed Values
Hold function - Freezing the displayed values The device can be configured in such a way that the information being shown on the display will freeze at the touch of a button until a new button is pressed. This function can be very useful when e.g. -
Page 18: Saving Individual Readings
LM5 Operating Manual Saving individual readings The device can be configured in such a way that the device will save a reading every time a button is pressed. This option (manual saving function) is the device’s default setting. 5.5.1... -
Page 19: Saving Several Readings (A Measurement Series) At The Same Time
Inputting letters: Press and hold to quickly scroll to the required letter and either press it for 3 seconds or press to confirm the selected letter (figure 22). Inputting numbers: Press and hold to quickly scroll to the required number and either press it for 3 seconds or press to confirm the selected number. - Page 20 LM5 Operating Manual Inputting letters: Press and hold to quickly scroll to the required letter and either press it for 3 seconds or press to confirm the selected letter (figure 25). Inputting numbers: Press and hold to quickly scroll to the...
-
Page 21: Viewing Individual Readings
Viewing individual readings To do so: You must have saved a reading (e.g. 1 log ). The display will now appear as shown in figure 26. Press Select the required reading. To do so, press » The display will now appear as shown in figure 27. »... -
Page 22: Deleting All Measured Values (Data Log)
LM5 Operating Manual Deleting all measured values (data log) To do so: You must have taken and saved one or several readings. Press twice or hold for 2 seconds. Select Edit Logs (figure 32). To do so, press and confirm by pressing Select Clear Logs (figure 33). -
Page 23: Deleting Individual Values From A Single Series Of Measurements
» The display will then show the message clear? (figure 38). Confirm by pressing » The value has been deleted. 5.11 Deleting individual values from a single series of measurements To do so: You must have saved a series of measurements comprising at least 2 logs. -
Page 24: Product Types
Selecting the product type Due to different manufacturing processes and different densities of leather, there are no default product type categories. The humimeter LM5's readings are based on densi- ties, which is why it is the decisive factor for the different product types. -
Page 25: How Moisture Content Is Defined
Compare the readings recorded for the different product types with those of the actual moisture content established using the reference measurement. From now on, always use the product type that most closely matches the reference measurement. » Note: You can change the product type name to a name of your choice (e.g. to the name of the leather). -
Page 26: Using The Logmemorizer Program
Exporting measured values to a computer To do so: LogMemorizer must be installed. And you must have taken and saved one or several moisture readings. Options: You can export moisture readings from the humimeter LM5 or initiate the export at your computer. Page 26... - Page 27 LM5 will now be sent to your computer. Initiating the data export at your computer Connect the humimeter LM5 to your computer using the supplied USB cable: Insert the USB Mini B connector into the humi- meter LM5 (figure 50).
- Page 28 (for importing the most recent manually saved Import most recent manual log logs) Name Import all manual logs Import most recent manual » The measuring values saved on the humimeter LM5 will now be sent to your computer. Page 28...
-
Page 29: Checking The Device's Status
Checking the device's status Press twice or hold for 2 seconds. Select Status . To do so, press and confirm by pressing » The display will then show the status indicator humimeter . » The display will show the following information: Name Serial number Software version... -
Page 30: Configuring The Device
LM5 Operating Manual Configuring the device Turning on Bluetooth The information on Bluetooth is provided in a separate operating manual. Adjust the date/time Press twice or hold for 2 seconds. Select Options . To do so, press and confirm by pressing Select Date/Time . -
Page 31: Selecting A Language
Selecting a language Press twice or hold for 2 seconds. Select Options . To do so, press and confirm by pressing Select Language . To do so, press and confirm by pressing Navigate to the required language. To do so, press and confirm by pressing »... -
Page 32: Deactivating Options
LM5 Operating Manual » The °C/°F, Userlevel, BL On Time , Auto Off Time , Materialcalibration, Password, Reset options are now activated. Press to leave the Options menu. Press to leave the main menu. Deactivating options Once the device has been switched restarted, the °C/°F, Userlevel, BL On Time , Auto Off... -
Page 33: Changing The Userlevel
Changing the Userlevel 9.7.1 Changing from the advanced to the simplified user To do so: All of the options must be activated (see "9.4 Activating options"). Press twice or hold for 2 seconds. Select Options . To do so, press and confirm by pressing Select Userlevel . -
Page 34: Reducing The Device's Power Consumption
LM5 Operating Manual Reducing the device's power consumption 9.8.1 Configuring the display illumination time To do so: All of the options must be activated (see "9.4 Activating options"). Press twice or hold for 2 seconds. Select Options . To do so, press and confirm by pressing Select BL On Time . -
Page 35: Configuring The Material Calibration Function
Configuring the material calibration function The type calibration function is described in a separate operating manual. 9.10 Changing the password To do so: All of the options must be activated (see "9.4 Activating options"). Press twice or hold for 2 seconds. Select Options . -
Page 36: Resetting The Device To Its Factory Settings
LM5 Operating Manual 9.11 Resetting the device to its factory settings To do so: All of the options must be activated (see "9.4 Activating options"). Press twice or hold for 2 seconds. Select Options . To do so, press and confirm by pressing Select Reset . -
Page 37: Checking The Calibration
10.2 Checking the calibration The device’s calibration should be checked every four weeks. When doing so, use the test plate supplied with the device. To do so: The device and test plate must have a tempera- ture of between 20 °C and 26 °C. Place the case on top of a wooden table. -
Page 38: Calibrating The Moisture Meter
LM5 Operating Manual 10.3 Calibrating the moisture meter To do so: The device must have a temperature of between 20 °C and 26 °C. Switch on the device. Press twice or hold for 2 seconds. Select Options . To do so, press and confirm by pressing Select Reinitialize (figure 65). -
Page 39: Cleaning The Device
10.5 Cleaning the device ATTENTION Do not clean with fluids Water or cleaning fluid getting inside the device can destroy the device. Only clean with dry materials. ► Sensor surface • Clean the sensor surface with a cloth. Page 39... -
Page 40: Faults
LM5 Operating Manual 11. Faults If the measures listed below fail to remedy any faults or if the device has faults not listed here, please contact Schaller GmbH. Fault Cause Remedy Measuring error The temperature of the The temperature of the mate-... -
Page 41: Storage And Disposal
Fault Cause Remedy Rubber protection cover Mount the rubber protection mounted in the wrong cover as shown in "The main direction unit" page 2 "Rear of the main unit" page Polluted sensor surface Clean the sensor surface (see "10.5 Cleaning the device") Data transfer to Log- Interface has not been... -
Page 42: Device Information
LM5 Operating Manual 13. Device information 13.1 EC declaration of conformity DECLARATION OF CONFORMITY______ Schaller GmbH Max-Schaller-Straße 99 A – 8181 St. Ruprecht in accordance with the following Directives: EMV - Richtlinie 2014/30/EU, RoHS - Directives 2011/65/EG, hereby declare that the following product types:... -
Page 43: Technical Data
13.2 Technical data Display resolution 0.1 % moisture content, 0.5 °C/°F temperature Measuring range 3 % to 20 % moisture content Operating temperature 0 °C to +40 °C Storage temperature -20 °C to +60 °C Temperature compensation Automatic Data memory Up to 10,000 measuring values Measuring depth 5 mm... - Page 44 Climate Materials Environment Buildings Food Bioenergy Paper / Board Grubatec AG Wölferstrasse 5 CH 4414 Füllinsdorf Tel.:+41(0)556170080 Fax:+41 (0)556170081 sales@grubatec.ch www.grubatec.ch...
Need help?
Do you have a question about the humimeter LM5 and is the answer not in the manual?
Questions and answers