
Related Manuals for Schaller humimeter PM3


Summary of Contents for Schaller humimeter PM3
- Page 1 User manual humimeter PM3 paper moisture meter version 1.2_en © Schaller GmbH 2012...
-
Page 2: Measuring Procedure
Measuring procedure 1. Switch on the device by pressing the power button ( ) for 3 sec. 2. Select the right calibration curve using the buttons . The name of the calibration curve is shown at the top of the display. Please see the instructions for selection of calibration curve below. - Page 3 Determination of the reference water content The humimeter PM3 determines the water content, which means that it calculates the moisture referred to the total mass (EN ISO 287): Mass of the sample before drying −...
- Page 4 Calibration curves density name paper type 600 kg/m³ 600 paper Very low density paper 650 kg/m³ 650 paper Low density paper 700 kg/m³ 700 paper Low density paper 750 kg/m³ 750 paper Fluting, Schrenz 800 kg/m³ 800 paper Newsprint paper 850 kg/m³...
-
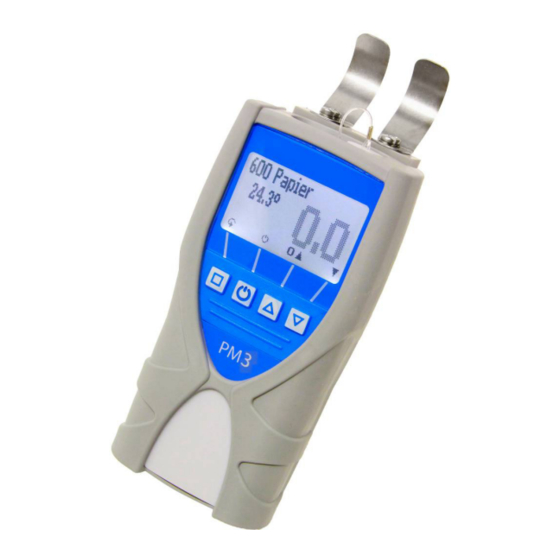
Page 5: Design Of The Device
Design of the device steel clamp (sensor area) name of measuring calibration value curve water content measuring changing the value calibration temperature curve rolling menu protective button rubber housing (removable) ON-OFF batteries slot button (backside) Device maintenance instructions To provide a long life of your device please do not expose it to strong mechanical loads or heat e.g. -
Page 6: Menu Level Overview
Keypad symbols Menu level overview measuring window: Rolling menu Power ON / OFF type selection menu Switch upper Switch lower Save Next calibration curve Previous calibration curve Hold Power off (3 sec.) Watch saved data Add supplier´s data store menu menu: Enter Watch last saved data... -
Page 7: Checking The Calibration
Checking the calibration We recommend to check the calibration of your humimeter PM3 every 4 weeks, using the proof plate delivered with the device. For this check the device has to show a temperature between 18,0 and 24,0° C. Switch on the instrument and select the calibration curve „reference“... -
Page 8: Changing The Batteries
Each device includes a serial number and the guarantee stamp. If those are broken, no claims for guarantee can be made. In case of a faulty device, please contact Schaller GmbH (www.humimeter.com) or your dealer. page 8... - Page 9 The bigger connector has to be connected to a USB slot on your PC. Start the LogMemorizer software on your PC and switch on your humimeter PM3. The data transfer can be started on your humimeter or on the software:...
- Page 10 PM3. At first plug in the side of the connector with the close plastic casing at the humimeter PM3. Then switch on the device. Not till then the other side of the cable has to be plugged in at the printer.
-
Page 11: Technical Data
182 x 75 x 54 mm (with rubber housing) Weight 330g (incl. batteries and rubber housing) Protection class IP 40 Scope of supply humimeter PM3, 4 pcs. 1,5 Volt AA Alkaline batteries, plastic case, proof plate, protective rubber housing, user manual Options data interface module incl. software and cable, mobile printer (only with option 1) version 1.2_en... - Page 12 Common reasons for incorrect measurements • Wrong calibration curve Double-check the correct selection of the calibration curve before measuring. The calibration curve „reference“ must NOT be used. • Inadequate thickness of the paper pile A single sheet of paper must NOT be measured. Make sure that the paper pile below the steel clamps has a thickness of at least 100 mm.
Need help?
Do you have a question about the humimeter PM3 and is the answer not in the manual?
Questions and answers