Advertisement
Scan for full manual
Step 1: Check what's in the box
WP-211X
4K HDR HDMI Auto Switcher Wall Plate
Frame (or frame set) and faceplate
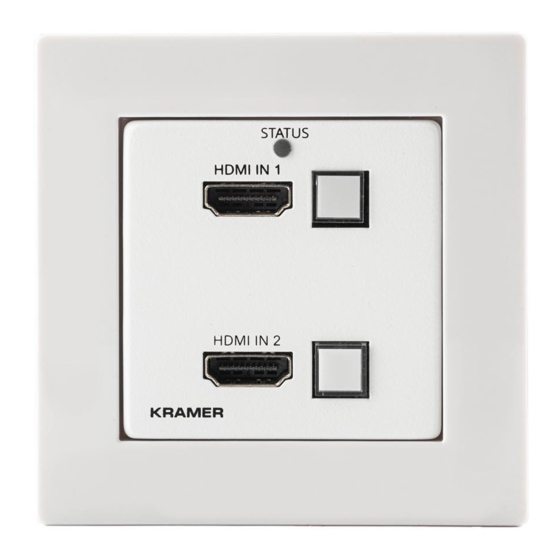
Step 2: Get to know your WP-211X
#
Feature
1
HDMI IN 2 Connector
HDMI IN 2 Button
2
HDMI IN 1 Connector
HDMI IN 1 Button
3
STATUS LED
4
PROG Mini USB Connector
5
SETUP 4-way DIP-Switches
6
Ring Tongue Terminal Grounding Screw
7
AUDIO OUT 3-pin Terminal Block Connector
8
Power Supply 2-pin Terminal Block
Connector
9
HDMI OUT Connector
The terms HDMI, HDMI High-Definition Multimedia Interface, and the HDMI Logo are trademarks or registered trademarks of HDMI Licensing Administrator, Inc.
WP-211X Quick Start
WP-211X Quick Start Guide
This guide helps you install and use your
Go to
www.kramerav.com/downloads/WP-211X
upgrades are available.
Function
Connects to an HDMI source.
Press to select the HDMI 2 input (button lights orange).
Connects to an HDMI source.
Press to select the HDMI 1 input (button lights orange).
Lights green when the device is powered and blue when an HDMI output is
connected.
Connect to upgrade the firmware.
Set the operation DIP-switches (see
Connect to grounding wire (optional).
Connect to an unbalanced analog audio acceptor.
Connect to the power supply. Connect GND to GND, +12V to +12V.
Connect to an HDMI acceptor.
WP-211X
for the first time.
to download the latest user manual and check if firmware
1 Quick start guide
1 Power adapter and cord
Setting the
P/N: 2 9 0 0 - 3 0 1 3 9 8 QS
Installation accessories
DIP-Switches).
Rev: 1
Advertisement
Table of Contents

Related Manuals for Kramer WP-211X


Summary of Contents for Kramer WP-211X
- Page 1 4K HDR HDMI Auto Switcher Wall Plate 1 Quick start guide Installation accessories Frame (or frame set) and faceplate 1 Power adapter and cord Step 2: Get to know your WP-211X Feature Function HDMI IN 2 Connector Connects to an HDMI source.
- Page 2 Step 4: Connect the inputs and outputs Always switch OFF the power on each device before connecting it to your WP-211X. For best results, we recommend that you always use Kramer high-performance cables to connect AV equipment to the WP-211X.
- Page 3 Off – EDID Locked. EDID lock On – EDID parameters are passed-through. Reserved for Factory Use It is mandatory to keep set to OFF. For optimum range and performance use the recommended Kramer cables available at www.kramerav.com/product/WP-211X WP-211X Grounding the (Optional) Connect the ring tongue terminal to the building grounding point wire (a green-yellow, AWG#18 (0.82mm...
Need help?
Do you have a question about the WP-211X and is the answer not in the manual?
Questions and answers