Kramer VIA CONNECT PRO User Manual
Collaboration hub
Hide thumbs
Also See for VIA CONNECT PRO:
- User manual (131 pages) ,
- Quick start manual (4 pages) ,
- User manual (63 pages)
Table of Contents
Advertisement
Quick Links
Download this manual
See also:
User Manual
Advertisement
Table of Contents

Related Manuals for Kramer VIA CONNECT PRO


Summary of Contents for Kramer VIA CONNECT PRO
-
Page 1: User Manual
USER MANUAL MODEL: VIA Connect PRO Collaboration Hub (For Firmware Version 2.0) P/N: 2900-300419 Rev 4 www.kramerAV.com... -
Page 6: Table Of Contents
Logging-In to VIA connect PRO by QR Code Scanning Logging-In to VIA Connect PRO Using a VIA Pad Logging-In to VIA Connect PRO Using a VIA NFC Tag for Android Using iOS/OS X / Android Mirroring to Share your Screen... -
Page 7: Introduction
Each participant in a VIA Connect PRO session can quickly view, edit, annotate, comment, and share content with other participants. Participants can share their ideas through the primary screen, or break off with others into smaller groups during a meeting. -
Page 8: Applications & Features
Here are just a few of the things you can do with VIA Connect PRO: • Multiviewing: Up to four different participant screens can be shown at the same time. -
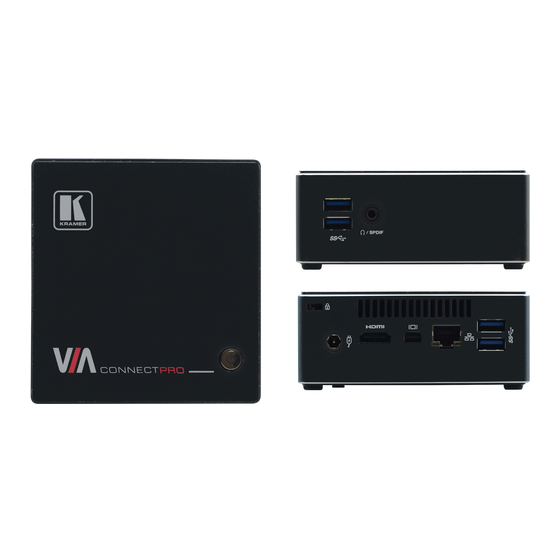
Page 9: Controls And Connections
Controls and Connections This section defines VIA Connect PRO. Figure 1: VIA Connect PRO Collaboration Hub Feature Function USB 3.0 Connectors Connect to up to two USB devices Ω/SPDIF 3.5mm Mini Jack Connects to earphones or a speaker (digital embedded audio from HDMI and analog audio supported;... -
Page 10: Setting Up Via Connect Pro
Always switch off the power to each device before connecting it to your VIA Connect PRO. After connecting VIA Connect PRO, connect its power and then switch on the power to each device. To connect the VIA Connect PRO as illustrated in the example in Figure 2 need: •... -
Page 11: Connecting Via Connect Pro To A Display
HDMI and Mini DisplayPort jacks. For full functionality, VIA Connect PRO must be connected to a local area network (LAN). You must assign an IP address to the VIA Connect PRO. However, your VIA Connect PRO is set on DHCP mode by default. -
Page 12: Downloading And Running Via Connect Pro Software
(PC, Mac) or the appropriate Android/iOS or Windows Phone app. To access the PC and Mac executable files: • Open your Web browser and enter the IP address for your VIA Connect PRO unit • Your Web browser recognizes your OS (MAC/Windows) and directs you to the correct client software •... - Page 13 C: drive. It creates a shortcut on the desktop for easy access. For tablets and smartphones, the Kramer VIA app is found in the App Store (iOS) and Google Play (Android) and Windows Store (Windows Phone). Alternatively, you can open your Web browser on your mobile device and enter the IP address for your VIA Connect PRO unit;...
-
Page 14: Using An.msi File
VIA Connect PRO iOS, Android and Windows Phone • First, enter the IP address for the VIA Connect PRO. This is found on the main display screen in the lower left • Next, choose a username (nickname) for your device (it can be any mix of letters and numbers) then enter it on the login screen of your device •... -
Page 15: Logging-In To Via Connect Pro By Qr Code Scanning
Logging-In to VIA connect PRO by QR Code Scanning iOS, Android & Windows Phone Launch the application on your mobile device and click the QR code icon (on the lower right corner). Put your mobile device in front of the VIA main display QR code (found on the VIA main display screen in the lower right corner). -
Page 16: Logging-In To Via Connect Pro Using A Via Pad
Pressing once again: Stops presenting. • Long press to display on the full screen when you are not the only one who is already presenting. Logging-In to VIA Connect PRO Using a VIA NFC Tag for Android To write an NFC tag: •... -
Page 17: Using Ios/Os X / Android Mirroring To Share Your Screen
All participants in a meeting using an Apple device can mirror their screen by using the Airplay service. No application is required to activate this mode. However, the VIA Connect PRO unit must run firmware version 1.9 or later and iOS mirroring feature must be enabled (see the “settings” section for more details). - Page 18 Swipe up from the bottom and swipe the toggle button to disconnect mirroring then tap to select "iPhone/iPad" accordingly. Note: If the room code is enabled on the VIA Connect PRO, you are prompted to enter the same 4-digit security code when attempting to mirror your iOS device.
- Page 19 Check that your Mac is running OS X 10.10 version as a minimum requirement to support this feature (Yosemite). El Capitan is recommended. • Connect your Apple device to the network where the VIA Connect PRO resides. • Click the AirPlay menu on the Apple Menu Bar. This is located in the top right corner of the screen near the clock.
- Page 20 Note: If the Room Code is enabled on the VIA Connect PRO, you are prompted to enter the same 4-digit security code when attempting to mirror you iOS device. This code appears on the main screen of the VIA Connect PRO.
- Page 21 7. To stop sharing your screen, re-open the VIA application and click on Stop Presenting. Note: Android mirroring does not support audio. Audio is heard from your device and not from the output of the VIA device. VIA Connect PRO - Setting Up VIA Connect PRO...
-
Page 22: Defining Via Connect Pro Functions
Defining VIA Connect PRO Functions VIA Connect PRO presents two types of screens depending whether it is being used by the Admin or by a User. The following screen shots illustrate both types. Figure 3 shows the VIA Connect PRO main Admin screen and its functions:... -
Page 23: Figure 4: Via Connect Pro Main User Screen And Features
Figure 4 shows the VIA Connect PRO main User screen and its functions: Figure 4: VIA Connect PRO Main User Screen and Features Item Icon Action Features Allows user to see and access all available features of VIA Connect PRO... -
Page 24: Using Via Connect Pro
Using VIA Connect PRO VIA Connect PRO is a powerful and versatile collaboration hub that gives participants a wide selection of presentation tools. In this section, we’ll look at each of those tools and discuss briefly how it works. VIA Connect PRO Main Menu This section refers to the user's experience. -
Page 25: Enabling Control
5, user Dave has stepped in and the Admin has taken control of Dave): The admin can work on Dave's system as he has taken control. (Admin can play media or work on a document or presentation file collaboratively with Dave). VIA Connect PRO - Using VIA Connect PRO... -
Page 26: Chatting With Participants
Start Collaboration icon and drag his laptop mouse to the top and off their local screen. That cursor now moves to the VIA Connect PRO unit and appears on the main display of Dave. Buttons are shown in the picture below:... -
Page 27: File Transfer
The user can check for active chat sessions by going to Features > Chat File Transfer VIA Connect PRO can transfer files between PC/Mac/Mobile logged in users. To share a file: • Go to the participant list and click on the file share icon for the desired participant with whom you wish to share a file. -
Page 28: Figure 7: Admin File Sharing
Once completed, the file is saved on that participant’s system. Figure 8: User File Sharing When completed, the file is saved at receiver’s system. You can check or cancel currently sharing file from Features > File Transfer. VIA Connect PRO - Using VIA Connect PRO... -
Page 29: Multimedia
VIA unit. All videos are being encoded directly on your BYOD device through the VIA software and then streamed from your device to the VIA unit. The VIA unit then decodes the streamed file for playback. VIA Connect PRO - Using VIA Connect PRO... - Page 30 VIA Connect PRO supports RTSP. A media being played locally on a computer can be streamed on a VIA Connect PRO unit, provided the computer and VIA Connect PRO are on connected networks.
- Page 31 4. Click Next on the next screen. 5. Choose RTSP from the New Destination drop down and click Add. 6. Enter a short name to be used as Path, uncheck Activate Transcoding and click Next. VIA Connect PRO - Using VIA Connect PRO...
- Page 32 8. Check Stream all elementary streams and click Stream. 8. Open VIA Connect PRO client and click Features > Multimedia > Streaming Player. 9. Type a name as the URL name. VIA Connect PRO - Using VIA Connect PRO...
- Page 33 Web-based push-to-talk features. VIA Connect PRO supports RTP. A media can stream on a VIA Connect PRO unit, provided the computer and VIA Connect PRO are on connected networks. VIA Connect PRO - Using VIA Connect PRO...
- Page 34 5. Choose RTP/MPEG Transport Stream from the New Destination drop down and click Add. 6. Enter VIA Connect PRO unit’s IP address and click Stream. 7. Open VIA Connect PRO client and click Features > Multimedia > Streaming Player. 8. Type a name as the URL name.
-
Page 35: Via Cloud (Files)
Cloud launches a standard file management system, enabling you to select files to share with other participants. VIA Connect PRO has 32 Gb of internal memory. The Cloud on the client user interface is the feature used to send a file from your computer to all participants. -
Page 36: Whiteboard Collaboration
Click on Start Collaboration or Whiteboard icon • Drag the cursor to the main display • Start annotate by using whiteboard tools Multiple users can interact, annotate and control the main display at the same time. VIA Connect PRO - Using VIA Connect PRO... -
Page 37: Figure 10: Whiteboard Toolbar
A toolbar is available for making annotations on your desktop and capturing an object. For example, capture an area of the screen and add it as an object in your current page. VIA Connect PRO - Using VIA Connect PRO... -
Page 38: Using The Via Connect Pro Settings Menu
Exit Exits the whiteboard Using the VIA Connect PRO Settings Menu The Settings menu is where you configure your VIA Connect PRO unit. More settings are available from the web interface management console. The Settings menu tabs include: •... -
Page 39: Figure 11: Settings Screen
When changing these settings, make sure they are correct. Incorrect values can cause a loss of communication. To change the IP address: • Click on LAN Settings • Select IP configuration -> Static VIA Connect PRO - Using VIA Connect PRO... -
Page 40: Figure 12: Lan Settings Screen
System Control Settings System controls access the control panel, audio settings, display settings, task manager, system health and log files of the VIA Connect PRO unit. The log folder is only available if system logging is activated from the configurations tab of settings. -
Page 41: Managing Settings From The Via Web Management Interface
Managing Settings from the VIA Web Management Interface To manage settings using the Web browser: • Open the Web browser and enter the IP address for your VIA Connect PRO unit • Enter user name “su” and password “supass”. VIA Connect PRO - Using VIA Connect PRO... - Page 42 Plug and Play setup when connecting your Connect PRO to the network. Information about the Disk Space in use can be found here, as well as the MAC address of the VIA Connect PRO device. VIA Connect PRO - Using VIA Connect PRO...
- Page 43 4.9.2 VIA Pad Configuration For entities using VIA Pad, the first required step is to configure VIA Connect PRO to allow it to pair the VIA Pad devices. VIA Pad Configuration • Guest mode: Enable this mode in case you want the VIA Pad to act as a simple “Present / Stop Presenting”...
- Page 44 VIA Site Management Server (VSM Server) is an optional software application (subject to a separate pricing) that allows an administrator to monitor and make changes to all connected VIA Connect PRO or Connect gateways. It is a Web- based interface that allows the administrator to: •...
- Page 45 Choose the settings “From VIA Site Management” to download the setting from the VIA Site Management server or choose “From Gateway” to keep the local settings. • Click Reboot to restart the unit VIA Connect PRO - Using VIA Connect PRO...
- Page 46 Select Wallpaper (must be an image file – jpeg, png, bmp) from your system All previously uploaded wallpapers are saved and shown as below. To select one of them, click on “Set”. To delete one of them, click “Delete”. VIA Connect PRO - Using VIA Connect PRO...
- Page 47 • Activate System Log – Activates the logging of all system activity either by the client or the gateway to aid diagnosing a problem with VIA Connect PRO • Activate Energy Saver Mode – To allow your unit to enter into sleep mode after 15 minutes of inactivity •...
- Page 48 You can select “Print QR Code” if you need to get a hard copy of it for displaying it in the room. • To relocate the QR code on the VIA main display, click and drag it with the mouse and drop it anywhere on the screen. VIA Connect PRO - Using VIA Connect PRO...
- Page 49 Room Name, enter the new address or DNS name, then click on Apply and reboot VIA Connect PRO. To login any device to the VIA Connect PRO client, you must enter the same Room Name in the location field on your device •...
- Page 50 Additionally, it defaults to allow 4 iOS devices to be mirrored to the VIA Connect PRO simultaneously. This setting can also be changed. Once these setting changes have been made, click Apply. Reboot the VIA Connect PRO to allows the settings to take effect.
- Page 51 VIA Connect PRO - Using VIA Connect PRO...
- Page 52 Database Based This mode requires building a database of users who can access the system. The users receive credentials (username and password). There are two default users available to login into VIA Connect PRO client in Moderator mode. Moderator: •...
- Page 53 To create users: • Open the VIA Connect PRO Web site by entering the VIA Connect PRO IP address in any Web browser (or open a browser from any client PC connected to the same network and enter the VIA Connect PRO IP address) •...
- Page 54 Enter the room code (if Room Code is activated) • Click Login To start a presentation: • Click “Present” and VIA Connect PRO sends a request to the moderator for display permission • The moderator clicks on “Allow” to start the participant’s presentation on the collaboration display •...
- Page 55 Active Directory groups or organizational units: • Moderator: A user with meeting moderator rights i.e., this user can directly display his/her screen on a VIA Connect PRO Gateway and can allow a participant requesting for presentation on the main display. •...
- Page 56 5. Based on the above selection, type the name of Moderator and Participant Group/OU in their respective boxes. Note: VIA Connect PRO does not discover and connect to the Active Directory; rather it relies on you to correctly enter the details. If there is a typographical error in any of fields, the users (Moderators and Participants) cannot log in.
- Page 57 Once a password is entered, click Apply and reboot the VIA device. To login into the VIA Connect PRO client when basic moderator mode is activated: 1. Open the VIA Connect PRO client and enter the location (IP address of the VIA Connect PRO gateway).
- Page 58 Make sure you click on “Apply” and Reboot your unit to apply these changes. VIA Connect PRO - Using VIA Connect PRO...
- Page 59 Make sure you click on “Apply” and Reboot your unit to apply these changes. 4.9.9 Mobile Features Manage the features available on the VIA client (mobile/tablet) applications VIA Connect PRO - Using VIA Connect PRO...
- Page 60 Using Gateway/Webadmin Activity Log 4.9.11 Update Firmware To update your VIA Connect PRO unit through this interface, ONLY use the .rpm file available for download from our technical support Web page: http://www.kramerav.com/support/downloads.asp Upon completion of the process, reboot the unit.
- Page 61 Click on Utilities on the left menu and then select Maintenance. You can select one by one the default configurations you would like to reset or simply click on “select all” to reset to complete default factory settings. VIA Connect PRO - Using VIA Connect PRO...
-
Page 62: User Experience
4.10 User Experience VIA Connect PRO enables a high level of collaboration in meetings. Participants can share files, chat, edit a common document, or stream full HD (1080p/60) video content. Following is a summary of VIA Connect PRO functions: Collaboration capabilities have been enhanced with the addition of the popular cloud services: •... - Page 63 (photo, document or video) and choose to upload it to your cloud service account, for later usage. Note: Different devices enable different features depending on the device capabilities. See the following illustrations. VIA Connect PRO - Using VIA Connect PRO...
-
Page 64: Figure 14: Samsung Galaxy S6
Figure 14: Samsung Galaxy S6 VIA Connect PRO - Using VIA Connect PRO... -
Page 65: Figure 15: Iphone 6S
Figure 15: iPhone 6S+ VIA Connect PRO - Using VIA Connect PRO... -
Page 66: Figure 16: Pc/Mac
Figure 16: PC/MAC VIA Connect PRO - Using VIA Connect PRO... -
Page 67: Technical Specifications
11.8cm x 11.5cm x 4.0cm (4.6” x 4.5” x 1.6”) W, D, H. NET WEIGHT: 0.475kg (1.0lbs) INCLUDED ACCESSORIES: 3 power cords (US, EU, UK), Kramer mini DP to VGA adapter, VESA mounting bracket Specifications are subject to change without notice at www.kramerav.com... -
Page 69: Safety Warning
SAFETY WARNING Disconnect the unit from the power supply before opening and servicing For the latest information on our products and a list of Kramer distributors, visit our Web site to find updates to this user manual. We welcome your questions, comments, and feedback.
Need help?
Do you have a question about the VIA CONNECT PRO and is the answer not in the manual?
Questions and answers