Advertisement
Quick Links
Scan for full manual
Step 1: Check what's in the box
WP-211T 1 Gang Ethernet and K-NET Control Keypad
1 Frame (or frame set) and faceplate
Step 2: Get to know your WP-211T
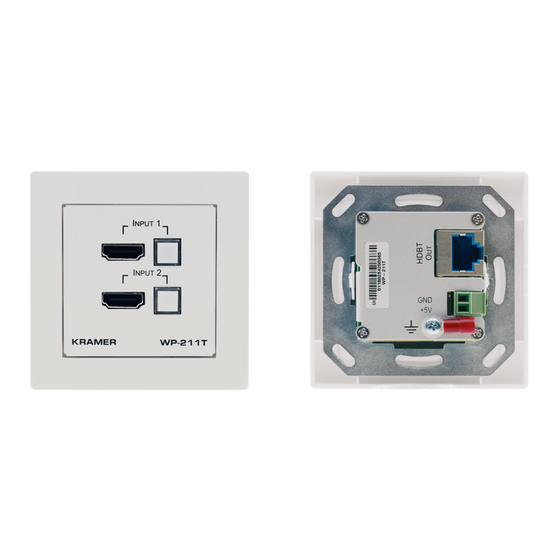
#
Feature
1
INPUT 1
HDMI Connector
Button
2
Operation Mode
DIP-switches
WP-211T DIP-switches are located behind the faceplate and should be set during installation, before placing the
faceplate. Pressing an input button manually selects that input, independent of the DIP-switch settings.
3
INPUT 2
HDMI™ Connector
Button
4
Grounding Screw
WP-211T Quick Start
WP-211T Quick Start Guide
This guide helps you install and use your WP-211T for the first time.
Go to
www.kramerav.com/downloads/WP-211T
upgrades are available.
Function
Connect to an HDMI source to route to HDBT OUT.
Press momentarily to manually select HDMI 1 (button lights orange).
By-default the DIP-switches are both set to OFF (left).
Controlling via the INPUT buttons overrides all DIP-switch settings and automatic
switching until the manually selected source disconnects, becomes inactive or WP-211T
is powered off.
DIP-switch 1
DIP-Switch 2
Connect to an HDMI Source to route to HDBT OUT.
Press momentarily to manually select HDMI 2 (button lights orange).
Connect to the common ground (optional) to prevent static electricity from impacting the
performance of the unit.
to download the latest user manual and check if firmware
1 Power adapter and cord
Installation accessories
OFF (left) - Last connected mode.
ON (right) - Priority mode according to DIP-switch 2 settings.
OFF (left) - INPUT 1 is the default priority.
ON (right) INPUT 2 is the default priority.
P/N:
2 9 0 0 - 3 0 1 0 8 8 QS
1 Quick start guide
4
Rev:
Advertisement

Subscribe to Our Youtube Channel
Related Manuals for Kramer WP-211T


Summary of Contents for Kramer WP-211T
- Page 1 OFF (left) - INPUT 1 is the default priority. ON (right) INPUT 2 is the default priority. WP-211T DIP-switches are located behind the faceplate and should be set during installation, before placing the faceplate. Pressing an input button manually selects that input, independent of the DIP-switch settings.
- Page 2 Step 3: Connect the inputs and outputs Always switch OFF the power on each device before connecting it to your WP-211T. For best results, we recommend that you always use Kramer high-performance cables to connect AV equipment to the WP-211T.
- Page 3 UK: 1 Gang in-wall junction box, 75x75mm (W, H), and depth that can fit in both the device and the connected cables (BS 4662). Step 5: Connect the power If the device is not powered via HDBT PoE, connect the 5V DC power adapter to the WP-211T and plug the adapter into the mains. Safety Instructions Caution: There are no operator serviceable parts inside the unit.
- Page 4 Technical Specifications Inputs 2 HDMI On female HDMI connectors Outputs 1 HDBT On a female RJ-45 connector Video Max. Data Rate 8.91Gbps (2.97Gbps per graphic channel) Max. Resolution 4K@60Hz (4:2:0) Standard Compliance HDCP 2.2 (does not support conversion to HDCP 1.4), HDMI 1.4 Controls DIP-Switches...
Need help?
Do you have a question about the WP-211T and is the answer not in the manual?
Questions and answers