Table of Contents
Advertisement
Quick Links
Advertisement
Table of Contents

Related Manuals for Kramer VP-796A


Summary of Contents for Kramer VP-796A
- Page 1 VP-796(A)(ASV) / VP-797A(ASV) / VP-798ASV User’s Manual...
- Page 2 DOCUMENTATION, even if advised of the possibility of such damages. In particular, and without prejudice to the generality of the foregoing, Kramer has no liability for any programs or data stored or used with Kramer software, including costs of recovering such programs or data.
-
Page 3: Table Of Contents
ORMATS ....................22 OMMUNICATIONS PECIFICATION 4.6.1 TCP/IP Port ......................... 22 4.6.2 Serial Connector pinout and RS-232 Configuration Settings ..........22 5. UNIT CONTROL ........................23 6. FRONT PANEL CONTROL ......................23 © KRAMER ELECTRONICS LTD. Issue 1-16 May 30, 2017... - Page 4 ..................... 63 YSTEM RESTORE FROM AN IMAGE FILE 9. ENVIRONMENTAL AND EMC ....................65 ..................65 ECOMMENDED PERATING ONDITIONS ............................65 TORAGE FCC C ......................65 OMPLIANCE PAT T ..........................65 ESTING © KRAMER ELECTRONICS LTD. Issue 1-16 May 30, 2017...
-
Page 5: List Of Figures
Table 2: Embedded HDMI & SDI Output Audio Formats ................. 20 Table 3: Supported Video Formats ......................21 Table 4: Serial Connector Pinout ......................22 Table 5: RS-232 communication settings ....................22 Table 6: I/O Lock behaviour ........................37 © KRAMER ELECTRONICS LTD. Issue 1-16 May 30, 2017... -
Page 6: Safety Warnings
PERSONNEL. ALWAYS DISCONNECT THE POWER CABLE FROM THE MAINS OUTLET BEFORE ANY COVER IS REMOVED. • THIS EQUIPMENT CONTAINS NO USER SERVICEABLE PARTS. REFER ALL SERVICING AND MAINTENANCE TO QUALIFIED SERVICE PERSONNEL. © KRAMER ELECTRONICS LTD. Issue 1-16 May 30, 2017... -
Page 7: Introduction
1. Introduction This manual explains how to operate your VP-796(A)(ASV) / VP-797A(ASV) / VP-798ASV Scaler-Switcher. If you have any questions relating to this or any other product supplied by Kramer please visit our web site www.kramerav.com. System Overview The VP-796(A)(ASV) / VP-797A(ASV) / VP-798ASV series of products feature excellent image processing algorithms for the very best in scaling, motion-adaptive de-interlacing and automatic film 3:2 and 2:2 pull-down correction. -
Page 8: Table 1: Table Of Models
VP-796A, VP-796ASV, VP-797A, VP-797ASV and VP-798ASV models include 8 stereo audio inputs and two microphone inputs with Phantom Power. An embedded audio mixer allows mixing of the mic inputs to any analog or digital audio signal. Units fitted with Audio include a 30W stereo audio power amplifier allowing direct connection to loudspeakers. -
Page 9: Packing List
Packing List 1) 3 pin plug IEC mains cable 2) CD (w/ documentation) 3) Quick Start Guide (QSG) © KRAMER ELECTRONICS LTD. Issue 1-16 May 30, 2017... -
Page 10: Basic Switcher Set-Up
¼ sec ultra-fast switching. Groups are identified by the button color on the front panel. If applicable, also connect any audio sources to the 3.5mm stereo jacks. Inset the power cord to turn-on the unit. The boot-up process takes about one minute. © KRAMER ELECTRONICS LTD. Issue 1-16 May 30, 2017... - Page 11 Genlock source. In the example, a 30Hz frame rate was I/O Lock selected. Except for LED applications, verify that the Test Frame Rates pattern with the border outline is shown on the display © KRAMER ELECTRONICS LTD. Issue 1-16 May 30, 2017...
- Page 12 4K source is connected to Out:2560x1600p 30.00 HMDI-1, the output is set to 2560@30 and the unit is free Free Run running. (no genlock or I/O lock) © KRAMER ELECTRONICS LTD. Issue 1-16 May 30, 2017...
-
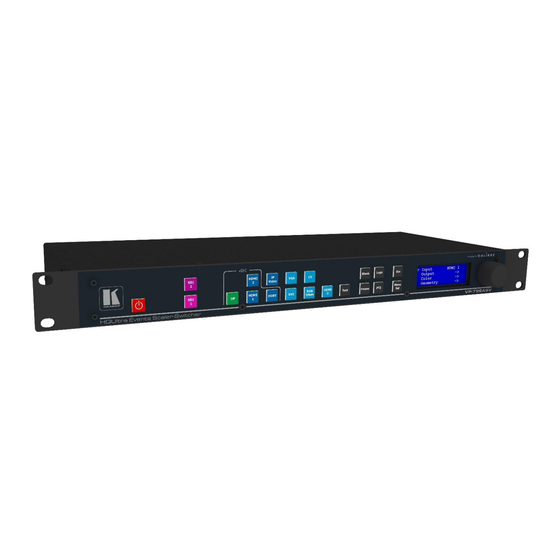
Page 13: System Description
The front panel layout is similar between the different models except for the SDI, HDBT selection keys. Only models featuring these inputs included these buttons. VP-796, VP-796A < ------------- 2 -------------- > 3 <- 4-> 5 VP-797A <... - Page 14 Esc + YPbPr (in live operation or at power up) Set output mode to 720p: Esc + VGA Firmware version: Standby + Esc ( press the menu button to exit ) © KRAMER ELECTRONICS LTD. Issue 1-16 May 30, 2017...
-
Page 15: Rear Panel Layout
Rear Panel Layout The rear panel features all input and output connectors, communication ports and the power supply connector. VP-796 VP-796A, VP-796ASV VP-797A, VP-797ASV, VP-798ASV 6/ 7 8 9/10 11 12 13/ 14 15 16 1 - 2x SD/HD-SDI/3G-SDI input... -
Page 16: Input Connector Overview
DVI & analogue (RGB/RGB/YPbPr) via DVI-U 3G-SDI I/O Via BNC Speaker & Line Out 2x 4-pin terminal connector © KRAMER ELECTRONICS LTD. Issue 1-16 May 30, 2017... -
Page 17: Product Specification
Signal formats: DOS, VGA – WUXGA up to 165MHz pixel clock • RGB video level: 0.7V - 1.0V • RGB input impedance: 75 Ohms • Sync format : Separate H & V sync at TTL/5V levels. © KRAMER ELECTRONICS LTD. Issue 1-16 May 30, 2017... -
Page 18: Hdmi-3 & Dvi Inputs
CAT6a/CAT7 for 100m and signals up to 297MHz Pixel Clock • Signal formats as HDMI 1 and HDMI 2. Graphics formats with odd numbered horizontal active pixels, e.g. 1365x768 are not supported. © KRAMER ELECTRONICS LTD. Issue 1-16 May 30, 2017... -
Page 19: Output Specifications
3G-SDI output will be disabled. If the display device does not support HDCP, the output will be black and a message indicating that the presence of an HDCP signal will be shown on the screen. © KRAMER ELECTRONICS LTD. Issue 1-16 May 30, 2017... -
Page 20: Audio Output
Audio models also include stereo audio power amplifier supporting 15W RMS loudspeaker per output and separate stereo balanced line level audio outputs for external amplifier systems. The analog stereo outputs are available on two phoenix connectors. © KRAMER ELECTRONICS LTD. Issue 1-16 May 30, 2017... -
Page 21: Video Formats
2560 1600 VESA CVT 004M-R EIA/CEA-861-F 3840 2160 VIC=93 EIA/CEA-861-F 4096 2160 VIC=98 © KRAMER ELECTRONICS LTD. Issue 1-16 May 30, 2017... -
Page 22: Communications Specification
The serial communication configured as follows: Table 5: RS-232 communication settings Parameter Value Baud rate 115200 Bits/second Stop Bits Number of bits received/transmitted in the BYTE Parity Bits No Parity Flow Control © KRAMER ELECTRONICS LTD. Issue 1-16 May 30, 2017... -
Page 23: Unit Control
For example, if you change the settings for the composite video channel, you will not affect the settings you may have made in the DVI channel. © KRAMER ELECTRONICS LTD. Issue 1-16 May 30, 2017... -
Page 24: Input
Composite Video • Test Pattern Default : HDMI-1 * : These inputs are not present on all the models. Please refer to the Input Connector Overview to determine the appropriate models. © KRAMER ELECTRONICS LTD. Issue 1-16 May 30, 2017... -
Page 25: Input Config
CCS is a filter to reduce luminance to chrominance cross talk of composite video signals (only) which appears as a coarse rainbow pattern or random colours in regions of fine details. Default : On © KRAMER ELECTRONICS LTD. Issue 1-16 May 30, 2017... - Page 26 The unit can signal the source to match with the audio capabilities of the display (setting Match Display 1/2), or to be S/PDIF friendly or to be © KRAMER ELECTRONICS LTD. Issue 1-16 May 30, 2017...
- Page 27 Depending on the Output resolutions, test pattern images are resized dynamically by the software resolution to completely fit the output raster space. ▪ Available Test Patterns: o Red Curtain o Green Curtain o Blue Curtain o Grey V Bars o Grey H Bars © KRAMER ELECTRONICS LTD. Issue 1-16 May 30, 2017...
- Page 28 8 = Multicolor, sets the four quadrant colours as red, green, blue and black) Default: 8: (Multicolor) 6.1.2.3.5 Moving Cross Speed Number of pixels that the test pattern moves per frame Settings: 1 to 10 Default: 1 © KRAMER ELECTRONICS LTD. Issue 1-16 May 30, 2017...
- Page 29 Start, Stop, Auto Start and Auto reconnect. Settings: Source IP address & Port, File name, Start, Stop, Auto Start, Auto reconnect Default: Auto Start=On, Auto reconnect=Off © KRAMER ELECTRONICS LTD. Issue 1-16 May 30, 2017...
-
Page 30: Colour Adjustments
Default : 0 6.1.3.5 Adjusts the colour hue of NTSC signals. This is not applicable for computer input signals or formats. Settings: -50 to 50 in steps of 1 Default : 0 © KRAMER ELECTRONICS LTD. Issue 1-16 May 30, 2017... -
Page 31: Geometry
Crop: The input image is scaled to completely fit the display area while preserving the aspect ratio of the source. Portions of the input image on the top/bottom or left/right will be cropped out of the output image. © KRAMER ELECTRONICS LTD. Issue 1-16 May 30, 2017... -
Page 32: Figure 1: Picture Format Examples
This cuts off unwanted features at the top or bottom from e.g. head switching in legacy video images. Settings: 0 to 10 in steps of 1 Default: 0 © KRAMER ELECTRONICS LTD. Issue 1-16 May 30, 2017... - Page 33 Default: Per Input 6.1.4.3.3 PTZ Value This setting determines whether the PTZ adjustments are done in pixel increments or in percentages of the input image size. Settings: Pixels / Percent Default: Pixels © KRAMER ELECTRONICS LTD. Issue 1-16 May 30, 2017...
- Page 34 Positive zoom will cause only a portion of the input image to fill the output raster. Settings: -25% to +400% Default: 0 6.1.4.3.9 PTZ Reset Resets all PTZ parameters to the default settings © KRAMER ELECTRONICS LTD. Issue 1-16 May 30, 2017...
-
Page 35: Enhancement
Correct setting of the detail enhance filter can make SD signals look virtually indistinguishable from true HD. At setting 0 the filter is switched off, with setting 3 providing the highest effect. Settings: 0, 1, 2, 3 Default : 1 © KRAMER ELECTRONICS LTD. Issue 1-16 May 30, 2017... -
Page 36: Output
Valid combinations are 50Hz/50Hz, 59.94Hz/59.94H and 60Hz/60Hz. If genlock is not achieved, the output frame rate refresh rate is determined by the frame rate setting. © KRAMER ELECTRONICS LTD. Issue 1-16 May 30, 2017... -
Page 37: Table 6: I/O Lock Behaviour
LED driving models. Settings: CMx Width: from 640 to 4096; CMx Height: from 480 to 2160; CMx Scan Type: Progressive/Interlaced Default : CMx Width: 1920; CMx Height: 1080; CMx Scan Type: Progressive © KRAMER ELECTRONICS LTD. Issue 1-16 May 30, 2017... -
Page 38: Gamma/Colour/Crush
If too high a setting is chosen, image solarization may be observed where dark image areas turn completely black or even change colour. Settings: 0 to 255 in steps of 1 Default : © KRAMER ELECTRONICS LTD. Issue 1-16 May 30, 2017... -
Page 39: Output Config
- 8 Bit System: 0x10 .. 0xEF, 10 Bit System: 0x040 .. 0x03BF, 12 Bit System: 0x100 .. 0xEFF. Settings : Default, Limited, and Full Default : Full © KRAMER ELECTRONICS LTD. Issue 1-16 May 30, 2017... -
Page 40: Video Wall
In the example below a 4K image is split into four 1080p quadrants in a 2x2 configuration. Each unit is set for a 2x2 configuration and I/O lock. Hpos and Vpos setting are set as shown in the drawing. © KRAMER ELECTRONICS LTD. Issue 1-16 May 30, 2017... -
Page 41: Figure 2: 2X2 Video Wall Example
Hor Offset : The horizontal position within the total display space where the image will be place Ver Offset : The vertical position within the total display space where the image will be place © KRAMER ELECTRONICS LTD. Issue 1-16 May 30, 2017... -
Page 42: Led Screen Setup
1920x1080 area will be ignored, and that is why is left black. Figure 3: Simple LED Screen Sizing Example Settings: Left Edge, Right Edge, Top Edge, Bottom Edge Default: Left Edge=0, Right Edge=Max Horizontal Settings, Top Edge=0, Bottom Edge=Max. Vertical Setting © KRAMER ELECTRONICS LTD. Issue 1-16 May 30, 2017... -
Page 43: Few Words About Aspect Ratio
Splicing Zoom should be turned off when the unit is connected to a multi-head graphics card where the content has been split. Settings: On/Off Default: Off © KRAMER ELECTRONICS LTD. Issue 1-16 May 30, 2017... -
Page 44: Splicing Width / Splicing Height
Standard mode works up to a wall size of 4x4. Advanced mode is limited to a maximum wall size of 2x2. Settings: Standard / Advanced Default : Standard © KRAMER ELECTRONICS LTD. Issue 1-16 May 30, 2017... -
Page 45: Standard Splicing
LED Screen Size> Right Edge 1320 1320 LED Screen Size> Bottom Edge 1440 1440 * Some steps are skipped, because the values are the same as the default settings after factory reset © KRAMER ELECTRONICS LTD. Issue 1-16 May 30, 2017... -
Page 46: Figure 6: Standard Splicing - 2X1 Example (Common Source)
LED Screen Size> Right Edge 1320 1320 LED Screen Size> Bottom Edge 1440 1440 * Some steps are skipped, because the values are the same as the default settings after factory reset © KRAMER ELECTRONICS LTD. Issue 1-16 May 30, 2017... -
Page 47: Advanced Splicing
LED Screen Size> Advanced Splicing> Wall Width 2640 2640 LED Screen Size> Advanced Splicing> Hor. Offset 1760 * Some steps are skipped, because the values are the same as the default settings after factory reset © KRAMER ELECTRONICS LTD. Issue 1-16 May 30, 2017... -
Page 48: Figure 8: Advanced Splicing - 3X1 Example
LED Screen Size> Advanced Splicing> Wall Width 2640 2640 2640 LED Screen Size> Advanced Splicing> Hor. Offset 1320 2200 * Some steps are skipped, because the values are the same as the default settings after factory reset © KRAMER ELECTRONICS LTD. Issue 1-16 May 30, 2017... -
Page 49: Figure 9: Advanced Splicing - 1X2 Example
LED Screen Size> Advanced Splicing> Wall Height 1350 1350 LED Screen Size> Advanced Splicing> Ver. Offset * Some steps are skipped, because the values are the same as the default settings after factory reset © KRAMER ELECTRONICS LTD. Issue 1-16 May 30, 2017... -
Page 50: System
The background colour of the web pages can be changed from dark to light. 6.4.3.1 Language Settings: English (AE), English (BE), Deutsch Default: English (AE) 6.4.3.2 Keypad Lock Settings: Off, Menu Only, All Keys Default: Lock: Off © KRAMER ELECTRONICS LTD. Issue 1-16 May 30, 2017... - Page 51 Settings: 5, 10, 15, 20, 25, 30, Infinite Default: 30 secs 6.4.3.4 LCD Backlight Settings: 0 ..10 Default: 10 6.4.3.5 Jog Push Enable Settings: On, Off Default: On 6.4.3.6 Web Colors Settings: Dark, Light Default: Dark © KRAMER ELECTRONICS LTD. Issue 1-16 May 30, 2017...
-
Page 52: Network Settings
This button allows users to restore all settings to the default values of the unit, allowing the unit to return to a known (good) system state. A confirmation is requested prior to actual system settings restore. Factory default does not affect the Network Settings © KRAMER ELECTRONICS LTD. Issue 1-16 May 30, 2017... -
Page 53: Audio
Settings: -100 to 500 ms Default : 0 ms 6.5.3.2 Input Level Input level adjusts the gain of the incoming audio signal Settings: -12 to +6 db Default : 0 db © KRAMER ELECTRONICS LTD. Issue 1-16 May 30, 2017... - Page 54 Settings: CVBS / HDBaseT / Display Port / HDMI 1 / HDMI 2 / VGA / DVI / HDMI 3 Default : CVBS © KRAMER ELECTRONICS LTD. Issue 1-16 May 30, 2017...
- Page 55 This menu allows users to enable phantom power for condenser mics. When phantom power is enabled, a voltage of +48V is sent to the condenser microphone via the XLR socket. 6.5.3.8 Audio Out Mute This menu allows users to mute audio output source individually. © KRAMER ELECTRONICS LTD. Issue 1-16 May 30, 2017...
-
Page 56: Status
(Deep Colour and HDCP support). The type of attached monitor (DVI or HDMI), video bit depth (8, 10 or 12 bit per colour channel) and HDCP encryption (on/off) is displayed. © KRAMER ELECTRONICS LTD. Issue 1-16 May 30, 2017... -
Page 57: Web Browser Control
PC mouse or corresponding navigational key presses. From the web Browser, under security settings, the user name and Password can be turned on. The default settings are: User Name: user Password: user © KRAMER ELECTRONICS LTD. Issue 1-16 May 30, 2017... -
Page 58: Web Page Menu Orientation
PV7 followed by the MAC address. The firmware version number and information on the input mode are listed next. Under the information pane the available input channels are shown and can be activated directly. © KRAMER ELECTRONICS LTD. Issue 1-16 May 30, 2017... - Page 59 Values can be entered directly in the field beneath the slider. Click into the field, enter the new value through the PC keyboard and click with the left mouse button to any location outside the field to update to the new value. © KRAMER ELECTRONICS LTD. Issue 1-16 May 30, 2017...
- Page 60 PC keyboard. The new name for the input channel can be entered. The new name is stored when clicking with the left mouse button to any location outside the field. © KRAMER ELECTRONICS LTD. Issue 1-16 May 30, 2017...
-
Page 61: Software Update
To restore the unit’s settings, browse and select the file on your PC. The selected file will be shown in the field left to the Browse button. Now press the restore button. © KRAMER ELECTRONICS LTD. Issue 1-16 May 30, 2017... -
Page 62: Logo And Custom Test Pattern Capture
This name can be changed and stored on the PC in any location. The image size limitation is 64MB. From the same menu you can select up-to four images and download them as custom test patterns. These images will appear as Custom1,2,3 or 4 in the Test pattern menu © KRAMER ELECTRONICS LTD. Issue 1-16 May 30, 2017... -
Page 63: Firmware Update
8. Firmware Update The latest firmware is found on Kramer’s download website at: There are two methods of updating your unit’s firmware. First, through a USB port with a USB memory drive and second, through TCP/IP connection with the web server. - Page 64 Hit the Menu Sel button to exit to the Status menu Next, follow either of the methods described earlier in this chapter to update the unit to the latest software release. © KRAMER ELECTRONICS LTD. Issue 1-16 May 30, 2017...
-
Page 65: Environmental And Emc
Always connect the test lead (mains earth) to the metal chassis. DO NOT CONNECT to the connectors of the rear panel (signal earth), because you may damage the unit beyond repair. This type of damage is not covered by warranty. © KRAMER ELECTRONICS LTD. Issue 1-16 May 30, 2017... -
Page 66: Appendix A: Front Panel Menu Tree Structure
LED Screen Size (VP-798ASV model only) • PIP* (not available in VP-796(A)(ASV) Models) • System • Status • Audio (Audio Models: Extensive audio menu is presented in Appendix B ) * Future software release © KRAMER ELECTRONICS LTD. Issue 1-16 May 30, 2017... -
Page 67: Input
V-Position -3 .. +3 ColorSpace YCbCr Auto Range Full Full Limited Auto Reset Mode EDID IN 1920x1080p 640x480p ... 2048x1200p RGB/YPbPr Setup Clock Phase 0 ... 31 steps H-Position V-Position ColorSpace © KRAMER ELECTRONICS LTD. Issue 1-16 May 30, 2017... -
Page 68: Input Menu
S/PDIF friendly SDI friendly 2-ch SDI friendly 8-ch SDI Setup* Stereo ch(1,2) Audio Map Stereo ch(1,2) Stereo ch(3,4) Stereo ch(5,6) Stereo ch(7,8) Multichannel Level B priority SDI 1 SDI 1 SDI 2 © KRAMER ELECTRONICS LTD. Issue 1-16 May 30, 2017... - Page 69 White Color Moving Cross Black adjustments White Yellow Cyan Green Magenta Blue Background Multi Color Black White Yellow Cyan Green Magenta Blue Multi Input Enable 3GSDI-1* 3GSDI-2 DisplayPort HDMI-1 HDMI-2 HDBT* © KRAMER ELECTRONICS LTD. Issue 1-16 May 30, 2017...
- Page 70 -512 ... 512 Red Gain -512 ... 512 Green Bias -512 ... 512 Green Gain -512 ... 512 Blue Bias -512 ... 512 Blue Gain -512 ... 512 Color Temp 6500K © KRAMER ELECTRONICS LTD. Issue 1-16 May 30, 2017...
- Page 71 -50% ... 50% Tilt -50% ... 50% Zoom H 25% - 400% Aspect Lock Off, On Zoom V 25% ...400% PTZ Reset Enhancement Sharpness -4 ... 4 steps Details 0 ... 3 steps © KRAMER ELECTRONICS LTD. Issue 1-16 May 30, 2017...
-
Page 72: Output
Output Gamma 1.0 ... 3.0 Black Crush 0 .. 255 steps Output Config HDMI Output DVI/HDMI HDMI DVI Forced HDMI 8-bit HDMI-10bit HDMI 12-bit DVI Output DVI/HDMI DVI Forced HDMI 8-bit © KRAMER ELECTRONICS LTD. Issue 1-16 May 30, 2017... -
Page 73: Output Menu
0 pxls ... 50pxls Wall Setup Standard Standard Advanced Adv. Wall Setup Wall Width 0 pxls ...3840pxls Wall Height 0 pxls ...2160pxls Hor Offset 0 pxls ...3840pxls Ver Offset 0 pxls ...2160pxls © KRAMER ELECTRONICS LTD. Issue 1-16 May 30, 2017... -
Page 74: Led Screen Sizing
Splicing Setup Standard Standard Advanced Advanced Splicing Wall Width 0 pxls ... 3840pxls Wall Height 0 pxls ... 2160pxls Hor Offset 0 pxls ... 3840pxls Ver Offset 0 pxls ... 2160pxls © KRAMER ELECTRONICS LTD. Issue 1-16 May 30, 2017... -
Page 75: Pip Menu
Enabled when Free H/V Aspect Lock for PIP Size is selected. These settings interreact with PIP H-Pos and PIP PIP Height V-Pos 0 ... Vmax Pan/Tilt/Zoom PTZ Enable Enabled when © KRAMER ELECTRONICS LTD. PTZ is enabled Issue 1-16 May 30, 2017... - Page 76 Zoom V 0 .. Vmax PTZ Reset Color Black-Level Offset 0 IRE 0 IRE 7.5 IRE Brightness -50 ... 50 Contrast -50 ... 50 Saturation -50 ... 50 -50 ... 50 © KRAMER ELECTRONICS LTD. Issue 1-16 May 30, 2017...
-
Page 77: System
5 sec 10 sec 15 sec 20 sec 25 sec 30 sec Infinite LCD Backlight 0 ..10 Jog Push Enable Web Colors Dark Dark Light Network Settings Address Type DHCP DHCP Static © KRAMER ELECTRONICS LTD. Issue 1-16 May 30, 2017... - Page 78 HDCP Bit Depth 8,10,12 This menu is present in non-audio models. Audio The Audio menu for Audio Delay the Audio models is -100 .. 500 ms presented in the next section © KRAMER ELECTRONICS LTD. Issue 1-16 May 30, 2017...
-
Page 79: Appendix B: Front Panel Audio Menu Tree Structure
-12.0 ... 6.0 db Input Mode Stereo / Mono Input Mute No / Yes Amp Gain 0 ... 39 Audio Assign Config Per Input Global Audio In Stereo Analog Analog with Mics Digital © KRAMER ELECTRONICS LTD. Issue 1-16 May 30, 2017... -
Page 80: Audio Menu
Stereo Analog Analog with Mics RGB/YPbPr Analog CVBS Display Port HDMI 1 HDMI 2 HDMI 3 HDBaseT CVBS Audio Stereo Analog Analog with Mics CVBS Analog CVBS Display Port HDMI 1 © KRAMER ELECTRONICS LTD. Issue 1-16 May 30, 2017... - Page 81 Analog with Mics Digital SDI2 Analog CVBS Display Port HDMI 1 HDMI 2 HDMI 3 HDBaseT DP Audio Stereo Analog Analog with Mics Digital DP Analog CVBS Display Port HDMI 1 HDMI 2 © KRAMER ELECTRONICS LTD. Issue 1-16 May 30, 2017...
- Page 82 HDMI-2 Analog CVBS Display Port HDMI 1 HDMI 2 HDMI 3 HDBaseT HDBT Audio Stereo Analog Analog with Mics Digital HDBT Analog CVBS Display Port HDMI 1 HDMI 2 HDMI 3 © KRAMER ELECTRONICS LTD. Issue 1-16 May 30, 2017...
- Page 83 DVI Analog CVBS Display Port HDMI 1 HDMI 2 HDMI 3 HDBaseT Mic Config Mic1 Phantom Mic2 Phantom Exit Audio Out Mute HDMI HDBaseT DVI/HDMI 3G-DVI Line Mute Loudspeaker Exit Exit © KRAMER ELECTRONICS LTD. Issue 1-16 May 30, 2017...
-
Page 84: Appendix C : Single Link Dvi-U Pinout
TMDS clock shield Pin 23 TMDS clock+ Digital clock+ Pin 24 TMDS clock− Digital clock− Analog red Analog green Analog blue Analog horizontal sync Analog ground Return for R, G, and B signals © KRAMER ELECTRONICS LTD. Issue 1-16 May 30, 2017...
Need help?
Do you have a question about the VP-796A and is the answer not in the manual?
Questions and answers