Advertisement
WP-211T Quick Start Guide
This guide helps you install and use your WP-211T for the first time.
Go to
upgrades are available.
Scan for full manual
Step 1: Check what's in the box
WP-211T 1 Gang 4K60 4:2:0 2 HDMI to HDBaseT auto switcher
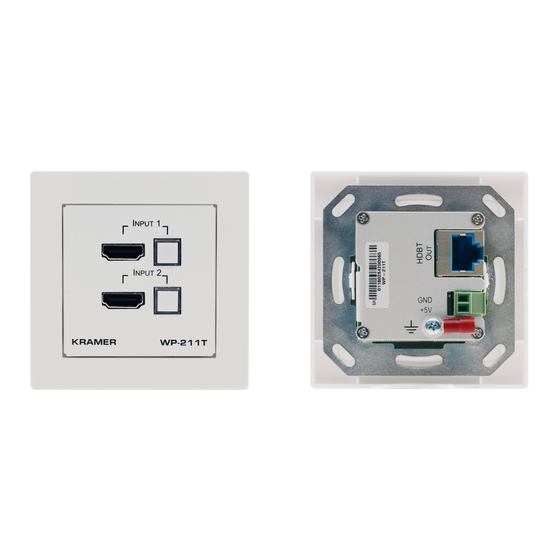
Step 2: Get to know your WP-211T
#
Feature
1
INPUT 1
HDMI Connector
Button
2
Operation Mode DIP-switches
WP-211T DIP-switches are located behind the faceplate and should be set during installation, before placing the
faceplate. Pressing an input button manually selects that input, independent of the DIP-switch settings.
3
INPUT 2
HDMI Connector
Button
4
Grounding Screw
5
GND 5V DC 2-pin Terminal
Block Connector
6
HDBT OUT RJ-45 Connector
WP-211T Quick Start (P/N: 2900-300918QS REV 2)
www.kramerav.com/downloads/WP-211T
Function
Connect to an HDMI source to route to HDBT OUT.
Press momentarily to manually select HDMI 1 (button lights orange).
By-default the DIP-switches are both set to OFF (left)
DIP-switch 1 OFF (left) - Last connected mode; ON (right) - Priority mode according to
DIP-switch 2 settings.
DIP-switch 2 OFF (left) - INPUT 1 is the default priority; ON (right) INPUT 2 is the default priority.
Controlling via the INPUT buttons overrides all DIP-switch settings and automatic switching until
the manually selected source disconnects, becomes inactive or WP-211T is powered off.
Connect to an HDMI Source to route to HDBT OUT.
Press momentarily to manually select HDMI 2 (button lights orange).
Connect to the common ground (optional) to prevent static electricity from impacting the
performance of the unit.
Connect to the supplied power adapter. Not needed on the WP-211T if there is a PoE provider
over HDBaseT.
Connect to an HDBaseT receiver (for example, TP-580R).
to download the latest user manual and check if firmware
1 Power adapter and cord
P/N:
2 9 0 0 - 3 0 0 9 1 8 Q S
1 Quick start guide
Rev:
2
Advertisement
Table of Contents

Related Manuals for Kramer WP-211T


Summary of Contents for Kramer WP-211T
- Page 1 Connect to the common ground (optional) to prevent static electricity from impacting the performance of the unit. GND 5V DC 2-pin Terminal Connect to the supplied power adapter. Not needed on the WP-211T if there is a PoE provider Block Connector over HDBaseT.
- Page 2 3. Insert the M3x6 screw (with the two toothed lock washers and ring tongue terminal) into the grounding screw hole and tighten the screw. Step 4: Connect the power If the device is not powered via HDBT PoE, connect the 5V DC power adapter to the WP-211T and plug the adapter into the mains. Safety Instructions Caution: There are no operator serviceable parts inside the unit.
Need help?
Do you have a question about the WP-211T and is the answer not in the manual?
Questions and answers