Table of Contents
Advertisement
Quick Links
PRE-CLEAN:
• Disconnect the spray gun from the air line and remove the
cup.
• Squirt solvent into the paint channel allowing waste solvent
to drain into a waste container (not supplied). (photo on right)
If you have a conventional cup drain paint into waste container.
PREPARE THE SPRAY GUN FOR CLEANING:
• Loosen the air cap 2 turns.
• Use the Trigger Lock Spring (120-350) as shown
in the photos to the right to hold the trigger in the
open position.
To prevent solvent from entering the air passage way of your spray gun:
• Insert the white plastic plug into the air fitting of the spray gun. If you have
removed the air fitting, attach the knurled nut (attached to the Trigger Lock Spring)
to the air passageway of the spray gun.
PLACE THE SPRAY GUN IN THE CLEANING TANK:
• Place the spray gun on a nozzle extension in the wash tank with
the air cap facing the corner. Select the nozzle extension that best fits your spray
gun. There is a fixed nozzle extension in the wash tank and push-on extensions in the
accessory kit.
WASH CYCLE:
• Close the lid of the cleaning tank and turn the
"Auto Wash Timer" clockwise to start cleaning.
The wash cycle takes about 60 seconds.
• Push and hold the "Air Rinse" button for about 2
seconds to evacuate the wash solvent.
• Press and hold the "Clean Rinse" button for about
2 seconds to send 100 cc of clean solvent through the
jets to rinse the spray guns. Clean-rinse is limited to
100 cc of solvent to minimize consumption.
Wait 30 seconds before re-using the clean rinse to allow the rinse pump to refill.
• Push and hold the "Air Rinse " button for about 2 second to air-rinse the guns.
• After cleaning the spray guns, remove the guns from the tank and wipe them dry.
Do not store spray guns and cups in the wash tank.
• Clean any splashed paint from the spray gun cleaner.
USING THE FLOW-THROUGH BRUSH:
• Step on the foot pedal to send wash solvent
through the Brush to wash the spray gun. See photo on
right.
• Solvent flow is set at the factory but may be adjusted
using the left side "Brush Flow Control". See photo on far
right.
• To increase flow, loosen the locking nut, rotate the
dial anti-clock wise, and tighten the locking nut.
For detailed instructions refer to your user manual or the user manual at www.uniram.com, Technical Support.
SOP-UG5 JULY 2020
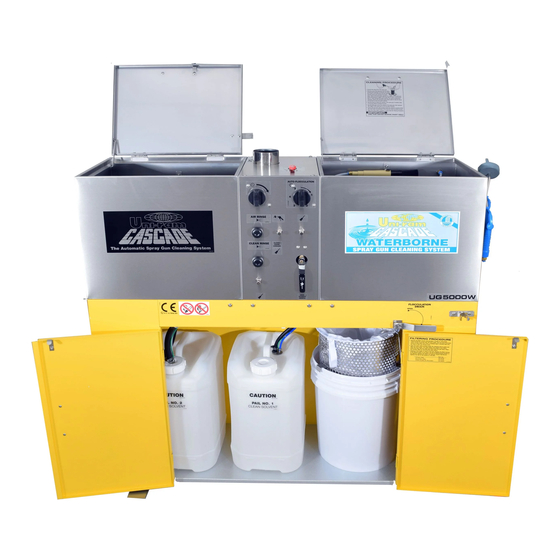
- SOLVENT TANK
UG5000W
STANDARD OPERATING PROCEDURES
Trigger Lock Spring
Trigger Lock
Spring in
position
Air Plug
(140-230)
PUSH
Auto Wash
Timer
Flow-Through Brush
Nozzle
Extrension
PUSH
Air Rinse
Clean
Rinse
Brush Flow
Control
Advertisement
Table of Contents

Related Manuals for Uni-ram UG5000W


Summary of Contents for Uni-ram UG5000W
- Page 1 - SOLVENT TANK UG5000W STANDARD OPERATING PROCEDURES PRE-CLEAN: • Disconnect the spray gun from the air line and remove the cup. • Squirt solvent into the paint channel allowing waste solvent to drain into a waste container (not supplied). (photo on right) If you have a conventional cup drain paint into waste container.
- Page 2 UG5000W - WATER TANK STANDARD OPERATING PROCEDURES PRE-CLEAN: • Disconnect the spray gun from the air line and remove the cup. • Squirt water into the disposable cup adapter, pull the trigger and allow waste water to drain into a waste container (not supplied).
- Page 3 UG5000W MONTHLY MAINTENANCE PROCEDURE: 1) Check the solvent level in the solvent wash pail and clean rinse pail. If the wash pail is less than 75% full, top up to the 75% mark. If the clean rinse pail is less than 50 % full, top up to the 100% mark. If the spray guns feel sticky after cleaning or if there has been 100 cleanings replace the solvent in the wash pail following procedure (A) below.
Need help?
Do you have a question about the UG5000W and is the answer not in the manual?
Questions and answers