
Related Manuals for Apera Instruments TN400


Summary of Contents for Apera Instruments TN400
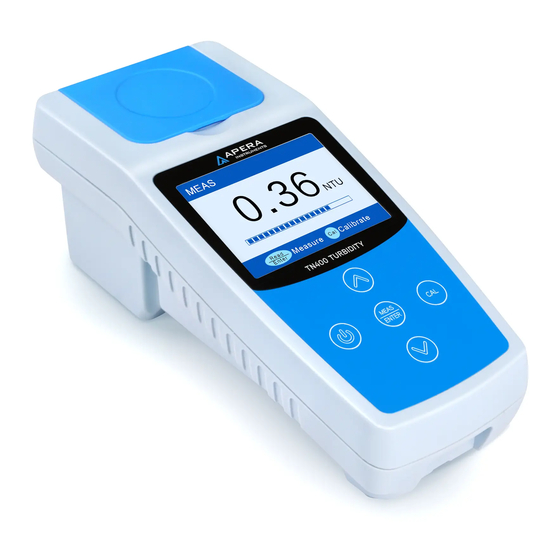
- Page 1 TN400 Portable Turbidity Meter Instruction Manual APERA INSTRUMENTS LLC aperainst.com - 1 -...
-
Page 2: Table Of Contents
Table of Contents 1 Overview ..................- 3 - 2 Technical Specifications..............- 4 - 2.1 Technical Parameters ................- 4 - 3 Instrument Description ..............- 5 - 3.1 Instrument Overview ................- 5 - 3.2 Meter and Accessories ................- 6 - 3.3 Display Mode .................. -
Page 3: Overview
The instrument uses infrared light emitting diode (LED 860±30nm) as the light source and 90° scattering method, which is compliant with ISO 7027 and DIN EN 27027 standards for the determination of turbidity for water solutions. TN400 allows you to measure the turbidity of an aqueous sample both in laboratory and in the field. -
Page 4: Technical Specifications
2 TECHNICAL SPECIFICATIONS 2.1 Technical Parameters Measuring Method ISO 7027 and DIN EN 27027 compliant nephelometric method(90°) Light Source Infrared light emitting diode (860±30nm) 0 ~ 1000 NTU, automatic range selection: 0.01~19.99 NTU Measuring Range 20.0~99.9 NTU 100~1000 NTU Accuracy ≤... -
Page 5: Instrument Description
3 INSTRUMENT DESCRIPTION 3.1 Instrument Overview ⑤ ⑧ ⑨ ⑥ ⑦ Diagram-1 Flip cover of the sample vial holder (Close the Dust proof plug (Take off the plug when ⑥ ① measuring) cover when measuring) Housing Sample vial holder ⑦ ②... -
Page 6: Meter And Accessories
3.2 Meter and Accessories Calibration Solutions: ① 0.0, 20.0, 100, 400, 800 NTU Carrying case ② ⑨ TN400 Turbidimeter ③ ① Microfiber cloth ④ Screwdriver (to remove battery cover) ② ⑤ Silicone oil (10 ml) ③ ⑥ AA Alkaline battery×4 ⑦... -
Page 7: Keypad
— Calibration mode ① — Standard values ② — Operation guide ③ Calibration Menu — Finish calibration indicator ④ 3.4 Keypad Diagram- 3 Functions ⚫ Power on/off ⚫ The meter will automatically shut off 10 mins after last key press ⚫... -
Page 8: Meter Calibration
icon displays to ensure measuring accuracy; when icon displays, the battery must be replaced, otherwise the instrument can't work properly. To extend battery life, user can setup auto- power off timer in Parameter Setup P6 according to usage requirements 3. Use the screwdriver to remove the four screws on the battery cover and open the battery cover. Insert 4 pieces of “AA”... -
Page 9: Calibration Procedure (Take 0 Ntu And 20 Ntu As An Example)
① The silicone oil applied should not be too much. After wiping with micro-fiber cloth, please wipe with filter paper or high-quality tissue paper to clean off. Excessive residual silicone oil on the vial surface will affect the measurement accuracy. ②... -
Page 10: Notes For Calibration
4) After calibration is done, press to confirm. The instrument will return to the calibration menu (see Diagram on the right side). The OK sign indicates that 0 NTU has been calibrated and prompt to calibrate 20 NTU. 5) Place the 20.0 NTU calibration vial in the sample vial holder, press to start 20 NTU calibration. -
Page 11: Turbidity Measurement
Calibration point selection: The instrument has been calibrated at full range before leaving the factory. Users can select 2 or more points as needed to calibrate, as long as the target measurement range is in between of the two calibration points. In calibration setup mode, press select the calibration point. -
Page 12: Measurement Modes
(approximately 18ml), see Diagram-4, tighten the vial cap. 2) Before measuring, gently shake the sample vial to make sample solution even and wait for air bubbles to disappear, see Diagram-5, wait for 2~5 minutes until bubbles eliminate. 3) Wipe the sample vial surface with a microfiber cloth. Ensure that the vial is dry, clean and free from smudges. -
Page 13: Warranty
We warrant this instrument to be free from defects in material and workmanship and agree to repair or replace free of charge, at the option of APERA INSTRUMENTS, LLC, any malfunctioned or damaged product attributable to the responsibility of APERA INSTRUMENTS, LLC for a period of TWO YEARS for the instrument from the delivery. -
Page 14: Replacement Parts
Compatible with T200-1 4 bottles AMCO polymer TN400&TN480 T500-3 Sample vials with lid Φ25×60mm,1#~6# 6 pcs TN400-S3 Silicone oil 10mL 1 bottle APERA INSTRUMENTS, LLC Address: 6656 Busch Blvd, Columbus Ohio 43229 Tel: 1-614-285-3080 Email: info@aperainst.com Website: https://aperainst.com - 14 -...
Need help?
Do you have a question about the TN400 and is the answer not in the manual?
Questions and answers