
Related Manuals for Apera Instruments TN400


Summary of Contents for Apera Instruments TN400
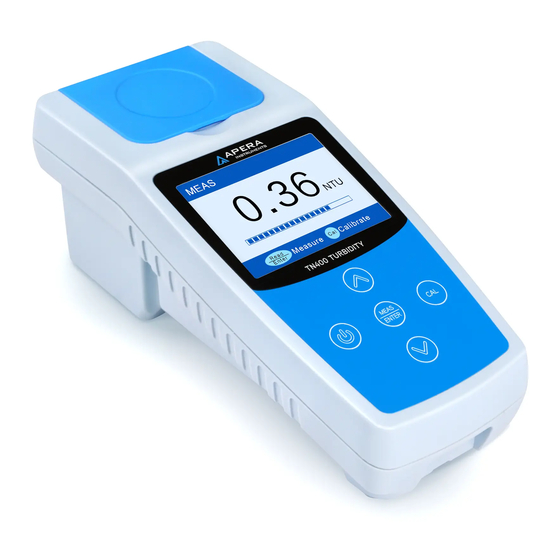
- Page 1 TN400 Portable Turbidity Meter Instruction Manual APERA INSTRUMENTS (Europe) GmbH www.aperainst.de - 1 -...
-
Page 2: Table Of Contents
Table of Contents Overview........................- 3 - Technical Specifications ................... - 4 - Technical Parameters ....................- 4 - Instrument Description ....................- 5 - Instrument Overview ...................... - 5 - Meter and Accessories ....................- 6 - Display Mode ......................... - 6 - Keypad .......................... -
Page 3: Overview
The instrument uses infrared light emitting diode (LED 860±30nm) as the light source and 90° scattering method, which is compliant with ISO 7027 and DIN EN 27027 standards for the determination of turbidity for water solutions. TN400 allows you to measure turbidity in a reliable and simple manner wherever you are. -
Page 4: Technical Specifications
2 TECHNICAL SPECIFICATIONS 2.1 Technical Parameters ISO 7027 and DIN EN 27027 Measuring Method compliant nephelometric method (90°) Light Source Infrared light emitting diode (860±30nm) 0 – 1000 NTU, automatic range selection: 0.01 – 19.99 NTU Measuring Range 20.0 – 99.9 NTU 100 –... -
Page 5: Instrument Description
3 INSTRUMENT DESCRIPTION 3.1 Instrument Overview ① ② ③ ④ ⑤ ⑨ ⑧ ⑥ ⑦ Diagram-1 ① Flip cover of the sample vial holder ⑥ Dust proof plug (Take off the plug (Close the cover when measuring) when measuring) ② Housing ⑦... -
Page 6: Meter And Accessories
3.2 Meter and Accessories Calibration Solutions: ① 0.0, 20.0, 100, 400, 800 NTU Carrying case ② TN400 Turbidimeter ⑨ ③ Microfiber cloth ④ Screwdriver ① ⑤ (to remove battery cover) ② Silicone oil (10 ml) ⑥ ③ AA Alkaline battery×4 ⑦... -
Page 7: Keypad
3.4 Keypad Diagram- 3 Functions ⚫ Power on/off ⚫ The meter will automatically shut off 10 mins after last key press ⚫ In measurement mode: press to enter calibration mode ⚫ In calibration mode: press to exit calibration mode ⚫ In measurement mode: long press to switch measurement units NTU-FTU ⚫... -
Page 8: Meter Calibration
METER CALIBRATION 4.1 Preparation for Calibration a) Calibration Point The instrument has 5 calibration points: 0 NTU, 20 NTU, 100 NTU, 400 NTU, and 800 NTU. Among them, 0 NTU point uses AMCO 0.0 NTU calibration solution or laboratory distilled water, and the remaining 4 calibration points use AMCO polymer solutions. -
Page 9: Calibration Procedure (Take 0 Ntu And 20 Ntu As An Example)
solutions that have not been used for a long time, slowly flip the vial twice and let it stand for 2 minutes. Be careful not to shake the solution vigorously, as this will create air bubbles which will destabilize the measurement; For 0.0 NTU calibration solution, do NOT shake or flip. -
Page 10: Notes For Calibration
6) If you want to continue to calibrate 100, 400 and 800 NTU, place the 100 NTU calibration vial in the sample vial holder and press to calibrate. After calibration is done, press to confirm; repeat the steps to calibrate 400 NTU and 800 NTU. -
Page 11: Turbidity Measurement
solution. If the error is large, the instrument needs to be recalibrated. e) The instrument does not automatically recognize the calibration solution. If the wrong solution is selected for calibration, the measurement will be completely wrong. To fix this problem, simply re-calibrate the meter selecting the correct calibration solutions. -
Page 12: Notes For Measurement
Press button, the display shows progress bar (see Diagram-6). It will display measured value after 10 seconds. Please press button again for repeated measurement. b) Average Measurement Mode Long press button, release it until you hear a beep, then the instrument enters average reading mode. -
Page 13: Replacement Parts
We warrant this instrument to be free from defects in material and workmanship and agree to repair or replace free of charge, at the option of APERA INSTRUMENTS any malfunctioned or damaged product attributable to the responsibility of APERA INSTRUMENTS for a period of TWO YEARS for the instrument from the delivery.
Need help?
Do you have a question about the TN400 and is the answer not in the manual?
Questions and answers