Table of Contents
Advertisement
Quick Links
Advertisement
Table of Contents

Related Manuals for Spypoint LINK-S-DARK


Summary of Contents for Spypoint LINK-S-DARK
- Page 1 SPYPOINT LINK-S-DARK USER MANUAL AND COMPARABLE v.1.0...
- Page 2 THANK YOU FOR CHOOSING A SPYPOINT PRODUCT The LINK-S-DARK is a one-of-a-kind hunting camera, since many of its features This User Manual will introduce you to the features of your new LINK-S-DARK are only offered by SPYPOINT. and will guide you through the acquisition of its functionalities so that you can use it to its full potential.
-
Page 3: Table Of Contents
Table Of Content SPYPOINT LINK-S-DARK Components ..................4 Features ....................6 Power ......................7 Memory Card ..................10 Preparation ..................11 Activation .................... 12 Starting your camera ..............13 Configuration ..................15 Installation ..................21 Verification ..................22 Tool – Accessories – Options ............23 Transferring Files to a Computer .......... -
Page 4: Components
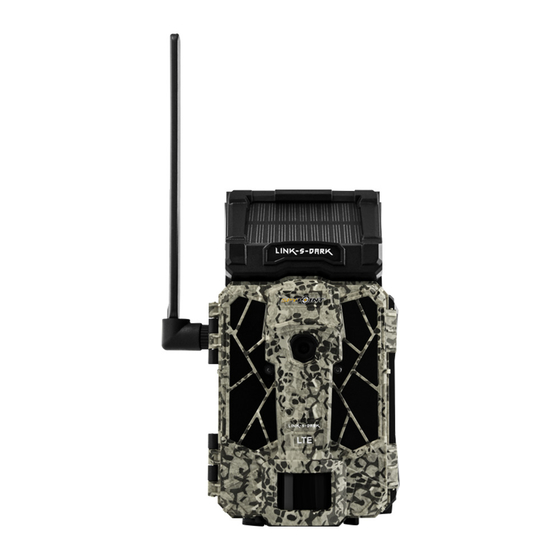
Components SPYPOINT LINK-S-DARK Antenna Delay light “BUSY” light Solar panel Navigation buttons Battery compartment LEDs ON/OFF switch SIM card slot Photo lens Slot for installation strap Microphone Light sensor Locking latch Screw-thread for standard ¼"-20 Viewing screen... - Page 5 The SIM card, pre-installed and pre-activated, is Space to insert the SD card (not included) needed to save photos included with the camera. It is important to use a SPYPOINT SIM and videos. card (supplied by SPYPOINT), otherwise the cellular functions of the camera will be inoperative.
-
Page 6: Features
CELLULAR TRANSMISSION VIEWING Frequency Built-in screen 2" ACL Transmission of your photos to your On the SPYPOINT app or on the website www.spypoint.com/en/manage SPYPOINT application by cellular network. POWER SOURCES Photo transmission Visit www.spypoint.com/plans to choose Alkaline or lithium AA batteries 8 x AA (not included) a plan that suits you. -
Page 7: Power
Power SPYPOINT LINK-S-DARK CHOOSING A POWER SOURCE OPERATION • The solar panel's function is to recharge the internal battery. This is the 4 options are available to you: default power supply system. The camera will be energetically self-sufficient • Internal lithium battery (included) under ideal conditions (a low energy configuration and a sunny environ- ment). - Page 8 Power SPYPOINT LINK-S-DARK MANAGING VARIOUS CAMERA POWER SUPPLY Make sure to insert the AA batteries according to their polarity (+) and (-) as shown in the battery compartment. 1. As soon as you connect an external 12 V battery to your camera via the 12 V socket, it becomes its main power supply source.
- Page 9 • If the internal battery charge level becomes insufficient, the camera will shut 2. In the SPYPOINT application: on the home page, you will see the battery down or switch to an auxiliary power source, if you provided one.
-
Page 10: Memory Card
INSERTING YOUR SD CARD Before inserting the SD card into your camera, it must be formatted via a computer to ensure proper operations. Visit www.spypoint.com/en/support if you need help formatting your SD card. • Make sure the camera is turned OFF. -
Page 11: Preparation
4. Choose “Format, ” then confirm your selection. FINDING THE ACTIVATION CODE 5. Your card will be formatted. This means that all the elements found there The activation code is located inside the LINK-S-DARK’s battery compartment. will be deleted and lost permanently. REMOVING YOUR SD CARD •... -
Page 12: Activation
“CREATE AN ACCOUNT”, fill out the required fields, then log in. 2. Select the + sign on the far right of the page; in the list, select “LINK-S-DARK” then follow the steps. 3. When complete, a confirmation email with instructions on how to finalize the creation of your account will be sent to you. -
Page 13: Starting Your Camera
Starting your camera SPYPOINT LINK-S-DARK STARTING THE CAMERA START CAMERA Allows the user to start the camera in PHOTO, VIDEO or TIME-LAPSE modes. Use the and buttons to navigate the interface and modify the selection, the OK button to confirm your selection and the BACK button to return to the DETECTION TEST previous menu. - Page 14 Allows you to view the date and time displayed DATE AND TIME on the photo. 3. By the SPYPOINT web app. You will first need to create an account and then log in. Use the “Settings” section. Allows you to protect individual photo's or video's,...
- Page 15 SPYPOINT application and on the website. • Note that during the 15 minutes after starting up your camera, it will communicate with the server each time it takes a photo and it will also apply the settings you previously chose.
-
Page 16: Configuration
Settings SPYPOINT LINK-S-DARK MAIN CONFIGURATION PHOTO MODE DELAY Allows you to choose the period of time to wait before the camera detects again and records the next picture. A longer delay minimizes the number of photos taken and therefore maximizes battery life. A shorter delay Instant;... - Page 17 Settings SPYPOINT LINK-S-DARK TIME-LAPSE MODE Allows the camera to take photos at regular preset intervals. For example, if “5 minutes“ is selected in the Time-lapse mode, the camera takes a photo every 5 minutes even if there is no detection.
- Page 18 Settings SPYPOINT LINK-S-DARK CELLULAR CONFIGURATION CELLULAR MODE Allows the user to turn ON or OFF the cellular functions. Note that this setting will only take effect the next time the camera makes a transfer. Activated; not activated Allows you to choose the time when the camera makes its first transfer of the day.
- Page 19 Settings SPYPOINT LINK-S-DARK ADVANCED CONFIGURATION Lets you choose the intensity of the infrared flash when taking a photo at night. This feature is one of the main characteristics that set this camera apart. Different options are available to you: OPTIMAL (normal), IR-BOOST (lights up powerfully to produce clear photos), NO GLOW (although active, the flash is imperceptible to the human eye), and BLUR REDUCTION (eliminates the motion blur that a moving subject produces on a photo).
- Page 20 The date and time are automatically updated during cellular connection, according to the time zone of the area where the camera is located. Displays the date, time, temperature, moon phase, SPYPOINT logo, and camera model on each photo. INFORMATION ON THE PHOTOS...
-
Page 21: Installation
Installation SPYPOINT LINK-S-DARK INSTALLING YOUR CAMERA MOUNTING BRACKET 1. To install the camera, loop the installation strap through the intended slot During installation, it is beneficial to use the base included with the camera. (see diagram). This makes it easier to remove and reposition your camera once installed to manage it according to your needs. -
Page 22: Verification
VERIFYING CAMERA STATUS APPLICATION STATUS PAGE Different tools are available to help you check the status of your LINK-S-DARK Here are the different indicators of the LINK-S-DARK status you have access to. and to inform you of any problems that may occur during its operation. -
Page 23: Tool - Accessories - Options
To make sure you use your trail camera in an optimal way, that it precisely • View and sort your photos. meets your needs, and that you have better success as a hunter, SPYPOINT For more information, visit offers you a range of very useful additional digital features. -
Page 24: Transferring Files To A Computer
Transferring Files to a Computer SPYPOINT LINK-S-DARK TRANSFERRING FILES TO A COMPUTER ON A MAC • Turn the camera OFF. Click on the search tool in the “Toolbar”. Locate your device under the “Devices” tab and click to access it. Then click on “DCIM” and “100DSCIM”... -
Page 25: Offered Accessories
Rechargeable lithium battery pack & AC cable. No external power source necessary. charger with charge indicator light. Voltage #CA-01 of 7.4 V. Fits 42 LEDs SPYPOINT cameras. #LIT-C-8 CABLE LOCK 12 V POWER CABLE 6 feet (4.57 meters) cable lock compatible with all cameras and security boxes from SPYPOINT. -
Page 26: Troubleshooting
IMPOSSIBLE TO TURN THE CAMERA ON 3. Check if the batteries are correctly installed. 4. Install the latest update (available on www.spypoint.com under the SUPPORT section). 5. Replace the batteries or the rechargeable battery pack. The camera is in PHOTO or VIDEO mode and the screen turns off after a period of 30 seconds in order THE SCREEN OF THE CAMERA TURNS OFF to preserve battery life. - Page 27 Troubleshooting SPYPOINT LINK-S-DARK ISSUES POSSIBLE SOLUTIONS 1. Verify if the signal strength received by your device is sufficient. 2. Make sure you have not reached the photo limit of your cellular plan. THE CAMERA IS NOT TRANSMITTING PHOTOS 3. Verify if there is a message in the Photo section of your app. You will receive a notification if your camera is Photo transmission issue active, but no motion was detected.
- Page 28 Troubleshooting SPYPOINT LINK-S-DARK ISSUES POSSIBLE SOLUTIONS 1. Verify the charge level of the batteries, as the night lighting may be malfunctioning if the charge level is low. 2. Make sure the subject is within range of the night lighting (approximately 100 feet).
- Page 29 Troubleshooting SPYPOINT LINK-S-DARK MESSAGES DISPLAYED ON THE SCREEN DESCRIPTIONS/SOLUTIONS The use of a memory card is required to record photos and videos. INSERT MEMORY CARD Make sure to turn OFF your camera, insert a SD card and turn it back ON again.
- Page 30 Your SIM card is locked. Contact the SPYPOINT customer service. ERROR: SIM CARD NOT SUPPORTED The camera must use the SPYPOINT SIM card provided with the camera. The SIM card does not detect any signal. If the network test failed, move outside or near a window and re-start ERROR: NO SERVICE the camera a few times if required to get all the informations from the cell network.
-
Page 31: Warranty And Preparation
INSTRUCTIONS FOR REPAIR SERVICES and it should be sent to: CANADA UNITED STATES SPYPOINT will repair the product, free of charge, or replace it at its discretion by an equivalent product, if it has a manufacturing defect covered by the SPYPOINT DISTRIBUTION CENTER warranty described above. -
Page 32: Regulation
Regulation SPYPOINT LINK-S-DARK FCC REGULATION DISPOSAL Article 15 of the FCC regulation ONLY USE ORIGINAL SPARE PARTS AND ACCESSORIES. This equipment has been tested and found to comply with the limits for a class If, one day, your camera has been used so intensively that it has to be replaced,... -
Page 33: Frequency
Frequency SPYPOINT LINK-S-DARK FREQUENCY FREQUENCY RANGE: 800/850/900/1900/2100 MHz MAXIMUM TRANSMISSION POWER: FREQUENCY MAX. GSM850 33 DBM ± 2 DB EGSM900 33 DBM ± 2 DB DCS1800 30 DBM ± 2 DB PCS1900 30 DBM ± 2 DB GSM850 (8-PSK) 27 DBM ± 3 DB EGSM900 (8-PSK) 27 DBM ±...
Need help?
Do you have a question about the LINK-S-DARK and is the answer not in the manual?
Questions and answers