Table of Contents
Advertisement
Quick Links
Congratulations! By purchasing your Panorama-VR-System III you have acquired
a tool, which enables you - together with a digital camera, a tripod, a ballhead and a
personal computer - to generate high quality panoramas simply.
To achieve exceptionally good results, you should make some adjustments before
and after taking your pictures. This applies to the hardware as well as to the soft-
ware. These instructions will help familiarize you with the most important working
steps.
Which equipment is necessary?
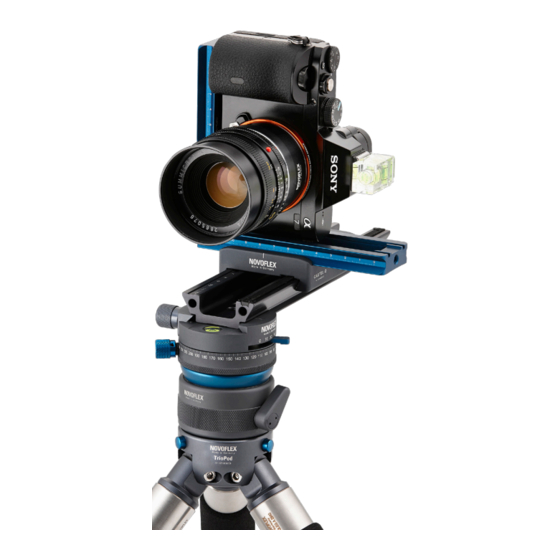
Beside your Panorama-VR-System III (consisting of panorama plate
bracket
Q=Plate
Vertical,
• A digital camera (ideally a full-featured SLR or mirrorless system camera with a standard or wide angle lens) or as an
alternative, an analog camera and a scanner
• A stable tripod (recommended: Novoflex QuadroPod or TrioPod)
• A ball head or leveling base (recommended: Novoflex ClassicBall, MagicBall or MagicBalance), a 3-way head or a
leveling center column
• A Windows
PC or a Mac (ideally a current computer with a lot of ram and a large hard disk)
TM
How is the panorama created?
Using the stitching technique, the final panorama will be an assembly of a series of individual images. Between these
single shots the camera will be rotated around a certain angle. You create your panorama afterwards on the computer
using a stitching software e.g. PanoramaStudio.
VR-System III
spirit level
for the flash shoe and the software PanoramaStudio) you will require:
Panorama=Q
48, focusing rack Castel-Q, angle
Advertisement
Table of Contents

Related Manuals for NOVOFLEX VR-System III


Summary of Contents for NOVOFLEX VR-System III
- Page 1 • A stable tripod (recommended: Novoflex QuadroPod or TrioPod) • A ball head or leveling base (recommended: Novoflex ClassicBall, MagicBall or MagicBalance), a 3-way head or a leveling center column • A Windows...
-
Page 2: Basic Assembly
Why should I use a panoramic tripod head? The panoramic tripod head (your VR-System III) makes it possible to rotate the entire optical system around the centre of the entrance pupil of the lens, also called the “nodal point” or “optical centre”. Thereby parallax effects are avoided, which is very important for the subsequent composition of the single frames. -
Page 3: Preparatory Steps
Locking Screw The panning base Panorama=Q 48 (see fig. on the left) is equipped with a safety pin, that prevents, together with four according milling grooves on the Safety Pin backside of the focusing rack Castel=Q inadvertent dropping of the equipment when the locking screw is not completely closed by mistake. - Page 4 Preparatory step 2: Level your panoramic head with the horizon: Watch the spirit level on your panning base Panorama=Q 48 and level the system by the ball head beneath. You don’t have to align the tripod. Preparatory step 3: Bring the camera to a precise vertical position: Observe the spirit level on the flash shoe of your camera and use the screw, that connects the body with the angle bracket, for adjusting.
- Page 5 Preparatory step 5: Forward-Backward Adjustment: Mount the lens, whose nodal point you want to find, to the camera body. When using a zoom lens, set the required focal length. Look through the viewfinder. Find a vertical edge or line, such as a floor lamp, which is located in the foreground and bring it in line with a vertical object in the background e.g.
-
Page 6: Field Use
Field use: Step 1: Transport: Common practice is to transport the equipment in two parts: • Part 1: Tripod with mounted ball head, with the panorama plate and focusing rack • Part 2: Angle bracket with mounted camera and spirit level on the flash shoe When you have performed preparatory steps 1 to 5 in the chapter... -
Page 7: Portrait Mode
The tables below are based on an overlap of 20-50% between two single shots and shows the recommended adjust- ment of the increment selector lever as a function of the camera (full-frame or APS-C sensor size) and the focal length of the lens in mm. - Page 8 Tip: f. length Lever Don’t take large charts with you, when you go out for taking pictures, but narrow them down to 16-21 8 (16/2) the information you really need on location. That is the nodal point distance and the increments 22-25 10 (30/3) of your favorite lenses.
- Page 9 These are the basic steps, working with the stitching software PanoramaStudio for Windows , which is in the package with your Panorama-VR-System III. You will find a detailed PDF manual with further information on the software CD. Step 1: Select pictures: Back home, copy all pictures belonging to one panorama to a folder on your desktop.
- Page 10 If you want to rotate the pictures in steps of 90 or 180 degree use the buttons on the side. Try all four buttons to see their effects! Step 2: Set up the focal length and the position of the horizon: When all pictures are in position click on “Parameters“.
- Page 11 After processing the result will be shown in the main window: Step 4: Cropping the panorama and further optimization: When the stitching process is done, it is still necessary to crop the panorama in order to remove irregular edges caused by the stitching.
- Page 12 Information: For more information, advice and tips concerning our products contact your photo dealer, the distributor of NOVOFLEX products in your country (have a look at “Where to buy“ section at our website to find your distributor) or visit our website: http://www.novoflex.com...
Need help?
Do you have a question about the VR-System III and is the answer not in the manual?
Questions and answers