Table of Contents
Advertisement
Quick Links
Tip
The interactive presentation of the cubical panorama on the front page of this manual can
VR-System PRO II
be seen in the internet at www.pixelmagazin.de/audi-tt-2016
USER MANUAL
Information
For more information, advice and tips concerning our products contact your photo dealer,
the distributor of NOVOFLEX products in your country (have a look at "Where to buy"
section at our website to find your distributor) or visit our website: http://www.novoflex.com
For personal advice about possible accessories which is suitable for your NOVOFLEX
product please contact the following phone number or send us an E-mail.
NOVOFLEX Phone: +49 8331 88888
NOVOFLEX E-Mail: mail@novoflex.com
© NOVOFLEX Präzisionstechnik GmbH
Brahmsstraße 7
D-87700 Memmingen
Phone +49 8331 88888, Fax +49 8331 47174
Email mail@novoflex.com, Internet www.novoflex.com
Advertisement
Table of Contents

Related Manuals for NOVOFLEX VR-System PRO II


Summary of Contents for NOVOFLEX VR-System PRO II
- Page 1 For more information, advice and tips concerning our products contact your photo dealer, the distributor of NOVOFLEX products in your country (have a look at “Where to buy“ section at our website to find your distributor) or visit our website: http://www.novoflex.com For personal advice about possible accessories which is suitable for your NOVOFLEX product please contact the following phone number or send us an E-mail.
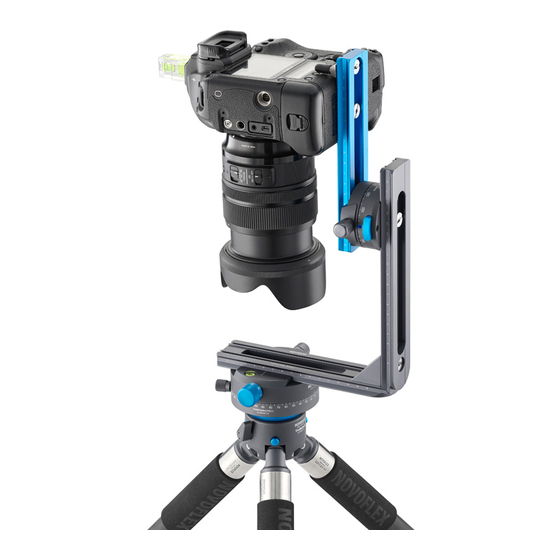
- Page 2 Separately pictured for better illustration • PTGui, • Pano2VR, • Photoshop NOVOFLEX MagicBalance (not in the scope of delivery) PANORAMA=Q PRO II NOVOFLEX TrioPod Separately pictured for better illustration (not in the scope of delivery) Interactive presentation see www.pixelmagazin.de/zurich Page 1...
-
Page 3: Recommended Accessories
• A ball head (recommended: NOVOFLEX ClassicBall or MagicBall), a 3-way head or • a leveling device (recommended: NOVOFLEX MagicBalance) A Windows™ PC or Mac™ (ideally a current computer with a lot of RAM and a large • hard disk) A stitching software, which is able to deal with multirow panoramas and possibly fisheye •... -
Page 4: Safety Notes
Safety notes Place the focus on the main subject of the scene. Then turn off the auto focus system. • Use a fixed white balance such as sunny, cloudy etc. (don’t use automatic white balance, • Before starting up, read this safety notes •... - Page 5 Step 6 The lower angle locking screw (11) should be • open any time, except when you are working in Define a vertical tilting angle the step less mode and want to fix the current When working with multi-row panoramas, set the vertical tilting position.
- Page 6 Alternatively use a battery grip or a quick 105 mm 5° 38.42 % 135 mm 7.5° 26.18 % release unit like the NOVOFLEX Q=MOUNT Mini D on the clamping plate. The problem only 120 mm 5° 29.67 % 140 mm 7.5°...
- Page 7 Advice The assembly of the remaining system should always be done from the bottom to the top When using a zoom lens, you have to find out the nodal point for each focal length sepa- rately. Set up your tripod and pay attention •...
- Page 8 Preparatory steps - finding the nodal point Preparatory step 3 Forward-Backward Adjustment The position of the entrance pupil “nodal point” depends on the camera-lens combination and - when using a zoom lens - on the focal length you use. Therefore you should try to In the following, you need a one-time set-up for testing.
Need help?
Do you have a question about the VR-System PRO II and is the answer not in the manual?
Questions and answers