Disc Makers ElitePro User Manual
Elite series
Hide thumbs
Also See for ElitePro:
- Network manual (36 pages) ,
- Troubleshooting manual (51 pages) ,
- Installation and setup gude (28 pages)
Table of Contents
Advertisement
Quick Links
ElitePRO_Getting_Started_03.indd 1
Instructions to get your ElitePRO duplicator
set up, powered, and running
Setting up the equipment
The ElitePRO duplicator has been engineered for easy setup and simple use. Fol-
low the instructions in this guide to start using the equipment quickly. The proce-
dures take you through the steps necessary to connect the duplicator to a monitor,
cable the components together, prepare the printer for use, run the FlexWare dupli-
cation software for the first time, and perform a simple disc copy and print opera-
tion. Once you have completed the steps in this guide, refer to the Elite Series User
Guide for more information about using your duplicator.
Choosing a setup location
Set up the duplicator on a sturdy, vibration-free work surface away from sources of
airborne contaminants and strong electromagnetic fields. The duplicator should
also be set up away from direct sunlight or very strong artificial light; the optical
sensors inside the unit may not operate properly if ambient light levels are too high.
For consistent duplication results, whether attended or unattended, we strongly
recommend the use of an Uninterruptible Power Supply (UPS) for isolating the
2/20/06 4:39:51 PM
Advertisement
Table of Contents

Related Manuals for Disc Makers ElitePro


Summary of Contents for Disc Makers ElitePro
-
Page 1: Choosing A Setup Location
Setting up the equipment The ElitePRO duplicator has been engineered for easy setup and simple use. Fol- low the instructions in this guide to start using the equipment quickly. The proce- dures take you through the steps necessary to connect the duplicator to a monitor, cable the components together, prepare the printer for use, run the FlexWare dupli- cation software for the first time, and perform a simple disc copy and print opera-... -
Page 2: Connecting The Keyboard, Mouse, And Monitor
Unscrew the knob on the access door directly beneath the printer and pull it open to expose the connectors for the keyboard, mouse, and monitor. The ElitePRO 2 can be used with a standard LCD or analog CRT monitor with a 15- pin VGA connector. -
Page 3: Preparing The Printer
Preparing the printer The self-contained printer included with the ElitePRO duplicator features its own power supply and individual controls. Before using the printer or the duplicator, install the two print cartridges provided as described in the following sections. -
Page 4: Powering On The Printer
Installing printer cartridges The ElitePRO duplicator includes two print cartridges: one black and one color. Do not unwrap the cartridges until you are ready to load them into the printer. - Page 5 The printer goes through a brief sequence to prepare the cartridges for printing. Note: You can test the operation of the printer during the procedure described in the section titled Operating the duplicator. ElitePRO_Getting_Started_03.indd 5 ElitePRO Getting Started Guide 2/20/06 4:40:05 PM...
-
Page 6: Powering On The Equipment
Starting FlexWare When you first power on the ElitePRO duplicator, the Windows startup screen displays a small FlexWare shortcut icon in the upper left just below the My Computer icon. Double click the FlexWare icon to start the program. -
Page 7: Running The Wizard
Create new print file: selected When you click Next from the Create new print file option, FlexWare launches Discus, described in the next section, to produce an image for printing on the blank disc. ElitePRO_Getting_Started_03.indd 7 ElitePRO Getting Started Guide 2/20/06 4:40:07 PM... - Page 8 ElitePRO Getting Started Guide Setting up labels The Discus program included with the ElitePRO duplicator provides an intuitive way to create visually appealing labels for printable surface discs. Discus lets you either print labels individually, directly to the disc printer, or create disc images that can be used in automated duplication operations.
- Page 9 For Disc Makers media, the Outer diameter of the print region, as controlled by the upper slider, should be set to 117 mm, as shown in the figure.
- Page 10 To start the duplication operation, first check to see if you have a master CD in the input spindle with two blank CDs underneath it. Click the Play button in the center of the window. The ElitePRO duplicator pick arm rotates to the input spindle, lowers to pick up the master disc, extracts the master disc, and places it in the upper disc recorder.
-
Page 11: Solving Common Problems
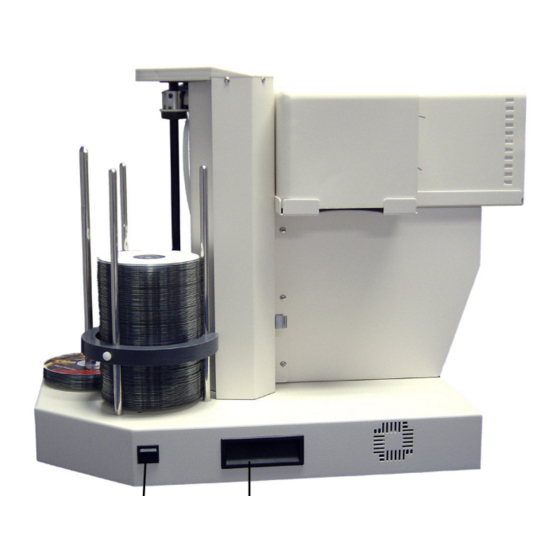
Solving common problems The duplicator won’t power on. The ElitePRO duplicator has two power switches—a master switch on the back of the cabinet next to the AC power cord input and a power switch on the left side of the cabintet. Ensure the master switch is in the On position (1) before pressing the power switch on the left side of the cabinet. -
Page 12: Getting Additional Help
Elite and ElitePRO are trademarks of Disc Makers. *Other names and brands may be claimed as the property of others. Disc Makers®...
Need help?
Do you have a question about the ElitePro and is the answer not in the manual?
Questions and answers