Disc Makers ElitePro Installation And Setup Gude
Elite series cdr/dvdr publisher
Hide thumbs
Also See for ElitePro:
- Network manual (36 pages) ,
- Troubleshooting manual (51 pages) ,
- User manual (13 pages)

Related Manuals for Disc Makers ElitePro


Summary of Contents for Disc Makers ElitePro
- Page 1 Hardware and Installation Setup Guide ElitePro with AutoGraph VI Printer CDR/DVDR Publisher...
-
Page 2: Service And Contact Information
This will allow you to be notified of future software upgrades. Whenever you contact Disc Makers please have the serial number listed below or on the rear of your unit, so a customer service representative can log onto your account... - Page 3 FlexWriter is a trademark of Amtren Corporation All other trademarks and registered trademarks are the property of their respective owners. This manual and its contents 2001 2002 2003 2004 Amtren Corporation The ElitePro is manufactured under license of Patent 6,141,298 and other Patents Pending...
-
Page 4: Table Of Contents
Load Blank Media and Start Duplication (Step 9) Design Print Image for Media (Step 10) Set Print Image for DiscJuggler (Step 11) Cycle Only Option (Step 12) Start the Job (Step 13) Using Drive Assigner Troubleshooting Guide 16-18 19-23 ElitePro Setup Guide... -
Page 5: Welcome And Introduction
ElitePro Setup Guide Welcome Thank you for purchasing your new standalone autoloader CDR/DVDR publisher. This system has been designed and is manufactured under strict quality guidelines. This product will provide years of dependable and trouble free operation. Description 125/200 Piece Input... -
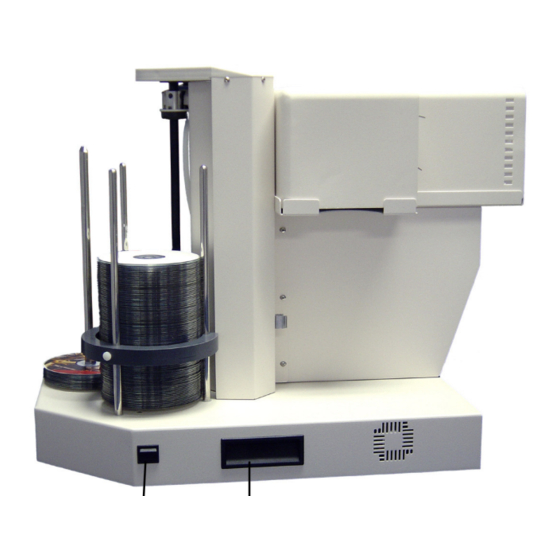
Page 6: Hardware Configuration
ElitePro Setup Guide Hardware Configuration Before starting the installation, please review the following Hardware and Functions. -
Page 7: Unpacking The Hardware (Step 1)
A new shipping container will be shipped out. Next, remove the monitor and the printer from their shipping carton. Place all the components on the table. Account for all the components and proceed to installation of the CD Pick Arm. ElitePro Setup Guide... -
Page 8: Installation Of Cd Pick Arm (Step 2)
Locate Pick Arm & Retainers Step 1 Install / Press in the Black Plastic Retainers Step 3 (NOTE: MAKE SURE THE Hold Pick Arm in Place & Connect RJ12 Connector Step 2 The Pick Arm after Installation Step 4 ElitePro Setup Guide... -
Page 9: Installation And Connection Of Ac Power Monitor
ElitePro Setup Guide Step 3 Installation and Connection of AC Power, Monitor, Keyboard and Mouse Plug the Monitor, Keyboard and Mouse into each of their color-coded connections located on the rear of the autoloader unit. These connections are identical to the common connections of standard computers. -
Page 10: Installation Of Cd Printer (Step 4)
ElitePro Setup Guide Step 4 Installation of the CD Printer Install the CD Printer and connections per this step. The autoloader is preset for the CD printer and all operating label software and drivers are included with the installation CDROM. -
Page 11: Installation Of Ink Cartridges (Step 5)
ElitePro Setup Guide Step 5 Installation of Ink Cartridges When you lift up the front plastic cover of the printer, the ink cartridge holder will slide into the center of the opening enabling you to replace the ink cartridges. If the pickarm will not allow the front plastic cover to open, then you may gently push the pickarm downward by applying downward pressure at the base of the pickarm where it wraps around the column. -
Page 12: Network Connection (Step 6)
ElitePro Setup Guide Step 6 Network Connection You may connect the autoloader to your existing computer network. It may be necessary to change some of the autoloader’s network settings before it will function properly on your network. Connecting the autoloader to your network will allow you to access shared folders and drives on other computers in the network. -
Page 13: Turn The System On And Boot Up (Step 7)
ElitePro Setup Guide Step 7 Turn the System ON and Boot UP. Ensure that all the cables are properly connected. Turn on the autoloader by pressing the power switch located on the unit’s front right side. A small green LED located on the front of the unit should light up. -
Page 14: Description Of Included Software
This icon runs a terminal program to allow serial connection to the autoloader’s controller. This function is reserved for technical service instructions from the Customer Support Staff. Please only use this mode when instructed to do so by the support staff. ElitePro Setup Guide... -
Page 15: Selecting Recorders & Printing Port
ElitePro Setup Guide Step 8 Using Drive Assigner to select Recording Drives & Printing Port From the factory, your duplicator is set to use the correct recorder drives and printer port. However, if you ever reinstall or upgrade the DiscJuggler software, it will be necessary to run Drive Assigner to select the CD recording drives and printing port to use with the autoloader. -
Page 16: Load Blank Media And Start Duplication (Step 9)
ElitePro Setup Guide Step 9 Load Blank CD’s and Start Duplication You are now ready to begin a job or task on the autoloader. Turn on your unit if you have not already done so. Refer to step seven if necessary. The next steps will take you through a typical setup and usage of the autoloader. - Page 17 ElitePro Setup Guide After you have selected Copy CDs and DVDs from the same burner, the panel below will open. Choose ACTION from the upper right section. On the PULL DOWN select Write and Print if you have a CD/DVD printer. Otherwise, select Write.
- Page 18 DiscJuggler menu. Next, click on the Defaults Here, you can change the default write speed for CDs and DVDs to the speeds that work best with your media. ElitePro Setup Guide tab if it is not already...
-
Page 19: Design Print Image For Media (Step 10)
ElitePro Setup Guide STEP 10 DESIGN PRINT IMAGE (LABEL) FOR MEDIA Note: You must be using an Autograph VI CD Printer in the following steps. If you are using another printer refer to documentation that came with your printer. Next you have to prepare a print image that can be used by the DiscJuggler software to print text or graphics on top of the media. - Page 20 ElitePro Setup Guide Choose the Print folder at the top. Verify that Discus is set for the Autograph...
- Page 21 ElitePro Setup Guide Text (1) ABC (2) Centered (3) Choose the folder at the top. Click on an button and the New (4) button. Then click on the button. Type in the text as shown in the figure below.
- Page 22 3. Make sure that the Autograph VI (Lexmark Z55) 4. Choose PRINT TO FILE. 5. Click on PRINT button. Type in the print file name: 7. Click the button. is selected under Printer Selection. " & ElitePro Setup Guide...
- Page 23 ElitePro Setup Guide Note that you will have to choose a file name for the PRINT (PRN) file. This can be the same as your label file; however, it is necessary to include the “.prn” at the end of the name. In the example below we have created printtest.prn...
-
Page 24: Set Print Image For Discjuggler (Step 11)
ElitePro Setup Guide STEP 11 SET PRINT IMAGE FOR DiscJuggler Now you have to provide the label print file location to the DiscJuggler. From the DiscJuggler Software choose the tab on the upper left section. Then click on the folder... -
Page 25: Cycle Only Option (Step 12)
ElitePro Setup Guide Step 12 Cycle Only Option As an option you can elect to “cycle only” and the software will not “RECORD” onto the media. Instead it will run through all functions BUT RECORD. Check the Cycle Only box to skip... -
Page 26: Start The Job (Step 13)
ElitePro Setup Guide Step 13 Start The Job Now you are ready for the unit to start a job. Click on the button. START The autoloader should move to the input spindle, pick up the 1 CD (your master) and place it into one of the recorders. -
Page 27: Using Drive Assigner
ElitePro Setup Guide Using Drive Assigner If Your Unit is trying to use CD/DVD Recorders on your PC, try the following: Due to the fact that DiscJuggler is an open platform that looks at the entire PC system for writers, it can sometimes try to assign your PC’s internal writer to the autoloader. -
Page 28: Troubleshooting Guide
ElitePro Setup Guide Troubleshooting the autoloader The autoloader system is comprised of 4 basic systems that all work together similar to a PC, Scanner and Printer configuration. Generally any items that come up can be isolated to one of the following components: 1) PC System / Windows®...
Need help?
Do you have a question about the ElitePro and is the answer not in the manual?
Questions and answers