Disc Makers EliteMicro Installation And Setup Manual
Usb 2.0 cd-r/dvd-r publisher
Hide thumbs
Also See for EliteMicro:
- Troubleshooting manual (51 pages) ,
- Installation and setup manual (37 pages)
Table of Contents
Advertisement
Quick Links
Download this manual
See also:
Troubleshooting Manual
Advertisement
Table of Contents

Related Manuals for Disc Makers EliteMicro


Summary of Contents for Disc Makers EliteMicro
- Page 1 VERSION 1.2 07/26/04 Hardware Installation and Setup Guide EliteMicro CD-R/DVD-R Publisher USB 2.0...
- Page 2 Service and Contact Information Free lifetime technical support Disc Makers’ technical support team is here to help you every step of the way with your duplication system. Our goal is to minimize your downtime and maximize the return on your investment. We offer FREE technical support to you for as long as you own your duplicator.
- Page 3 It is illegal to duplicate copyrighted discs for any reason other than personal use, unless you happen to be the copyright owner. The EliteMicro recording unit is intended for use only to those identities that are the owners of the copyright or are properly licensed to use the copyright.
-
Page 4: Table Of Contents
Carton Contents ................12 Installation of Printer Adapter Kit ..........13 Installation of Printer ..............14 Connection of the EliteMicro ............15 Turn On EliteMicro & Install Drivers ..........16-17 Powering Off Duplicator ............... 18 Powering On Printer..............19 Startup CD-ROM ................. 20-21 Installation of Recording Software .......... -
Page 5: Welcome And Introduction
EliteMicro™ with Inkjet Printer Welcome Thank you for choosing the EliteMicro CD-R / DVD-R publisher. This system has been designed and manufactured under strict quality guidelines to give you years of dependable and trouble free operation. The EliteMicro comes with all the hardware and software needed for easy installation with your computer hardware. -
Page 6: Installation Requirements And Cautions
Installation Requirements and Cautions The EliteMicro is an investment for your company. It is very reliable and you can count on it to produce quality CDR and DVDR disks as needed, over and over for many years. Review and try to double check the following items if, after following the installation directions in this manual, the system does not work correctly. -
Page 7: Hardware Configuration
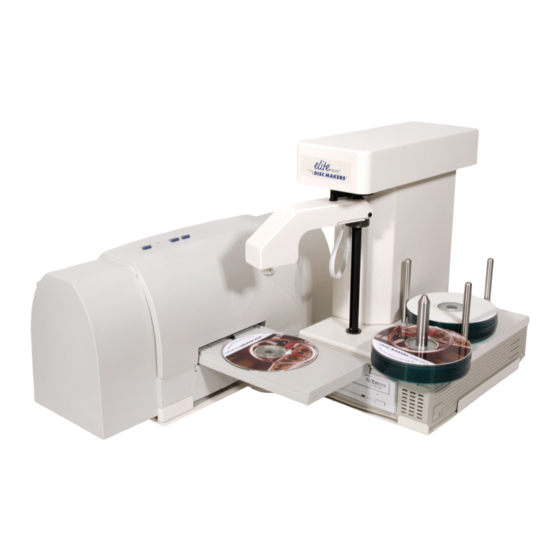
Hardware Configuration Before starting the installation, please review the following figures showing the EliteMicro hardware and functions. Input Spindle Pick Arm Output Spindle Power Switch AC Power Input Printer Control Cable USB 2.0 to PC USB 2.0 to Printer www.discmakers.com... - Page 8 Printer Controls Disc Printer Printer Guide EliteMicro with color inkjet printer www.discmakers.com 1-800-237-6666...
-
Page 9: Minimum Pc Hardware Requirements
The following are minimum requirements for the PC to which the EliteMicro is to be connected. These are very important. Due to the high speed of the writer, sufficient memory and FAST hard drives are required. -
Page 10: Unpacking The Hardware
This brief setup guide is provided to get the EliteMicro operational out of the box. Once you get the system operational, complete online help can be accessed from the DiscJuggler HELP Section. Step 1 Unpacking the Hardware: Your EliteMicro system is shipped in one main carton. If you ordered an EliteMicro with printer, you ll also receive a box with the printer adapter kit and a box with the inkjet printer. - Page 11 Carefully lift out as shown. Remove from bag. NOTE: Do not attempt to raise the CD Pick Arm by hand; the software will position the Pick Arm when the EliteMicro is initialized. www.discmakers.com 1-800-237-6666...
-
Page 12: Carton Contents
Main Carton w/ EliteMicro • USB 2.0 Cable • AC Power Cord • Installation CD with EliteMicro Software • Hardware Setup Manual Printer Adapter Kit Carton • Printer Guide Plates (2 pcs) • Printer Control Cable • Installation CD with Label Printing Software www.discmakers.com... -
Page 13: Installation Of Printer Adapter Kit
Review your configuration and confirm it matches Figures 9.5 and 9.6. Plug the Printer Control Cable (mini din cable similar to a keyboard cable with connectors on both ends) into matching connectors in the rear of the EliteMicro and the rear of the Printer. (Figures 9.7 & 9.8) Plug the USB printer cable provided with the CD Printer into the rear of the printer and into the auxiliary USB port on the rear of the Micro.(Figure 9.8) -
Page 14: Installation Of Printer
Figure 9.7 Figure 9.8 Plug Printer Control Cable and USB Cable for Plug the Printer Control Cable and USB the CD Printer into the EliteMicro as shown. Cable into the CD Printer as shown. www.discmakers.com 1-800-237-6666... -
Page 15: Connection Of The Elitemicro
USB 2.0 port on your PC. Your PC should be off at this time. Plug the power cord into the power supply of the EliteMicro, also located on the rear side. Plug into a standard 115V AC outlet. -
Page 16: Turn On Elitemicro & Install Drivers
Ensure that all the cables are properly connected (see Step 3 on page 15). Turn on your PC. Locate the EliteMicro Installation and Support CD-ROM and insert it into your PC’s CD-ROM drive. If a web page automatically launches, minimize it for now. Turn on the EliteMicro by using the power switch located on the rear of the unit (see image on page 15). - Page 17 EliteMicro Duplicator to use. Typically, the port will be assigned the next available COM Port number. It will be listed in the Windows Device Manager when the EliteMicro is turned on and connected to your computer. Windows 2000 users: Note that the above installation process may look slightly different if you are using Windows 2000.
-
Page 18: Powering Off Duplicator
Powering off your EliteMicro CD Duplicator: It is recommended that you turn your PC off before turning off your EliteMicro. If it is necessary to leave your PC on and turn the EliteMicro off, make certain that you first close any applications or windows that are using the duplicator or the duplicator’s drive. -
Page 19: Powering On Printer
Printer Driver included with your printer. Follow the directions included with the CD Printer to install the drivers and ink cartridges. The EliteMicro is generally preset for the printer. Once the unit is connected and operational, you may have to perform an alignment of the printer. -
Page 20: Startup Cd-Rom
Installation of Startup CD Locate the EliteMicro Installation and Support CDROM (that was used to install autoloader drivers earlier), insert it into your PC’s CDROM drive and it will automatically open to a setup screen. Note: If your CDROM drive is not set to autoplay, open the CDROM and click on click_here.htm. - Page 21 Register Online If your PC is currently connected to the Internet, click on this option to register your EliteMicro online. You are encouraged to register your EliteMicro to allow you to be notified of software updates. Download Center If your PC is currently connected to the Internet, click on this option and you will be directed to the software support download site.
-
Page 22: Installation Of Recording Software
Step 6 Installation of Recording Software The next installation step is to install the recording software. Click on the DiscJuggler link in Step 2 of the Installation and Support CD. You will have a choice between “OPEN from location,” or “SAVETO.” This choice will depend on your hardware configuration. - Page 23 Select the radio button next to “Complete” and click “Next.” The installation is complete. Click “Finish” and the DiscJuggler Icon will be placed on your desktop. www.discmakers.com 1-800-237-6666...
-
Page 24: Installation Of Autoloader Command Console
Next you can install the ACC (Autoloader Command Console) program. This is a utility program used to align and support the Elite Autoloading unit. Double click on the “Install EliteMicro Autoloader Command Console Program” in Step 2 of the Installation and Support CD and choose open” from location. ACC will install. Please follow the instructions carefully. - Page 25 The ACC allows you to troubleshoot and update your EliteMicro unit. If any electrical or mechanical issues occur, run the Diagnostics. The ACC Diagnostic routine will test all functions of the autoloader and provide graphical feedback. The Comm Port setting allows you to select the appropriate COM port when communicating with the EliteMicro.
- Page 26 This screen provides an easy way to update the AutoLoader’s firmware if changes are made in the future. This screen offers an easy way to recalibrate your unit if the need should arise. You must first click “Calibrate” for the buttons to become active.
-
Page 27: Using Drive Assigner
DiscJuggler will review the system and display the devices that it has located. Select the recorder that is located in the EliteMicro unit by clicking on the box beside the drive. Click on “Update” and then “OK” when finished with your selection. This process will assign only the recorder of the EliteMicro to DiscJuggler. -
Page 28: Installation Of Labeling Software
Step 9 Installation of Labeling Software If your EliteMicro was purchased with the Inkjet Printer Adapter Kit, you will need to install the label making software included with the kit. Locate the Discus Labeling Software CD and insert into the CD-ROM drive on your PC that is connected to the EliteMicro. -
Page 29: Disabling Cd Rom "Auto-Run
Step 10 Disabling Auto-Insert Notification for your CD ROM Drives If your computer automatically tries to play a music CD or launch a program when a data CD is inserted into your CD ROM drive, you will need to turn off your computer’s “auto-run” feature. You MUST disable auto-run. -
Page 30: Set Print Image For Media
A print image that can be used by DiscJuggler to print text or graphics directly on the disc has to be prepared. The Discus Labeling software provided with the EliteMicro will be utilized to do this. Open up the Discus CD labeling program by double clicking on the Discus CD Labeling icon found on your desktop. - Page 31 Choose the Print folder at the top. Click on “Select Template” and choose the “Primera Bravo” template. Then click on the Text folder. Discus will display the Text folder. Click on an “ABC button” and the “Centered” button. Then click on the image of the CD.
- Page 32 Now click on the “Print” tab, then the “Print” button. A printer display similar to the one shown in the figure below will be displayed. Make sure that your CD printer is selected under “Name.” Click “PRINT TO FILE.” In order for DiscJuggler to use the label file, it is necessary to create a print file (i.e. printtest.prn).
-
Page 33: Load Blank Cds And Start Duplication
Load Blank CDs and Start Duplication You are now ready to begin a job or task on the EliteMicro. Begin by powering on the unit, if you have not already done so (switch is located on the back as indicated in the picture on page 15). The next steps will take you through typical setup and operation of the EliteMicro. - Page 34 After selecting “Copy CDs and DVDs from the same burner,” the panel below will open. Under ACTION in the upper right section, click on the PULL DOWN and click “Write and Print” if you have a CD/DVD printer. Otherwise, select “Write.” Under the Source and Destination tab, ensure that the Micro unit is selected, and NOT a recorder on your PC.
-
Page 35: Set Print Image For Discjuggler
Step 13 SET PRINT IMAGE FOR DiscJuggler Now, the label print file location must be provided to DiscJuggler. From DiscJuggler choose the “AUTOLOADER” tab from the upper left section. Then click on the folder icon to the right of the GOOD LABEL file panel. -
Page 36: Start The Job
Step 14 Start The Job Now you are ready for the unit to start a job. Click on the “START” button. www.discmakers.com 1-800-237-6666... - Page 37 The recorded CD will be placed into the printer tray and the CD will be printed. After printing, the EliteMicro will pick up the CD from the printer and place it into the output spindle. It will repeat this and the cycle will continue until all 25 copies are completed.
-
Page 38: Troubleshooting
B. In DiscJuggler go to Tools - Device Explorer. You will see your EliteMicro on the list. Click the plus sign to the left of the EliteMicro. You will then see the drive that is associated with the EliteMicro directly underneath. Verify that it is the burner drive in the robotics, if it is not close out of DiscJuggler and follow step C. - Page 39 4. Buffer under runs error A. This error can be caused by a number of reasons, Media, system resources or a faltering drive. One test is to slow down the burn speed in your DiscJuggler program to see if this fixes the problem.
-
Page 40: Warranty
Makers is not responsible for or liable for consequential damages related to the use or misuse of this equipment. Disc Makers’ liability under this warranty extends solely to the obligation to repair or replace a covered product. Disc Makers’ liability under this warranty shall not exceed the cost of the covered product.
Need help?
Do you have a question about the EliteMicro and is the answer not in the manual?
Questions and answers