Table of Contents
Advertisement
Quick Links
Advertisement
Table of Contents

Related Manuals for Disc Makers Pico MAC


Summary of Contents for Disc Makers Pico MAC
- Page 1 User’s Guide Rev.: 111005.1...
-
Page 2: Copyright Notice
Other trademarks referred to are the property of their respective trademark or registered trademark holders. Warranty Disc Makers, Inc. warrants to the original purchaser that the equipment that you have purchased is free from defects in materials and workmanship, for a period of time as follows: Duplicator Electronics & Mechanical Parts Recorders (warranty by drive manufacturer) This warranty is applicable when the warranty registration has been completed and returned to Disc Makers, Inc. -
Page 3: Table Of Contents
Table of Contents ABOUT DISC MAKERS, INC..4 XPECT ABOUT THIS MANUAL ... 4 GETTING STARTED... 5 ’ ... 5 : ... 5 HAT YOU WILL ALSO NEED Recommended PC requirements: ... 5 ... 6 ACKING ATERIALS LACE ... 6... - Page 4 ... 31 UDIO MAGE DITOR OOLBAR ... 32 DDING RACKS ... 32 EMOVING RACKS A UPC C ... 33 HANGING ISRC C HANGING ODES NSERTING DITING EMOVING NSERTING DITING EMOVING AVING URRENT UDIO To create a physical audio disc image file (.IMG):... 37 OADING XISTING CRIPT...
-
Page 5: About Disc Makers, Inc
About Disc Makers, Inc. Thank you for purchasing Disc Makers’ Pico autoloading duplication system. Disc Makers offers a wide variety of CD & DVD production equipment, including manual and fully automatic CD and DVD duplicators and printers. We hope you will consider us for all of your CD and DVD needs. -
Page 6: What' In The Box
Getting Started Carefully remove the Pico duplication system from the shipping container. Inspect the contents and verify them against the packing slip. Report any errors in shipping as soon as possible. What’s In The Box The package includes: • Pico duplication system •... -
Page 7: Packing Materials
Uninterruptible Power Supply (UPS), or a surge protector is always a good idea. Repairs or alterations should only be attempted by authorized factory trained technicians. Disc Makers reserves the right to void the warranty if unauthorized service is performed. Page 6... -
Page 8: Removing Packing Restraints
Removing Packing Restraints Be sure to remove all packing restraints before operation or power-on. Save the foam block, as you will need to return it to its place when transporting the unit in the future. Setup Before turning on your unit, please follow these steps: Installing media adapters The input media adapters allow you to set the input bin to accept standard 120mm discs, 80mm mini discs, or BizCDs. -
Page 9: Front View
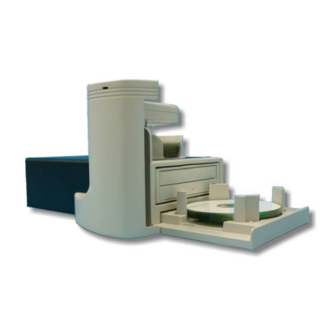
Step 3: Rotate the four pillars as shown below and set to desired media type. Front View 1. Robotic Arm 2. Status indicator: Green=Ready, Yellow=Burning, Red=Error 3. Output Bin 4. CD/DVD Burner 5. Input Bin 6. Rejects: Pico discards rejects over the top of (3) Output Bin. -
Page 10: Making The Connection
Making the connection The Pico requires a host PC to control it. Your PC should meet the requirement detailed earlier. Installation is simple, and only a single USB 2 connection need be made between your PC and the Pico. • Make sure the Pico power switch is set to the off position (0=Off, 1=ON). - Page 11 • After the driver installation is • Click on FINISH (Fig. 2) Page 10 automatically, you will be asked to point to the install file on the Pico Installation CD. Select the file “x:\Autoloader \AutoLoader.Inf” where “x” is the drive letter of the disc drive in which you have put the Install CD.
-
Page 12: Installing The Pico Software
Installing Pico’s Software Pico’s comes Disc Forge. If you are upgrading or reinstalling the software, it is recommended you remove the old version first. To install Disc Forge software: • Insert the Pico software CD into one of the drives on the Pico drive tower. •... - Page 13 • Click NEXT to continue • If you accept the terms of the license agreement, select “I accept…” then click NEXT to continue. • Click NEXT to continue, or CHANGE to install to a location other than the default. Page 12 Rev.
- Page 14 Rev. 111005.1 • Click INSTALL to continue. • Please wait while the Pico software is copied to your hard drive. Page 13...
- Page 15 Rev. 111005.1 • Installation is complete. Click FINISH. Page 14...
-
Page 16: Quick Start, Making Copies
Quick Start, Making Copies Starting the Disc Forge application To start the Disc Forge application the steps are as follows: • From the desktop of the computer, click the Disc Forge Icon • The Disc Forge application screen will now be displayed: •... - Page 17 • Select “Copy and/or verify” and then click NEXT. You will now be prompted: Enter the desired number of copies in the “Quantity” box. When you satisfied with your selections, click NEXT. • Use the default “Job Name” or enter your own such as a work order number.
- Page 18 Rev. 111005.1 The “Jobs in Progress” section of the Job Manager TAB will now show the status of the job you just started. The Pico will now load the master disc into the drive. Once read-in successfully, it will accept the master disc to the output bin and then load the first blank disc to begin duplication.
-
Page 19: The Disc Forge Application
The Disc Forge Application Pico with Disc Forge software is a state-of-the-art CD / DVD duplicating system. It is designed to create, duplicate and verify most standard disc formats. This startup section will guide you through starting and configuring the Disc Forge application. Starting the Disc Forge Application To start the Disc Forge application the steps are as follows: •... - Page 20 • Click on and three new TABs will be revealed: • You may toggle between these modes, simply by enabling and disabling the Advanced Authoring Tools. Page 19 Rev. 111005.1...
-
Page 21: Disc Forge Application Layout
Disc Forge Application Layout The Disc Forge application is organized into either two or five cards, depending on if Advance Authoring Tools enabled. These cards, referred to as TABs, are accessible by clicking on the desired TAB on the top of the screen. Tabs include Job Manager, Data Image Editor, Audio Image Editor, and Settings. -
Page 22: Settings Editor
The Settings tab is divided into four areas: Version Information, Default folders, Communication Port, and the toggle button to enable and disable advanced authoring tools. The field closest to the top of the tab is the Pico’s version information. This lets you know what version of Pico you are currently running. -
Page 23: Cd Label Default Folder
CD Labels Default Folder • The Disc Forge software is used by other products which can also print in-line. This does not apply to the Pico as it is a “duplication only” model. Saved Jobs Default Folder • Think of a job as a work order. It saves the quantity, the image and image file so that past jobs may be quickly recalled and resubmitted. -
Page 24: Data Image Editor
Data image editor The first step in constructing a CD or DVD is to create an image file. Image files may be made by reading in a physical master, or by pre-mastering the disc in the Data or Audio Imager Editors. The Pico creates industry standard data (Mode 1 ISO 9660 level 2 with Joliet extensions) and audio (Red Book) CDs from scratch as well as duplicates of existing discs authored in most formats. -
Page 25: Image Toolbar
Image Toolbar Horizontally along the top of the screen is an area which contains ten buttons, from left to right the buttons are: New CD layout, Load CD layout [*.ISC], Save CD layout [*.ISC], CD Image properties, Create CD image [*.ISO], Record CD, Enable inserting entire contents of folder [*.*], Large Icons, Small Icons, List, and Details. -
Page 26: Adding File And Folder
Selecting Disc Capacity Along the bottom of the lower panes is a series of radio button options that are used to select the capacity of the disc you are creating • Click the radio button corresponding to the capacity of the discs loaded into the Pico. -
Page 27: Static And Dynamic Content
• Click the desired file or folder in the bottom left or right pane and drag the item to the recycle bin in the lower right hand corner. This does not delete the actual file, but rather exclude it from the CD or DVD layout. Static and Dynamic Content Pico allows discs to be created from both static and dynamic content. -
Page 28: Saving The Current Disc Image File
Rev. 111005.1 Saving the Current Disc Image File Once a data disc image has been created, it must be saved before it can be used by the Pico as a data source for recording. Disc images can either be saved as script files (with an “ISC” extension) or physical image files (with an “.ISO”... - Page 29 The CD IMAGE PROPERTIES dialog box contains a series of radio buttons as well as a number of information boxes. • Click the radio button corresponding to the logical file system to be used on the disc (ISO 9660, Joliet, or UDF 1.02 for DVD). •...
-
Page 30: To Create A Physical Disc Image File
To create a physical disc image file: • Click the Create CD Image button on the toolbar. The screen will now read: Disc Image File • Select the volume and directory where you want to save the physical image file. •... -
Page 31: Audio Image Editor
Audio Image Editor The Pico creates industry standard audio (Red Book) CDs from scratch that can be played on any home, car or portable compact disc audio player or computer CD or DVD-ROM drive. Audio tracks are created using any combination of 44.1 kHz, 16 bit stereo WAV or MP3 files. -
Page 32: Audio Image Editor Toolbar
Audio Image Editor Toolbar Horizontally along the top of the screen is an area which contains ten buttons, from left to right the buttons are: New CD layout, Load CD layout [*.ISC], Save CD layout [*.ISC], CD Image properties, Create CD image [*.IMG], Record CD, Large Icons, Small Icons, List, Details. -
Page 33: Adding Tracks
Adding Tracks • As depicted below, drag one or more WAV / MP3 files onto the text "The end" as it appears in the top left corner of the bottom pane. Multiple files may be selected by pressing and holding down the SHIFT or CTRL key while clicking on the tracks. -
Page 34: Changinga Upc Code
Changing A UPC Code The UNIFORM PRODUCT CODE (UPC) is an optional 13-digit descriptor that can be written into an audio CD. To change the UPC code: • Click the CD Image Properties button on the Image toolbar. The screen will now read: •... - Page 35 To change an ISRC code: • Right click the desired audio track in the lower left pane, and select Edit. The screen will now read: • Enter the code in the ISRC line and click the OK button. Valid codes start with two-letter country code, followed by ten digits.
-
Page 36: Inserting, Editing And Removing Silence
Inserting, Editing And Removing Silence When assembling an audio CD disc image the Disc Forge application does not insert silences (gaps) between tracks. To insert silence between tracks: • Right click on an audio track. • Select “Insert silence.” To edit the amount of silence between tracks: •... -
Page 37: Inserting, Editing And Removing Subindexes
Inserting, Editing And Removing Subindexes Subindexes are markers used by CD audio players to locate specific points inside an audio track. Subindex 0 indicates the start of any silence before the beginning of a track and subindex 1 indicates the beginning of a track’s audio material. -
Page 38: Saving The Current Audio Disc Image
• Drag the subindex over the trashcan in the bottom right of the Audio tab and release the mouse button. • Click the Yes button. Saving The Current Audio Disc Image Once an audio disc image has been created it must be saved before it can be used by the Pico as an audio source for recording. -
Page 39: Loading An Existing Script File
Rev. 111005.1 • Enter the name for the physical image file and click the Save button. Loading An Existing Script File Once a data disc image script file has been saved it can be modified at a later date. To load an existing script file: •... -
Page 40: Job Manager Tab
Job Manager Tab A job is any production run whether it be reading-in a master (archive), or copying an existing disc. In addition to showing you the status of jobs, the job manager is where you will go start new jobs. •... -
Page 41: The Production Process
The Production Process During production, the blank discs will be loaded one at a time from the input bin, sometimes referred to as a spindle, into the recorder. Upon successful completion the discs will be unloaded onto the output. This process will continue until the job is complete and the Pico will then advance to the next job in the queue according to its priority. - Page 42 • Check the option box to enable the production option needed for your job and click “Next”: Operations and Options: Copy When checked, the discs in the submitted job will be recorded using the disc image file selected in the IMAGE field.
-
Page 43: Archive Only - Reading In A Master Disc
Archive only – reading in a master disc An Archive job allows you to read-in an existing master to create a disc image file. DVDs will be saved as .UDF files and CDs to .IMG files. These files may be used later when starting a COPY job. - Page 44 “Next”. 4. The “Job parameters” will then be displayed. Give your job a name and select a priority. 5. Click “Finish” and the Pico will run the job. (fig. 3) (fig. 4) Page 43 Rev. 111005.1...
-
Page 45: Copy And / Or Verify
Copy and / or Verify This allows you to start copying or verifying from an image file, or a new master disc. 1. On the Job Manager TAB click new and select the “Copy and/or Verify” button as seen in (fig. 1). 2. - Page 46 Rev. 111005.1 select a priority. 8. Click Finish and the Pico will run the job. (fig. 4) Page 45...
-
Page 47: Relay Mode Job
Relay mode job Relay mode allows you to make multiple copies of multiple masters. Simply load the unit with the desired number of blank discs, then the master such that the master sits on top of the blanks. Then load in more blanks followed by the next master and so on. The end result will be copies of each master placed in to the input bin(s). - Page 48 Rev. 111005.1 7. The Job parameters will then be displayed. Give your job a name and select a priority. 8. Click Finish and the Pico will run the job. Page 47...
-
Page 49: Network Client Software
Network Client Software Pico comes with a Network client. This allows you to connect the Pico as you would any Microsoft Windows XP PC on your network. In doing so, you can share the Pico with other users on your network allowing them to submit jobs remotely. Client PC minimum requirements: Client PCs should meet or exceed these minimum requirements: •... -
Page 50: Using The Client Software
• Again using Windows Explorer. browse to the location where you would like to place the client software, right click and select PASTE. I suggest copying to your remote’s PC’s desktop, or to a network a share from which you can copy ScribeCLient.exe file to each client PC’s desktop.
Need help?
Do you have a question about the Pico MAC and is the answer not in the manual?
Questions and answers