
Related Manuals for Disc Makers ElitePro1


Summary of Contents for Disc Makers ElitePro1
- Page 1 Version 1.1 10/03/02 ElitePro™ CD-R/DVD-R Publishing and Printing System Instruction Guide ElitePro1 ElitePro2 ElitePro3 ElitePro4 www.discmakers.com 1-888-800-4041...
-
Page 2: Warranty
Warranty does not apply to malfunctions caused by misuse, negligence, acci- dent, or alteration. Disc Makers is not responsible for or liable for consequential damages related to the use or misuse of this equipment. Disc Makers’ liability under this warranty extends solely to the obligation to repair or replace a cov- ered product. - Page 3 And fast turn times are our specialty. Many of our complete CD-ROM packages are ready in just 7 working days! No one does it faster. Call your Disc Makers product spe- cialist at 1-800-CD-ROM-NOW, or go to www.discmakers.com/rom for com- plete information and package pricing.
-
Page 4: Table Of Contents
Table of Contents Warranty ............2 Description . -
Page 5: Description
ElitePro autoloader software, providing a seamless, reliable solution. The DiscJuggler.NET software is available as an option to allow users on a network to submit CD duplication jobs from their desktop. Call your Disc Makers duplicator specialist at 1-888-800-4046 for details and pricing. www.discmakers.com... -
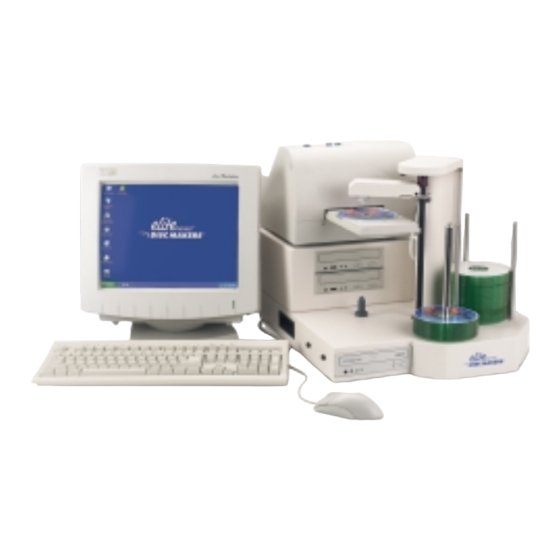
Page 6: Hardware Configuration
Hardware Configuration Before starting the installation process, please review the ElitePro hardware and functions below: www.discmakers.com 1-888-800-4041... -
Page 7: Unpacking The Hardware
Your system was shipped in three separate boxes. The larger box contains the ElitePro unit, keyboard, mouse, and cables. The remaining two boxes contain the monitor and Disc Makers Autograph on-disc inkjet printer. Please inspect the contents and verify them against your packing slip. Be sure to report any errors in shipping immediately. -
Page 8: Installation Of The Pick Arm
Step 2 Installation of the CD Pick Arm The CD pick arm needs to be installed onto the robotic lift ring. • Remove the pick arm from its bubble wrap packaging. Included with the pick arm will be a bag containing two small black plastic rivets. These are used to hold the pick arm in place. -
Page 9: Monitor, Keyboard, And Mouse
Step 3 Installation and Connection of AC Power, Monitor, Keyboard, and Mouse. • Plug the monitor, keyboard, and mouse into each of their color-coded connections located on the rear of the ElitePro unit. These connections are identical to the common connections of standard computers. •... -
Page 10: Installation Of The Autograph On-Disc Printer
Step 4 Installation of the Autograph On-disc Printer Review the Autograph printer manual, which was included in the box with your printer. Install the print cartridge (also included in the box with your printer) according to the instructions in the printer manual before mounting your printer on the Elite duplicator. -
Page 11: Network Connection
Step 5 Network Connection You may connect a standard network connection to the rear of the ElitePro. You will need to configure the Windows XP software for the network name. Once the ElitePro boots up, make the necessary setup changes for the net- work. -
Page 12: Turn The System On And Boot Up
Step 6 Turn the System On and Boot Up With all the cables in place and power connected, turn on the power button on the right of the ElitePro. The system will boot up and you will see program icons on the desktop. From the bottom to the top: Elite/DiscJuggler This icon starts the duplication software and autoloader. -
Page 13: Start The Duplication Process
Step 7 Start the Duplication Process You are now ready to begin a CD-R or DVD-R (if your ElitePro is a DVD-R ver- sion) duplication job or task on the ElitePro. The next steps will take you through a typical setup and usage of the ElitePro. We recommend that you fol- low these steps and produce a test job, then move on to the many other func- tions and features of the ElitePro. - Page 14 Important: Because DVD files are generally much larger than CD files, it will take longer for a DVD image to load to the hard drive. • After you have selected Copy CDs and DVDs from the same burner, the panel pictured below will open. Go to the Action section in the upper right portion of the panel.
-
Page 15: Set On-Disc Print Image (Label)
Step 8 Set On-disc Print Image (Label) for Media The next step is to prepare a print image that can be used by the DiscJuggler software to print text or graphics on your CD-Rs or DVD-Rs. To do this, you will use the Discus labeling software provided with your ElitePro. - Page 16 • The DiscJuggler software uses *.prn files for printing. Choose File / Print from the menu bar. Examine the Printer name window for your printer. The default is the CD Color Printer IV. If you purchased the Autograph Pro printer, use the drop down carrot at the right of the printer window to change to the CD Color Printer Pro.
-
Page 17: Set Printer Image For Discjuggler
Step 9 Set Print Image for DiscJuggler Now you have to provide the label print file location to the DiscJuggler. • From the DiscJuggler screen choose the Autoloader tab on the upper left section. • Go to the end of the Good Label field and click on the folder icon. •... -
Page 18: Cycle Only Option
Step 10 Cycle Only Option As an option, you can elect to "cycle only" and the software will not record onto the media. Printing will still occur, but the disc will not be recorded on. Check the Cycle Only box in the Autoloader section at the top left to skip recording. www.discmakers.com 1-888-800-4041... -
Page 19: Start The Job
Step 11 Start the Job Click on the Start button in the center of the screen and the ElitePro will begin the duplication and printing process. The CD pick arm will move to the input spindle, pick up the first CD (your mas- ter disc) and place it into the first drive. -
Page 20: Troubleshooting
Troubleshooting the ElitePro The ElitePro is comprised of four basic systems that work together. Generally any issues that come up can be isolated to one of the following components: • PC System / Windows XP • Loader Unit • DiscJuggler software •...
Need help?
Do you have a question about the ElitePro1 and is the answer not in the manual?
Questions and answers