
Subscribe to Our Youtube Channel
Related Manuals for Casio LABEL IT! KL-BT


Summary of Contents for Casio LABEL IT! KL-BT
- Page 1 KL-BT1 Model No. User’s Guide Supported Tape Widths MO2103-A © 2021 CASIO COMPUTER CO., LTD.
- Page 2 Bluetooth SIG, Inc. • ® and is used under license by CASIO COMPUTER CO., LTD. All other trademarks and trade names are the property of their respective owners. All other company and product names used in this manual are trademarks • ...
-
Page 3: Table Of Contents
Contents Safety Precautions ......Printing ........Printing Precautions ....Precautions During Use ....Printing ........Printer and Bundled Accessories Changing the Settings ....Operational Flow for This Printer . Canceling Printing ....Installing the App ......Advancing the Tape ....Names of Parts and Their Functions Cutting the Tape ...... -
Page 4: Safety Precautions
Safety Precautions Thank you for purchasing this printer. Be sure to read the “Safety Precautions” before using this product to ensure that you use it correctly. Indicates something that creates the risk of death or serious personal injury. Indicates something that creates the risk of minor personal injury or physical damage. - Page 5 Doing so creates the risk of electric shock. If the AC adaptor or power cord becomes damaged, contact your original retailer or a CASIO Service Center. Continued use creates the risk of fire and electric shock. Before leaving the product unattended, unplug the AC adaptor from the power outlet, and move the product to a location away from animals and pets.
- Page 6 1. Turn off power. 2. If you are using an AC adaptor, unplug its power plug from the power outlet. 3. Contact your original retailer or a CASIO Service Center. Disassembly and Modification Do not attempt any disassembly or modification. For any internal inspection, adjustment, or repair, contact your original retailer or a CASIO Service Center.
- Page 7 2. If you are using an AC adaptor, unplug its power plug from the power outlet. 3. Contact your original retailer or a CASIO Service Center. Do not locate a flower vase or other liquid container on top of or next to the product or AC adaptor.
- Page 8 Do not use a leaking battery. Doing so creates the risk of fire and electric shock. Immediately stop using the product and contact your original retailer or a CASIO Service Center. Connections Connect only specified devices and items to connectors.
- Page 9 AC Adaptor Observe the precautions below in order to avoid AC adaptor fire and electric shock. Insert the power plug into the outlet as far as it will go. • After use, unplug the power plug from the power outlet. • ...
-
Page 10: Precautions During Use
In order to ensure best printer function and stability, always use only genuine • CASIO tape cartridges. Use of a non-CASIO tape cartridge can harm your printer, result in poor printing quality, and cause other problems that can permanently affect the printer’s ability to perform at the level for which it was designed. - Page 11 The wireless function in this product should be used within the limitations stated in this User’s Guide. CASIO COMPUTER CO., LTD. accepts no liability whatsoever for any damages arising from other uses of this product. Magnetism, electrostatic charge and radio interference Do not use this product in locations exposed to magnetism, electrostatic charge or radio interference, such as close to a microwave oven.
-
Page 12: Printer And Bundled Accessories
Printer and Bundled Accessories Label printer Trial tape cartridge • • (12 mm wide) AD-A95100L AC adaptor (with • power cord) The shape of the power cord plug varies according to country or geographic area. -
Page 13: Operational Flow For This Printer
Operational Flow for This Printer Install the app on your smartphone Page 14 Connect the AC adaptor Page 16 Or load the batteries Page 17 Connect the printer to your smartphone Page 25 Create a label file in the app Creating files in LABEL DESIGN MAKER • ... -
Page 14: Installing The App
This printer creates labels using the LABEL DESIGN MAKER label printing app. Follow the instructions on the page shown below to install LABEL DESIGN MAKER on your smartphone. LABEL DESIGN MAKER downloads https://s.casio.jp/s/10009/ This manual sometimes refers to LABEL DESIGN MAKER as “the app”. • ... -
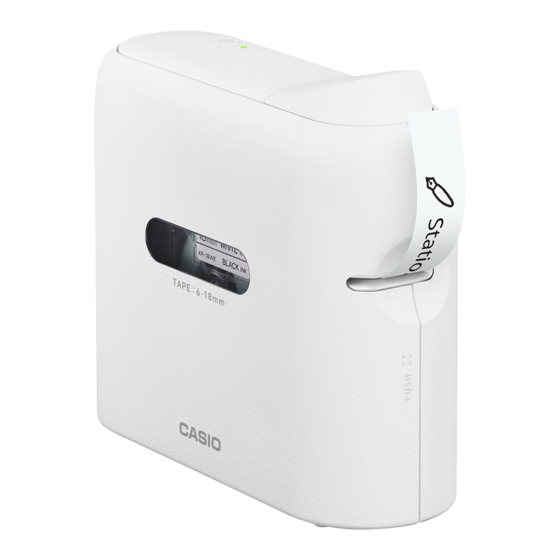
Page 15: Names Of Parts And Their Functions
Names of Parts and Their Functions ON/Stand-by Tape cartridge container LED indicator Tape cutting button Press to cut the tape. Tape outlet Tape level checking window (shows remaining tape) Battery cover AC adaptor port Use this to connect the specified AC adaptor. -
Page 16: Power Supply
Power Supply When using the printer, you can use either the specified AC adaptor or third- party alkaline batteries as the power source. Be sure to read “Safety Precautions” (Page 4) before using the printer. • Operation Using the AC Adaptor ■ ... -
Page 17: Operation Using Batteries
Operation Using Batteries Important! Always ensure that all 6 batteries are new AA-size alkaline batteries. The • use of batteries other than those specified or a combination of new and old batteries could result in battery characteristics that do not match the printer’s specifications. - Page 18 Important! Using batteries that are low on charge may cause the printer to shut down • during printing. It is recommended that you use the specified AC adaptor. Due to the particular characteristics of the batteries, their capacity may • degrade when used at temperatures lower than 10°C.
-
Page 19: Turning The Power On And Off
Turning the Power On and Off This section describes how to turn the printer on and off. ■ Turning the printer on Pressing on the top of the printer turns the printer on and the LED indicator lights green. To turn the printer on, you must first either connect the AC adaptor or load • ... -
Page 20: Installing Tape Cartridges
Installing/Removing Tape Cartridges To print labels, you need a tape cartridge. Use either the tape cartridge supplied with the printer or one sold separately. This printer supports the 6 mm, 9 mm, 12 mm and 18 mm tape widths. • Important! To replace the tape cartridge, set the printer set down on its side. - Page 21 4. Stopper Remove the stopper attached to the tape cartridge. Important! When removing the stopper, carefully and slowly raise it straight upwards. Pulling • on the stopper with strong force can cause the stopper to break and leave part of it inside one of the tape wheels, which can cause tape rotation problems and faulty printing.
- Page 22 6. Set the tape cartridge in place. Taking care not to pull on the ink ribbon, pass the tape and ink ribbon between the print head and the rubber roller (illustration below). Press down on the tape cartridge until it clicks securely into place. If the tape is not loaded correctly, a tape-related error message will appear and you may not be able to print.
- Page 23 7. Re-attach the cover. Engage the cover hooks with the printer locations marked “a” and close the • cover. Close the cover until it clicks into place. Once you have loaded the tape cartridge, do not pull the tape out or try to • ...
-
Page 24: Removing Tape Cartridges
Removing Tape Cartridges 1. Press until the LED indicator turns off indicating that the power is off. 2. Remove the cover. See steps 2-3 in “Installing Tape Cartridges” (Page 20) for details. • 3. Remove the tape cartridge. Because the printer head is hot just after printing, allow ample time before • ... -
Page 25: Connecting To A Smartphone
Connecting to a Smartphone Connect the printer to a smartphone using Bluetooth. This offers a simple way to connect with no need for pairing. Before connecting, you must first either connect the AC adaptor to the printer or load third-party batteries. See “Power Supply” (Page 16) for details. -
Page 26: Launching The App Subsequently
7. Tap the “KL-BT1_******” printer name to select this printer. The printer name is displayed in the “product name” + “product-specific 6- • digit alphanumeric code”. When this printer is selected, the LED indicator on the printer flashes several • times. -
Page 27: Printing
Printing This printer creates files for printing using the LABEL DESIGN MAKER label printing app and prints those files. All the steps in this process are performed in the app. Printing Precautions Tape fed out during printing should not be touched until printing is completed. • ... -
Page 28: Changing The Settings
Changing the Settings ■ Changing the Print Density 1. Tap the Settings tab ( ) in the app’s top screen. To change the setting while editing labels, tap the Settings icon ( ) in the • app screen. The “Print Settings” screen appears. Proceed to step 3. The “Settings”... -
Page 29: Canceling Printing
Canceling Printing To interrupt printing in progress, press on the printer during printing. Once printing has stopped, feed the tape out and then manually cut the tape. • See “Advancing the Tape” (Page 29) for information on how to feed tape out and “Cutting the Tape”... -
Page 30: Cutting The Tape
Cutting the Tape 1. Press the tape cutting button. Remove the tape after cutting. • Important! Check that all the printing has finished before cutting the tape. Pressing the tape • cutting button during printing could cause a tape jam or damage the printer. Using iron-on fabric tape or heat-shrinkable tube Iron-on fabric tape and heat-shrinkable tube are specially treated tapes. -
Page 31: Affixing A Label To A Surface
Affixing a Label to a Surface 1. If required, use scissors or some other implement to trim the label to the desired size or shape. 2. Peel off the backing of the label and affix the label to the desired surface. -
Page 32: Cleaning
Cleaning Soiling on the printer head or rubber roller may result in impaired label printing quality. Use the procedure below to clean the printer head and rubber roller. Using Cotton Buds Important! Use a soft implement such as a cotton bud to clean the printer head and • ... - Page 33 Cleaning the Exterior of the Printer Use a soft cloth moistened with water to clean the exterior of the printer. Be • sure to completely wring out all excess liquid from the cloth before wiping. Never use benzene, alcohol, thinners, or other volatile agents, which can damage the printer.
-
Page 34: Troubleshooting
This section explains reference information that comes in handy when you experience problems with printer operation. If, for any reason, you cannot find the solution to your problem here, contact your original retailer or a CASIO service center. ● The LED indicator doesn’t light when I press... - Page 35 ● Printing is not clear. ● The printer won’t print clearly. ● The printing is too faint. Probable Cause Required Action There is dirt, dust or other Clean the printer head and rubber roller. soiling on the printer head (Page and rubber roller.
- Page 36 ● The LED indicator continuously flashes red. Probable Cause Required Action Printer fault Contact your original retailer or a CASIO Service Center for replacement. The tape is wrapped around Check the tape cartridge. the rubber roller. ● No tape is fed out when I try to print.
- Page 37 ● Labels don’t stick Probable Cause Required Action The location or the material Labels will not stick onto rough, gritty, wet, oily or is not suitable. soiled surfaces. (Page ● Label margins too large Probable Cause Required Action The margin is set to “Large” Set the margin to “Small”.
-
Page 38: List Of Printer Statuses And Led Indicator Displays
List of Printer Statuses and LED Indicator Displays The table below shows the printer statuses and the corresponding LED indicator lighting and flashing patterns. Printer Status LED lighting/flashing pattern Printer turned on Green Printer selected on the Green smartphone Battery level low Orange Communicating/Printing/ Green... -
Page 39: Specifications
Specifications Model Name : KL-BT1 Printing Printing resolution : 200 dpi Printing method : Thermal transfer Printing speed : 10 mm per second maximum Printing speed depends on the printing environment, printing conditions, etc. • Maximum print width : Approximately 12 mm 4 mm (Tape width: 6 mm) 7 mm (Tape width: 9 mm) 10 mm (Tape width: 12 mm) - Page 40 For more details, contact your customer service representative. English Hereby, CASIO Europe GmbH declares that the radio equipment type Label Printer Model KL-BT1 is in compliance with Directive 2014/53/EU. The full text of the EU declaration of conformity is available at the following...
Need help?
Do you have a question about the LABEL IT! KL-BT and is the answer not in the manual?
Questions and answers