
Related Manuals for Anzzi Mezzo Series


Summary of Contents for Anzzi Mezzo Series
- Page 1 MEZZO SERIES INSTALL GUIDE Model# SH-AZ037 SH-AZ038 SH-AZ039 PERFECTION IS OUR TRADITION™ v2.0516...
-
Page 2: Table Of Contents
Final Page YOUR REVIEWS MATTER! The ANZZI™ Family thanks you for your purchase and hopes you enjoy your very own ANZZI product for years to come! In the meantime let us know about your experience? We would love to hear your thoughts from the packaging to the quality and function of the product. -
Page 3: Parts List
PARTS LIST NO . PART NAME Flange Shower arm Shower head Screw Protect cover Trim cap Cartridge locknut Cartridge Sleeve Body Check valve Ttrim plate Knob Handle Screw Joint Joint Joint Screw O-ring Aerator wrench O-ring Screw Index Allen key Button Aerator Spout... -
Page 4: Before You Start
Adjustable Wrench Teflon tape Allen key ATTENTION: Please read all instructions thoroughly including all warnings, attentions and notes before beginning installation. For any questions or concerns contact our dedicated technical support team at 1-844-44-ANZZI. PERFECTION IS OUR TRADITION™ pg. 2... -
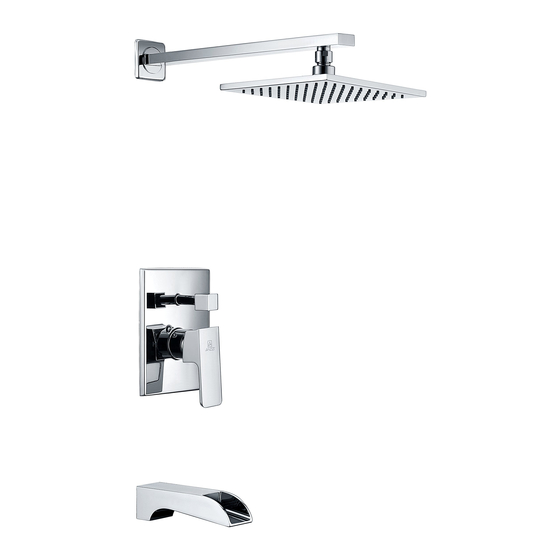
Page 5: Spec Drawing
SPEC DRAWING [inches] PERFECTION IS OUR TRADITION™ pg. 3... -
Page 6: Installation
INSTALLATION Figure 1 Step 1A Remove the protective covers (5a) and (5b) by turning counter clockwise and sliding them out. Step 1B Do not remove protective cover (5c) until you make sure the cover is flush with the finished wall. Step 1C Using a Philips screwdriver, unscrew and remove the two screws (4). - Page 7 INSTALLATION Figure 2 Step 2A Connect all plumbing lines to the faucet valve as shown. Step 2B Make sure the hot and cold supply lines are connected to the pertaining sides. PERFECTION IS OUR TRADITION™ pg. 5...
- Page 8 INSTALLATION Figure 3 Step 3A Turn on water and allow it to run for 1-2 minutes. Step 3B Check all connections and confirm there are no leaks before proceeding. PERFECTION IS OUR TRADITION™ pg. 6...
- Page 9 INSTALLATION Figure 4 O-r i n g O-r i n g Step 4A Apply Teflon tape to the shower arm (#2) then place shower arm flange (#1) on shower pipe and screw shower arm to the pipe. Step 4B After shower arm is in place screw the shower head (#3) onto the arm. Important: Make sure the O-ring is placed in between the shower arm (#2) and the shower head (#3).
- Page 10 INSTALLATION Figure 5 O-r i n g Step 5A Put the trim plate (#12) through the faucet valve then fasten it with screws (#19) and tighten using screw driver. Step 5B Attach the diverter knob (#13) to the valve. Step 5C Place the mixing valve handle (#14) and secure with set screw (#15).
- Page 11 INSTALLATION Figure 6 O-r i n g Step 6A Apply Teflon tape to the spout connector before installing to spout to pipe. Step 6B Attach the connector (#31) to the shower spout (#28). Step 6C Secure it with two set screws provided (#29). PERFECTION IS OUR TRADITION™...
- Page 12 INSTALLATION Figure 7 FINAL Check the connections pointed by the arrows for any kind of leaks and re-tighten if necessary. Important: Please make sure not to over tighten. PERFECTION IS OUR TRADITION™ pg. 10...
-
Page 13: Care & Maintenance
DO NOT ALLOW THE CLEANER TO SOAK. Following these simple principles will ensure you ANZZI™ product will remain as lustrous and stun- ning as the day it was first received. ENJOY! Sincerely, La Familia ANZZI™... -
Page 14: Warranty
ANZZI™ products are manufactured with superior quality standards and workmanship and are backed by our limited lifetime warranty. ANZZI™ products are warranted to the original consumer purchaser to be free of defects in materials or workmanship. We will replace FREE OF CHARGE* any product or parts that proves defective. - Page 15 Email..................I have read the ANZZI™ Owner’s Manual carefully and understand and agree that any installation, operation or maintenance of the product must be done strictly in accordance with instructions and guidelines contained in the ANZZI™ owner’s manual and installation guide.
- Page 16 Perfection is our Tradition™...
Need help?
Do you have a question about the Mezzo Series and is the answer not in the manual?
Questions and answers