Advertisement
Quick Links
Advertisement

Related Manuals for Anzzi CRANE SP-AZ059


Summary of Contents for Anzzi CRANE SP-AZ059
- Page 1 CRANE Series INSTALL GUIDE Model# SP-AZ059 PERFECTION IS OUR TRADITION™ v2.0516...
-
Page 2: Table Of Contents
Final Page YOUR REVIEWS MATTER! The ANZZI™ Family thanks you for your purchase and hopes you enjoy your very own ANZZI product for years to come! In the meantime let us know about your experience? We would love to hear your thoughts from the packaging to the quality and function of the product. -
Page 3: Parts List
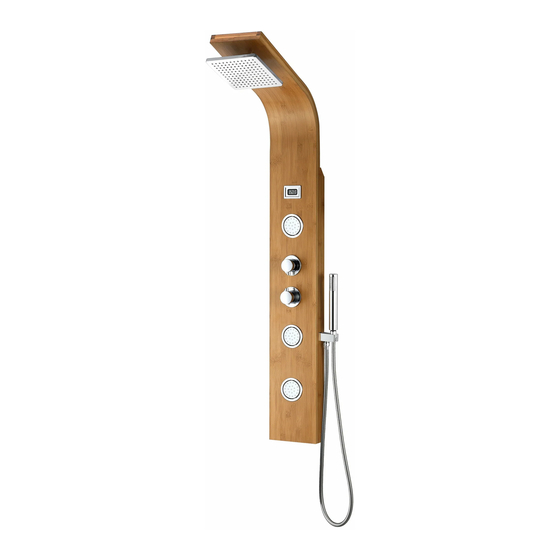
PARTS LIST 1. Shower Head 2. Diverter 3. Body Jets 4. Mixer 5. Hand Shower 6. Themometer Displayer braided hose PERFECTION IS OUR TRADITION™ pg. 1... -
Page 4: Before You Start
Adjustable Wrench Teflon tape Allen key ATTENTION: Please read all instructions thoroughly including all warnings, attentions and notes before beginning installation. For any questions or concerns contact our dedicated technical support team at 1-844-44-ANZZI. PERFECTION IS OUR TRADITION™ pg. 2... -
Page 5: Spec Drawing
SPEC DRAWING 17.72 Perfection is our Tradition™ CRANE Series SP-AZ059 Material: Natural Bamboo Finish: Nature Bamboo Handles: 2 Jets: Shower: 7.874”x7.874” Sprayer: 60” reach Weight: 16.94 lbs Height: 59.05” Supply: 1/2” connections 2.75 7.87 Flow: 2.5 gpm Features Heavy Rain™ Showerhead Acu-Stream™... -
Page 6: Installation
INSTALLATION (SETUP) Figure A IMPORTANT Before drilling any holes for the shower panel brackets, ensure there are no hidden cables or pipelines aligned with the desired drilling position. Step A Drill the two holes for the top bracket 1” apart at the desired height. Step A.2 Drill the two holes for the bottom bracket 1”... - Page 7 INSTALLATION (SETUP) Figure C Figure B Step B Insert the wall anchors into the pre-drilled holes as shown in Figure B. Step C Place the shower panel brackets aligned with the drilled holes and using a Philips screw- driver tighten the screws to secure the brackets. PERFECTION IS OUR TRADITION™...
- Page 8 INSTALLATION (HANDSHOWER) Figure 1 Step 1A Insert the shower wand holder through the pre-drilled hole on the shower panel. Step 1B Install the water supply hose for the shower wand onto the holder, as shown. Step 1C Make sure all O-rings are inserted to prevent leakage. Step 1D Once the shower panel is fully installed and hung on the bracket, you can install the shower wand hose to the holder connection.
- Page 9 INSTALLATION (HANDSHOWER) Figure 2 1 Setting 3 Setting Hand Hand Shower Shower Step 2A Finally, install the shower wand to the hose, as shown. PERFECTION IS OUR TRADITION™ pg. 7...
- Page 10 INSTALLATION (SHOWER HEAD) Figure 3 Step 3A Install the shower head to the upper threader connectin on the shower panel as shown. PERFECTION IS OUR TRADITION™ pg. 8...
- Page 11 INSTALLATION (WALL MOUNTING) Figure 4 Cold Screw the cold and hot water hoese from the shower panel to the supply lines in the wall. Step 4A Carefully hang the shower panel on the secured mounting brackets as shown in Figure 4. Step 4B PERFECTION IS OUR TRADITION™...
- Page 12 INSTALLATION (BATTERY) Figure 5 Step 5A The LED Temperature display requires one (1) AA battery inserted into the battery housing found behind the shower panel. Step 5B Once the AA battery is installed the LED Temperature display will activate. To deactivate the display, remove the AA battery from the housing. PERFECTION IS OUR TRADITION™...
-
Page 13: Care & Maintenance
DO NOT ALLOW THE CLEANER TO SOAK. Following these simple principles will ensure you ANZZI™ product will remain as lustrous and stun- ning as the day it was first received. ENJOY! Sincerely, La Familia ANZZI™... -
Page 14: Warranty
ANZZI™ products are manufactured with superior quality standards and workmanship and are backed by our limited lifetime warranty. ANZZI™ products are warranted to the original consumer purchaser to be free of defects in materials or workmanship. We will replace FREE OF CHARGE* any product or parts that proves defective. - Page 16 Email..................I have read the ANZZI™ Owner’s Manual carefully and understand and agree that any installation, operation or maintenance of the product must be done strictly in accordance with instructions and guidelines contained in the ANZZI™ owner’s manual and installation guide.
- Page 17 Perfection is our Tradition™...
Need help?
Do you have a question about the CRANE SP-AZ059 and is the answer not in the manual?
Questions and answers