Table of Contents
Advertisement
Quick Links
Advertisement
Table of Contents

Related Manuals for Metrohm 814


Summary of Contents for Metrohm 814
- Page 1 814 USB Sample Processor Manual 8.814.8001EN / 2020-02-29...
- Page 3 Metrohm AG CH-9100 Herisau Switzerland Phone +41 71 353 85 85 Fax +41 71 353 89 01 info@metrohm.com www.metrohm.com 814 USB Sample Processor Manual 8.814.8001EN / 2020-02-29...
- Page 4 Technical Communication Metrohm AG CH-9100 Herisau techcom@metrohm.com This documentation is protected by copyright. All rights reserved. This documentation has been prepared with great care. However, errors can never be entirely ruled out. Please send comments regarding possible errors to the address above.
-
Page 5: Table Of Contents
■■■■■■■■■■■■■■■■■■■■■■ Table of contents Table of contents 1 Introduction The 814 USB Sample Processor in the Titrando sys- tem ..................1 Instrument description ............2 1.2.1 Model versions ................ 2 1.2.2 Instrument components ............4 1.2.3 Intended use ................5 About the documentation ........... - Page 6 7 Technical specifications Lift and turntable ............... 42 Membrane pump(s) with valve .......... 42 Interfaces and connectors ..........42 Power connection ............... 43 Ambient temperature ............43 Reference conditions ............43 Dimensions ................43 8 Accessories Index ■■■■■■■■ 814 USB Sample Processor...
- Page 7 ■■■■■■■■■■■■■■■■■■■■■■ Table of figures Table of figures Figure 1 The Titrando system ................1 Figure 2 Front 814 USB Sample Processor ............. 10 Figure 3 Rear 814 USB Sample Processor ............11 Figure 4 Connector strip ................12 Figure 5 Sample rack 6.2041.470 ..............
-
Page 9: Introduction
1 Introduction The 814 USB Sample Processor in the Titrando sys- The 814 USB Sample Processor is a component of the modular Titrando system. Operation is carried out either by a Touch Control with a touch- sensitive screen ("stand-alone titrator") or by a computer with a corre- sponding software. -
Page 10: Instrument Description
Metrohm Titrando system. The versatile communications options of the Titrando system (Remote Box, LIMS link, etc.) can thus all be used. Thanks to these abilities, a 814 USB Sample Pro- cessor is predetermined for all kind of automation tasks in a modern labo- ratory, especially for highly integrated laboratory data systems. - Page 11 2 stirrer connectors (tower stirrer) ■ 2 connectors for Swing Heads ■ 3 MSB connectors for dosing devices or stir- ■ rers 2 USB connectors ■ 1 connector "Controller" for Touch Control ■ or PC ■■■■■■■■ 814 USB Sample Processor...
-
Page 12: Instrument Components
1 connector "Controller" for Touch Control ■ or PC 1.2.2 Instrument components The 814 USB Sample Processor has the following components: Turntable ■ For sample racks with a diameter of up to 42 cm. One or two towers with lift ■... -
Page 13: Intended Use
1 Introduction 1.2.3 Intended use The 814 USB Sample Processor is designed for usage as an automation system in analytical laboratories or in factories that fulfill the specified ambient conditions (see chapter 7.5, page 43). It is not suitable for usage in biochemical, biological or medical environments in its basic equipment version. -
Page 14: Safety Instructions
Electrical safety The electrical safety when working with the instrument is ensured as part of the international standard IEC 61010. WARNING Only personnel qualified by Metrohm are authorized to carry out service work on electronic components. ■■■■■■■■ 814 USB Sample Processor... -
Page 15: Tubing And Capillary Connections
Damaged tubing ends lead to leakage. Appropriate tools can be used to loosen connections. Check the connections regularly for leakage. If the instrument is used mainly in unattended operation, then weekly inspections are manda- tory. ■■■■■■■■ 814 USB Sample Processor... -
Page 16: Personnel Safety
Personnel safety WARNING Wear protective goggles and working clothes suitable for laboratory work while operating the 814 USB Sample Processor. It is also advisable to wear gloves when caustic liquids are used or in situations where glass vessels could break. -
Page 17: Flammable Solvents And Chemicals
The correct disposal of your old instrument will help to prevent negative effects on the environment and public health. More details about the disposal of your old instrument can be obtained from your local authorities, from waste disposal companies or from your local dealer. ■■■■■■■■ 814 USB Sample Processor... -
Page 18: Overview Of The Instrument
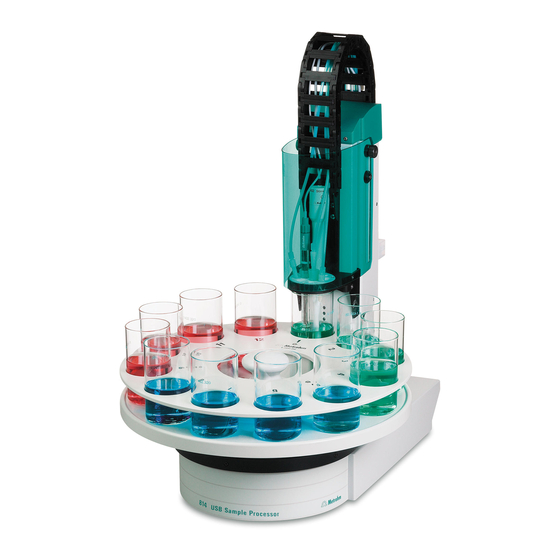
■■■■■■■■■■■■■■■■■■■■■■ 2.1 Front and rear 2 Overview of the instrument Front and rear Figure 2 Front 814 USB Sample Processor Safety shield (6.2751.080) Sample rack (6.2041.310) other models, see chap. Accessories. other models, see chap. Accessories. Stirrer rail Guide chain For magnetic stirrer (741 Stirrer). -
Page 19: Figure 3 Rear 814 Usb Sample Processor
■■■■■■■■■■■■■■■■■■■■■■ 2 Overview of the instrument US B 2 Figure 3 Rear 814 USB Sample Processor Distributor Membrane pump For rinsing equipment. Pump 1. Pump connection Pump valve Pump 2. For the external pump. Swing Head connector Stirrer connector Mini DIN socket (9-pin). -
Page 20: Back Panel
A sample rack is a turntable that acts as a receptacle for sample vessels. Various types of sample racks are available for different numbers and types of sample vessels. The 814 USB Sample Processor requires sample racks with up to a maxi- mum of 42 cm diameter. Figure 5 Sample rack 6.2041.470... - Page 21 This will enable an unambiguous recognition of the rack and thus the cor- rect positioning of the beaker. A positioning table is assigned to each rack type in which each rack position is defined. ■■■■■■■■ 814 USB Sample Processor...
-
Page 22: Setting Up The Instrument
Unplug the power plug immediately if you suspect that moisture has ■ gotten inside the instrument. Only personnel who have been issued Metrohm qualifications may ■ perform service and repair work on electrical and electronic parts. ■■■■■■■■... -
Page 23: Connecting A Computer
Cable connection and driver installation A driver installation is required in order to ensure that the 814 USB Sample Processor is recognized by the computer software. To accomplish this, you must comply with the procedures specified. The following steps are neces-... -
Page 24: Figure 6 Connecting The Computer
Registering and configuring the instrument in the computer software The instrument must be registered in the configuration of your computer software. Once that has been done, you can then configure it according to your requirements. Proceed as follows: ■■■■■■■■ 814 USB Sample Processor... -
Page 25: Installing The Rinsing And Aspiration Equipment
(see chapter 3.5, page 20). These are the feed lines for the spray nozzles. 2 Mounting the aspiration tubing Manually tighten the 6.1805.510 FEP aspiration tubing (60 ■ cm) in the M8 bore hole of the distributor. ■■■■■■■■ 814 USB Sample Processor... - Page 26 Pull the end of the tubing over the connection nipple of the distri- butor and fasten in place with the union nut. The tubing leads to the aspiration pump (Pump 2) and can be cut to the correct length. ■■■■■■■■ 814 USB Sample Processor...
- Page 27 ■ of the chain links. The tubing can remain connected. Insert the upper hook of the holder in the upper clip. ■ Let the bottom part of the holder snap in the bottom clip. ■ ■■■■■■■■ 814 USB Sample Processor...
-
Page 28: Placing Tubing And Cables In The Guide Chain
Make sure that tubing and cables do not kink. Inserting and removing the tubing and cables requires no tools. 1 Placing tubing and cables Press one side of the clip downwards and place tubing or cables ■ in the guide chain. ■■■■■■■■ 814 USB Sample Processor... -
Page 29: Installing The Titration Head
Note the orientation of the titration head. The arrow on the titration head marks the opening for the rod stirrer and has to point to the front, see figure. ■■■■■■■■ 814 USB Sample Processor... -
Page 30: Figure 9 Installing Accessories For The Titration
(6.2740.030) into the oblique bore holes of the titration head, see figure. 2 Insert two 6.2709.070 guide sleeves into the titration head, see figure. 3 Insert a 6.1543.200 titration tip (with antidiffusion valve) into a guide sleeve. ■■■■■■■■ 814 USB Sample Processor... -
Page 31: Figure 10 Connecting The Tubings
6.2740.020 Figure 10 Connecting the tubings 1 Tighten the 6.1805.420 rinsing tubings which have been fas- tened to the distributor on the rear of the tower to the spray or rinsing nozzles (6.2740.020 or 6.2740.030). ■■■■■■■■ 814 USB Sample Processor... -
Page 32: Figure 11 Rod Stirrer 802 Stirrer
If an MSB stirrer is connected to the MSB1 or MSB2 socket, then the stirrer connector on tower 1 or tower 2 cannot be used, because the tower stirrers are also internally controlled via MSB1 or MSB2. ■■■■■■■■ 814 USB Sample Processor... -
Page 33: Figure 14 Inserting The Rod Stirrer
Installing the 741 Stirrer A magnetic stirrer (741 Stirrer) can be used as an alternative to a rod stir- rer. 1 Hang the magnetic stirrer to the assembly rail between the tower and the turntable. ■■■■■■■■ 814 USB Sample Processor... -
Page 34: Connecting An External Pump
Tighten the knurled screw at the front end of the plug by hand in ■ clockwise direction. This secures the plug. 2 In case of an 843 Pump Station, connect the other end of the cable (9-pin D-Sub plug) to the socket Remote 1 of the pump. ■■■■■■■■ 814 USB Sample Processor... -
Page 35: Connecting Msb Devices
In order to connect MSB devices, e.g. stirrers or dosing devices, Metrohm instruments are equipped with up to a maximum of four connectors on what is referred to as the Metrohm Serial Bus (MSB). Various kinds of peripheral devices can be connected in sequence (in series, as a "Daisy Chain") at a single MSB connector (8-pin Mini DIN socket) and con-... -
Page 36: Connecting A Dosing Device
685 Dosimat plus ■ WARNING If a Dosino is connected to the 814 USB Sample Processor, then the connection cable must be equipped with a T.2400.102 ferrite core. The ferrite core diminishes any interference voltages and thus ensures com- pliance with the strict EMC standards in accordance with the applicable technical standards, see EU declaration of conformity of the instrument. -
Page 37: Connecting A Stirrer Or Titration Stand
804 Ti Stand only: Connect the rod stirrer to the stirrer connector ■ (socket with stirrer symbol) of the titration stand. Start the control software. ■ US B 1 Co ntr . MS B 2 MS B 3 Figure 18 Connecting an MSB stirrer ■■■■■■■■ 814 USB Sample Processor... -
Page 38: Connecting A Remote Box
Instruments that are controlled via remote lines and/or that send control signals via remote lines can be connected via the 6.2148.010 Remote Box. In addition to Metrohm, other instrument manufacturers also use similar connectors that make it possible to connect different instruments together. -
Page 39: Connecting Usb Devices
Connecting USB devices Two USB connectors (type A sockets) are available for connecting instru- ments with an USB interface. The 814 USB Sample Processor then func- tions as USB hub (distributor). If you wish to connect more than two USB devices, you can also use an additional, commercially available USB hub. -
Page 40: Mounting The Drip Pan
Installing the drip pan Install the drip pan as follows: 1 Fasten the enclosed tubing to the drainage nipple on the drip pan and then guide the free end of the tubing into a waste container. ■■■■■■■■ 814 USB Sample Processor... -
Page 41: Attaching A Sample Rack
NOTICE Hold the rack in such a way that the printed Metrohm logo is legi- ble horizontally. 2 Carry out the [Rack reset] or [Initialize rack] function in the man- ual control of the control software. -
Page 42: Mounting The Safety Shield
Mounting the safety shield WARNING It is imperative that the safety shield be installed before the first time the 814 USB Sample Processor is used. The device may not be operated without a safety shield. Figure 24 Mounting the safety shield Proceed as follows. -
Page 43: Operation And Maintenance
4 Operation and maintenance 4 Operation and maintenance General notes The 814 USB Sample Processor requires appropriate care. Excess contami- nation of the instrument may result in malfunctions and a reduction in the service life of the sturdy mechanical and electronic components. -
Page 44: Troubleshooting
"Configuration" rectly configured. (or under "Device manager" for Touch Con- trol). Sample Processor – The Initialize the rack using the function Initialize wrong rack table is being rack in the "Manual control". used. ■■■■■■■■ 814 USB Sample Processor... -
Page 45: Pump
Make sure that the canisters are not placed ■ much pressure on the on a higher level than the pump. pump valve. Check the fill level of the canisters. ■ Make sure that the canisters are not com- ■ pletely sealed (overpressure). ■■■■■■■■ 814 USB Sample Processor... -
Page 46: Appendix
6.2740.030 rinsing nozzle (optionally available) ■ The rinsing liquid is applied as a fine jet for optimal removal of layers on electrodes and on titration accessories. ■■■■■■■■ 814 USB Sample Processor... -
Page 47: Remote Interface
MSB interface of the Sample Processor. Figure 27 Connectors of the Remote Box Cables MSB connector For connecting to an MSB connector of the Metrohm Serial Bus. For connecting external Sample Processor. dosing devices or stirrers. Remote connector For connecting instruments with a remote interface. -
Page 48: Pin Assignment Of The Remote Interfaces
Pin assignment of remote socket and remote plug The above figure of the pin assignment of a Metrohm remote interface does not only apply for the Remote Box, but also for all Metrohm devices with 25-pin D-Sub remote connectors. Inputs +5 V approx. - Page 49 Pin no. Assignment Pin no. Input 6 Output 6 Input 7 Output 7 0 volts / GND Output 8 +5 volt Output 9 0 volts / GND Output 10 Output 11 Output 12 Output 13 ■■■■■■■■ 814 USB Sample Processor...
-
Page 50: Technical Specifications
Three 9-pin Mini DIN sockets for connecting dosing devices (Dosino/ MSB1…MSB3 Dosimat), stirrers, etc. USB connectors Two USB Downstream Ports (Type A sockets), each 500 mA, for con- necting Metrohm instruments or USB peripheral devices of other man- ufacturers. Stirrer connector DIN socket Stirring rate Rod stirrer 722/802: 180…3000 rpm... -
Page 51: Power Connection
Width 0.28 m Height 0.73 m Depth 0.50 m Weight (without 1.814.0010: 14.52 kg accessories) 1.814.0020: 15.42 kg 1.814.0030: 13.82 kg 1.814.0110: 18.87 kg 1.814.0120: 19.93 kg 1.814.0130: 16.82 kg Material Housing Metal housing, surface-treated ■■■■■■■■ 814 USB Sample Processor... -
Page 52: Accessories
Downloading the accessories list 1 Enter https://www.metrohm.com/ into your Internet browser. 2 Enter the article number (e.g. 814) into the search field. The search result is displayed. 3 Click on the product. Detailed information regarding the product is shown on various tabs. -
Page 53: Index
MSB devices ....... 27 Connect ......24 Maintenance ......35 Power grid ......14 Supply voltage ......7 Metrohm Serial Bus MSB, see also Remote Box ......30 "MSB" ........27 Stirrer ......... 29 Model versions ......2 Titration head ......21 Stirrer on tower ....
Need help?
Do you have a question about the 814 and is the answer not in the manual?
Questions and answers