Table of Contents
Advertisement
Advertisement
Table of Contents

Subscribe to Our Youtube Channel
Related Manuals for Metrohm 892


Summary of Contents for Metrohm 892
- Page 1 892 Professional Rancimat Manual 8.892.8001EN / 2020-03-11...
- Page 3 Metrohm AG CH-9100 Herisau Switzerland Phone +41 71 353 85 85 Fax +41 71 353 89 01 info@metrohm.com www.metrohm.com 892 Professional Rancimat Manual 8.892.8001EN / 2020-03-11...
- Page 4 Technical Communication Metrohm AG CH-9100 Herisau techcom@metrohm.com This documentation is protected by copyright. All rights reserved. This documentation has been prepared with great care. However, errors can never be entirely ruled out. Please send comments regarding possible errors to the address above.
-
Page 5: Table Of Contents
Replacing fuses ..............22 3.3.3 Switching the instrument on and off ........23 Connecting a computer ............24 3.4.1 Connecting the 892 Professional Rancimat and the com- puter ..................24 4 Operation Rancimat method ............... 26 Calibration functions ............27 4.2.1... - Page 6 5 Operation and maintenance General notes ..............41 5.1.1 Care ..................41 5.1.2 Maintenance by Metrohm Service .......... 41 5.1.3 Cleaning the instrument ............42 Replacing the dust filter ............ 43 Regenerating or replacing the molecular sieve ....44 6 Troubleshooting Problems ................
- Page 7 ■■■■■■■■■■■■■■■■■■■■■■ Table of figures Table of figures Figure 1 Front 892 Professional Rancimat ............6 Figure 2 892 Professional Rancimat rear ............7 Figure 3 Instrument display ................8 Figure 4 Mounting accessories for the air supply ........... 11 Figure 5 Drying flask - Individual parts ............
-
Page 9: Introduction
The measurements at the individual measuring positions can be started individually for this. The 892 Professional Rancimat is controlled by means of the StabNet computer software and a computer that is connected via the USB inter- face. Up to 4 instruments can be controlled and monitored by each com- puter, hence allowing a maximum of 32 samples to be analyzed at the same time. -
Page 10: About The Documentation
This symbol draws attention to a possible hazard due to heat or hot instrument parts. WARNING This symbol draws attention to a possible biological hazard. CAUTION This symbol draws attention to possible damage to instruments or instrument parts. ■■■■■■■■ 892 Professional Rancimat... -
Page 11: Safety Instructions
Flammable substances WARNING The heating block of the 892 Professional Rancimat can be heated to 229.9 °C. Flammable substances may ignite at such temperatures. Adjust the oven's maximum heating temperature to the sample that is to be analyzed. - Page 12 ■■■■■■■■■■■■■■■■■■■■■■ 1.3 Safety instructions WARNING Only personnel qualified by Metrohm are authorized to carry out service work on electronic components. WARNING Never open the housing of the instrument. The instrument could be damaged by this. There is also a risk of serious injury if live components are touched.
-
Page 13: Flammable Solvents And Chemicals
The correct disposal of your old instrument will help to prevent negative effects on the environment and public health. More details about the disposal of your old instrument can be obtained from your local authorities, from waste disposal companies or from your local dealer. ■■■■■■■■ 892 Professional Rancimat... -
Page 14: Overview Of The Instrument
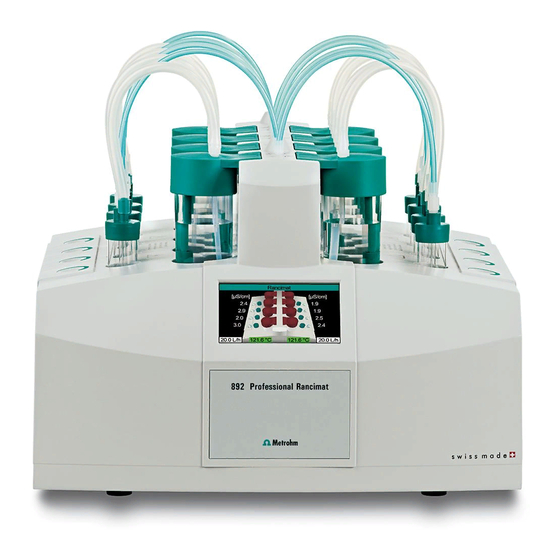
■■■■■■■■■■■■■■■■■■■■■■ 2.1 Front of the instrument 2 Overview of the instrument Front of the instrument Figure 1 Front 892 Professional Rancimat Silicone tubing (6.1816.010) Measuring vessel cover (6.0913.130) For connecting the reaction vessel to the Contains an integrated conductivity measur- measuring vessel. -
Page 15: Rear Of The Instrument
■■■■■■■■■■■■■■■■■■■■■■ 2 Overview of the instrument Rear of the instrument Figure 2 892 Professional Rancimat rear Electrode connector Air supply connector For connecting the conductivity measuring For connecting the FEP tubing 250 mm. cell integrated in the measuring vessel cover. -
Page 16: Instrument Display
Instrument name Measuring vessel cover gray The instrument name display corresponds to This measuring position is not available for the configuration in StabNet. starting a determination (instrument not connected to computer or no method loa- ded). ■■■■■■■■ 892 Professional Rancimat... - Page 17 Shows the gas flow measured on block A Shows the measured conductivity. (gray background: gas flow switched off; Dash (-) is displayed = Conductivity cannot white background: gas flow switched on). be displayed (no sensor connected or no valid measuring signal). ■■■■■■■■ 892 Professional Rancimat...
-
Page 18: Setting Up The Instrument
The instrument should be protected against excessive temperature fluctua- tions and direct sunlight. NOTICE In order to improve accessibility of the measuring positions, the instru- ment can also be placed on the optionally available turning ring (6.2059.000). ■■■■■■■■ 892 Professional Rancimat... -
Page 19: Mounting Accessories
3.2.1 Mounting the internal air supply The gas in the 892 Professional Rancimat is normally supplied using the internal air pump, which aspirates laboratory air. For air supply and air purification, the following accessories must be mounted on the rear of the... -
Page 20: Figure 5 Drying Flask - Individual Parts
Screw the other end of the FEP tubing to the From flask connec- ■ tor on the rear of the 892 Professional Rancimat. Screw one end of the second FEP tubing 250 mm to the second ■... -
Page 21: Mounting The External Air Supply
If the laboratory air is heavily contaminated, an external gas supply with synthetic air can be provided. For this, the corresponding accessories must be mounted on the rear of the 892 Professional Rancimat . NOTICE If air is supplied externally, the gas flow cannot be regulated in the computer program. -
Page 22: Assembling The Reaction And Measuring Vessels
Screw one end of the FEP tubing 130 mm to the Air/N in con- ■ nector (2-12) on the rear of the 892 Professional Rancimat. Screw the tubing adapter M6/olive (6.1808.020) onto the other ■ end of the FEP tubing. -
Page 23: Figure 7 Equipping The Reaction And Measuring Vessels
13 Opening "In" 14 Label field For supplying the air to the measuring ves- For attaching labels (e.g. 6.2250.000 lami- sel. nated labels). 15 Connector plug 16 Measuring vessel cover (6.0913.130) Contains an integrated conductivity measur- ing cell. ■■■■■■■■ 892 Professional Rancimat... - Page 24 Place the reaction vessel cover on the reaction vessel. ■ NOTICE When mounted without foam barrier, the air tube must be in a vertical position in the reaction vessel. ■■■■■■■■ 892 Professional Rancimat...
-
Page 25: Inserting Vessels / Establishing Tubing Connections
Fill distilled water into the measuring vessel. ■ Place the measuring vessel cover onto the measuring vessel. ■ Insert the measuring vessel into the openings provided on the 892 ■ Professional Rancimat. While doing so, carefully guide the con- nector plug into the electrode connector. -
Page 26: Mounting The Exhaust Air Collection Tube
Mounting the exhaust air collection tube The optional exhaust air collection tube (6.2757.000) can be mounted on the 892 Professional Rancimat for targeted removal of the exhaust air. NOTICE A total of 8 pieces of silicone tubing (6.1816.010) (220 mm) are required in addition to the exhaust air collection tube. -
Page 27: Mounting The Oil Separator
1 Mounting the exhaust air collection tube Insert the exhaust air collection tube with both support pins into ■ the collection tube holders on the 892 Professional Rancimat in such a way that the connector to the exhaust air removal is located to the rear. -
Page 28: Figure 10 Mounting The Oil Separator
3 Attaching the silicone tubing to the measuring vessel Attach one end of the silicone tubing to the outlet opening OUT ■ of the oil separator. Attach the other end of the silicone tubing to the tubing connec- ■ tor of the measuring vessel. ■■■■■■■■ 892 Professional Rancimat... -
Page 29: Power Connection
Only operate the instrument with a residual current circuit breaker. ■ If you suspect that moisture has gotten into the instrument, discon- ■ nect the instrument from the energy supply. Then, notify Metrohm Service. Only personnel who have been issued Metrohm qualification may ■... -
Page 30: Replacing Fuses
Proceed as follows to replace defective fuses: 1 Pulling out the power cord Pull the power cord out of the power socket of the 892 Profes- ■ sional Rancimat. 2 Removing the fuse holder Release the fuse holder located on the rear of the instrument ■... -
Page 31: Switching The Instrument On And Off
■ place. 3.3.3 Switching the instrument on and off The 892 Professional Rancimat is switched on and off using the power switch (2-3). The instrument display is switched on when the instrument is switched on. Figure 11 Instrument display with instrument name... -
Page 32: Connecting A Computer
The StabNet computer program allows you to control up to 4 instru- ments. Connect and set up the 892 Professional Rancimat as follows: 1 Establish a connection between the USB interface (2-16) of the 892 Professional Rancimat and the required USB interface on the com- puter using the USB cable (6.2151.130). - Page 33 ■■■■■■■■■■■■■■■■■■■■■■ 3 Installation NOTICE You will find detailed information regarding the StabNet com- puter program in the Tutorial. The instrument name entered in the configuration must appear on the instrument display (3-3). ■■■■■■■■ 892 Professional Rancimat...
-
Page 34: Rancimat Method
AOM (active oxygen method) for determining the induction time of fats and oils. This method has become established over the course of time and has been incorporated in various national and international standards, e.g. AOCS Cd 12b-92 and ISO 6886. ■■■■■■■■ 892 Professional Rancimat... -
Page 35: Calibration Functions
As a rule, the time until an increase in conductivity of 50 µS/cm is determined. The cell constant for the conductivity electrode being used has to be calibrated in order to be able to measure the con- ductivity correctly. ■■■■■■■■ 892 Professional Rancimat... -
Page 36: Determining The Temperature Correction
Temperature correction indicates the deviation of the current sample temperature from the temperature of the heating block and forms part of the method as a parameter. It can be determined automatically with the calibrated, external tempera- ture sensor. ■■■■■■■■ 892 Professional Rancimat... -
Page 37: Figure 16 Assembling The Reaction Vessel For Determining The Temperature Correc- Tion
For supplying air into the reaction vessel. Thread adapter M8/M6 (6.1808.090) O-ring (6.1454.040) Temperature sensor opening Connector For inserting the temperature sensor. For connecting the thread adapter M8/M6. Reaction vessel cover (6.2753.107) Air tube (6.2418.100) Spacer (6.2042.040) 10 Reaction vessel (6.1429.040) ■■■■■■■■ 892 Professional Rancimat... - Page 38 ■ nector of the 892 Professional Rancimat. Connect the temperature sensor to the Pt100 connector (2-14) ■ on the rear of the 892 Professional Rancimat. NOTICE You will find detailed information regarding the StabNet computer program in the Tutorial. ■■■■■■■■...
-
Page 39: Determinations
Completely liquefy the fat in a water bath or in a drying oven at ■ a temperature exceeding its melting point by 10 °C. Place the reaction vessel on a scale using a 6.2628.000 holder. ■ ■■■■■■■■ 892 Professional Rancimat... - Page 40 Weigh in the fat as solid. ■ For this, weigh in 3 g sample material directly in the reaction vessel and insert it briefly in the heated block of the 892 Profes- sional Rancimat, so that the fat melts. 2 Checking the filling level Make sure that the quantity of melted sample material in the ■...
- Page 41 4 Operation NOTICE In order to carry out at least one double determination on the 892 Professional Rancimat, you have to extract approx. 10 g pure oil or fat, allowing for a certain transfer loss (for more than two determi- nations, an accordingly higher amount is necessary).
- Page 42 This type of storage does not provide complete protection against unintended and uncontrolled changes in the oxidation stability, but it provides useful preservation in many cases. ■■■■■■■■ 892 Professional Rancimat...
-
Page 43: Preparing The Instrument And The Accessories
Fill the cleaned measuring vessels with 60 mL distilled water ■ each. For analysis times of more than 24 h approx. 7 mL more distilled water must be added per day to compensate for the evaporation loss, so that the electrodes remain safely immersed. ■■■■■■■■ 892 Professional Rancimat... -
Page 44: Preparing The Determination
Insert the measuring vessels with the measuring vessel covers into ■ the openings provided for this on the 892 Professional Rancimat while carefully guiding the connector plugs of the cover into the electrode connectors. 4 Weighing in samples... - Page 45 If required, also switch on the heater for Block B. ■ The color of the temperature display on the 892 Professional Ranci- mat changes to red during the heating phase. The color of the temperature display on the 892 Professional Ranci- mat changes to green once the setpoint temperature has been reached.
-
Page 46: Cleaning The Accessories
Screw the pieces of FEP tubing 250 mm to the M8/M6 thread ■ adapters of the reaction vessel covers and the air supply connec- tors of the 892 Professional Rancimat. Insert the prepared reaction vessels into the recesses of the heat- ■... -
Page 47: Cleaning The Oil Separator
Cleaning the oil separator Figure 17 Oil separator (6.2753.200), disassembled Body Base Body with the IN and OUT connectors. Base with O-ring (6.1454.050) used for seal- ing the oil separator. 1 Disassembling the oil separator Remove the base. ■ ■■■■■■■■ 892 Professional Rancimat... - Page 48 Replace the O-rings if they no longer sit tightly on the body or if the material is brittle. 4 Assembling the oil separator Press the base onto the body by hand until it sits flush. ■ ■■■■■■■■ 892 Professional Rancimat...
-
Page 49: Operation And Maintenance
5.1.2 Maintenance by Metrohm Service Maintenance of the 892 Professional Rancimat is best carried out as part of annual service, which is performed by specialist personnel from Metrohm. If you are frequently working with caustic and corrosive chemi- cals, we recommend a shorter maintenance interval. -
Page 50: Cleaning The Instrument
■ sockets) from moisture. If you suspect that moisture has gotten into the instrument, discon- ■ nect the instrument from the energy supply. Then, notify Metrohm Service. Only personnel who have been issued Metrohm qualification may ■ perform service and repair work on electric and electronic parts. -
Page 51: Replacing The Dust Filter
NOTICE If the suspicion arises that liquids have found their way into the product, disconnect the instrument from the power grid and con- tact your Metrohm service engineer. NOTICE Water or ethanol can be used as a cleaning medium. NOTICE The connectors at the rear of the product must only be cleaned with a dry cloth. -
Page 52: Regenerating Or Replacing The Molecular Sieve
CAUTION Do not fill the hot molecular sieve directly into the drying flask after regeneration, as otherwise the plastic filter on the filter tube will melt. Wait until the molecular sieve has cooled down before filling. ■■■■■■■■ 892 Professional Rancimat... -
Page 53: Troubleshooting
Check the silicone tubing for blockage and, ■ although an air flow if necessary, clean. can be discerned in Check the tubing adapter and the PTFE ■ the reaction vessel. cannula on the measuring vessel cover for blockage and, if necessary, clean. ■■■■■■■■ 892 Professional Rancimat... - Page 54 The connection to the Ensure that no air can escape through leaks measuring vessel is not when transferring from the reaction vessel to mounted correctly. the measuring vessel. ■■■■■■■■ 892 Professional Rancimat...
- Page 55 Make sure that the value defined for the con- longer/shorter than not correctly defined. ductivity change in the method is correct. expected. See also: The stability times are not reproducible for multiple determinations. See also: The induction time is longer/shorter than expected. ■■■■■■■■ 892 Professional Rancimat...
- Page 56 Stop rectly. once all the criteria have been fulfilled option. The evaluation parameters can be optimized on the basis of this curve, or the curve can be evaluated manually. Increase the Evaluation sensitivity ■ method parameter. ■■■■■■■■ 892 Professional Rancimat...
- Page 57 Increase the value for time or conductivity. ■ before the endpoint. Deactivate time or conductivity as stop cri- ■ terion. ■■■■■■■■ 892 Professional Rancimat...
-
Page 58: Technical Specifications
Maximum temper- typ. < 0.3 °C ature difference between different measuring posi- tions per block Temperature fluc- typ. < 0.1 °C tuations (With operating temperature attained, reaction vessels inserted and identically filled and 20 L/h air throughput.) ■■■■■■■■ 892 Professional Rancimat... -
Page 59: External Temperature Sensor
7 Technical specifications Shutdown temper- 260 ± 15 °C ature (Resetting and troubleshooting carried out by Metrohm Service.) Heating time for approx. 45 min (from 20 °C to 120 °C) the instrument approx. 60 min (from 20 °C to 220 °C) External tempera- <... -
Page 60: Gas Flow Regulation
450 VA tion Fuse Diameter 5 mm, length 20 mm 4.0 ATH (slow-acting) Ambient temperature Nominal function +5 - +45 °C range (at 20 - 80% humidity) Storage –20 - +70 °C Transport –40 - +70 °C ■■■■■■■■ 892 Professional Rancimat... -
Page 61: Dimensions/Material
Width 383 mm Height 277 mm (without accessories) Depth 462 mm Weight 16.1 kg (without accessories) ® Cover material Baydur 110 FR-6 with flame retardation for fire class UL94VO, CFC- free Base material Steel sheet, coated ■■■■■■■■ 892 Professional Rancimat... -
Page 62: Accessories
Downloading the accessories list 1 Enter https://www.metrohm.com/ into your Internet browser. 2 Enter the article number (e.g. 892) into the search field. The search result is displayed. 3 Click on the product. Detailed information regarding the product is shown on various tabs. -
Page 63: Index
Determine ......28 Dust filter Regenerate ....13, 44 Temperature measurement Mount ........ 11 Measuring range ....50 Replace ......43 Reproducibility ....50 Resolution ......50 Pure, clear oils ....31 Electrostatic charge ....4 ■■■■■■■■ 892 Professional Rancimat...
Need help?
Do you have a question about the 892 and is the answer not in the manual?
Questions and answers