Table of Contents
Advertisement
Quick Links
Advertisement
Chapters
Table of Contents

Related Manuals for Metrohm 862


Summary of Contents for Metrohm 862
- Page 1 862 Compact Titrosampler Manual 8.862.8002EN...
- Page 3 Metrohm AG CH-9101 Herisau Switzerland Phone +41 71 353 85 85 Fax +41 71 353 89 01 info@metrohm.com www.metrohm.com 862 Compact Titrosampler Manual 8.862.8002EN 10/2009 dm/jb...
- Page 4 Teachware Metrohm AG CH-9101 Herisau teachware@metrohm.com This documentation is protected by copyright. All rights reserved. Although all the information given in this documentation has been checked with great care, errors cannot be entirely excluded. Should you notice any mistakes please send us your comments using the address...
-
Page 5: Table Of Contents
Miscellaneous remote cables ..........23 3.10.2 Example systems ..............24 3.11 Mounting the cable cover and the safety shield ..... 26 3.12 Connecting the mains cable ..........27 4 Titration and automation sequences Dynamic equivalence point titration (DET) ....... 28 ■■■■■■■■ 862 Compact Titrosampler... - Page 6 Live parameters ..............55 Results ................. 56 Statistics ................58 5.10 Printing a report manually ..........59 5.11 Manual control ..............61 5.11.1 Rotating the sample rack ............61 5.11.2 Moving the lift ............... 62 5.11.3 Dosing ................... 62 ■■■■■■■■ 862 Compact Titrosampler...
- Page 7 Endpoint titrations (SET) ..........114 7.3.1 Conditioning ............... 114 7.3.2 Start conditions ..............115 7.3.3 Titration parameters ............117 7.3.4 Control parameters EP1 ............119 7.3.5 Control parameters EP2 ............122 7.3.6 Stop conditions ..............122 ■■■■■■■■ 862 Compact Titrosampler...
- Page 8 Automation: Double dipping ........... 132 Automation: Rinsing in sample ........133 Automation: Rinsing in special ........134 8 Handling and maintenance General ................135 Quality Management and validation with Metrohm ..135 9 Troubleshooting SET titration ..............137 Miscellaneous ..............138 10 Appendix 10.1 Dosing unit ................
- Page 9 12 Conformity and warranty 12.1 Declaration of Conformity ..........152 12.2 Warranty (guarantee) ............153 12.3 Quality Management Principles ........154 13 Accessories 13.1 Scope of delivery 2.862.0010 ......... 156 13.2 Optional accessories ............160 Index ■■■■■■■■ 862 Compact Titrosampler...
- Page 10 Connecting a polarizable electrode ..........23 Figure 20 Remote cable with lettering ............. 24 Figure 21 Remote connection 862 Compact Titrosampler - 843 Pump Station - Dosimat plus ................... 24 Figure 22 Remote connection 862 Compact Titrosampler - Dosimat ....25 Figure 23 Mounting the shields ...............
-
Page 11: Introduction
1 Introduction 1 Introduction Instrument description The 862 Compact Titrosampler is a versatile analysis instrument which combines a titrator and a compact sample changer in a single unit. It is the central control instrument in an automation system that can also include, in addition to a Dosimat (for adding auxiliary solutions), a pump for rinsing and aspirating the sample vessels. -
Page 12: Titration And Measuring Modes
– pH (calibration of pH electrodes) 1.1.3 Intended use The 862 Compact Titrosampler is designed for usage as an automation system in analytical laboratories. It is not suitable for usage in biochemi- cal, biological or medical environments in its basic equipment version. -
Page 13: About The Documentation
This symbol draws attention to a possible hazard due to electrical current. Warning This symbol draws attention to a possible hazard due to heat or hot instrument parts. Warning This symbol draws attention to a possible biological hazard. ■■■■■■■■ 862 Compact Titrosampler... -
Page 14: Safety Instructions
The electrical safety when working with the instrument is ensured as part of the international standard IEC 61010. Warning Only personnel qualified by Metrohm are authorized to carry out service work on electronic components. Warning Never open the housing of the instrument. The instrument could be damaged by this. -
Page 15: Tubing And Capillary Connections
Personnel safety Warning Wear protective goggles and working clothes suitable for laboratory work while operating the 862 Compact Titrosampler. It is also advisable to wear gloves when caustic liquids are used or in situations where glass vessels could break. ■■■■■■■■... - Page 16 Always install the safety shield supplied with the equipment before using the instrument for the first time. Pre-installed safety shields are not allowed to be removed. The 862 Compact Titrosampler may not be operated without a safety shield! Warning Personnel are not permitted to reach into the working area of the instrument while operations are running! A considerable risk of injury exists for the user.
-
Page 17: Flammable Solvents And Chemicals
The correct disposal of your old equipment will help to prevent negative effects on the environment and public health. More details about the disposal of your old equipment can be obtained from your local authorities, from waste disposal companies or from your local dealer. ■■■■■■■■ 862 Compact Titrosampler... -
Page 18: Overview Of The Instrument
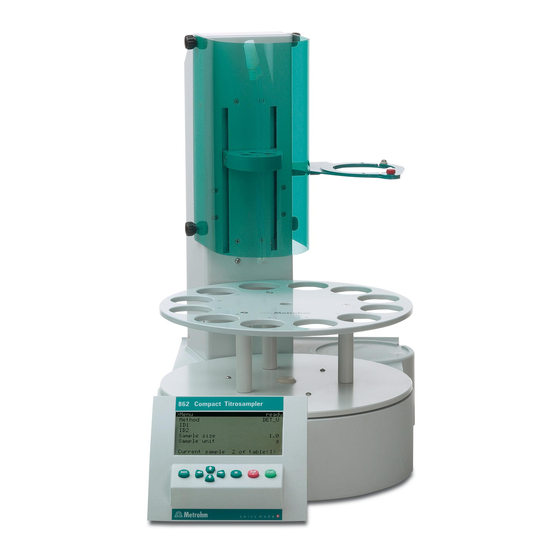
■■■■■■■■■■■■■■■■■■■■■■ 2 Overview of the instrument Figure 1 Front 862 Compact Titrosampler Safety shield (6.2751.130) Titration head With knurled screws for mounting. The With two retracted dosing tips and four safety shield can be folded up. stoppers. Sample rack Display For 11 sample beakers and one rinsing beaker (6.1459.300, 120 mL) -
Page 19: Figure 2 Rear 862 Compact Titrosampler
■■■■■■■■■■■■■■■■■■■■■■ 2 Overview of the instrument 3 4 5 6 7 8 9 10 11 12 Figure 2 Rear 862 Compact Titrosampler Warning symbol Tubing and cable cover (see Chapter 1.3.4, page 5) Electrode connector (Ind.) Electrode connector (Ref.) For connecting pH or redox electrodes with For connecting reference electrodes. -
Page 20: Installation
Place the instrument in a location of the laboratory which is suitable for operation, free of vibrations, protected from corrosive atmosphere, and contamination by chemicals. The instrument should be protected against excessive temperature fluctu- ations and direct sunlight. ■■■■■■■■ 862 Compact Titrosampler... -
Page 21: Removing The Safety Shield And Cable Cover
Do not forget to refasten these two shields after the installation of the accessories. Mounting the Dosino The 800 Dosino is used for adding titrant. The titrant bottle can be placed next to the tower of the 862 Compact Titrosampler. ■■■■■■■■ 862 Compact Titrosampler... -
Page 22: Figure 4 Mounting The Dosino
3 Attach the dosing drive Insert the 800 Dosino with the guide pins into the openings on the upper side of the dosing unit. Fix the 800 Dosino with a rotation to the left. Note the markings. ■■■■■■■■ 862 Compact Titrosampler... -
Page 23: Connecting The Dosino
Connect the Dosino to the MSB socket on the rear of the instrument. The Dosino is automatically recognized when switching on the instrument. Figure 5 Connecting the Dosino Caution Make sure that the flat side of the plug matches the marking on the socket. ■■■■■■■■ 862 Compact Titrosampler... -
Page 24: Setting Up The Titration Head
21). 5 Manually screw the enclosed 6.1805.100 FEP tubing to the dosing tip mounted on the titration head. Connect the other end of the tub- ing to the dosing unit on the Dosino. ■■■■■■■■ 862 Compact Titrosampler... -
Page 25: Figure 7 Installing Rinsing Nozzles And Aspiration Tip
It can be adjusted in terms of height and its tip can be cut as required to the necessary length. 4 Manually screw the 6.1805.200 aspiration tubing (with M8 thread) firmly to the aspiration tip. ■■■■■■■■ 862 Compact Titrosampler... -
Page 26: Figure 8 Setting Up The Distributor
Note Enclosed with the 862 Compact Titrosampler is the 6.1815.010 spiral band. You can wrap cables and tubings with it. This will ensure that the cables and tubings are arranged in an organized manner. -
Page 27: Connecting A Stirrer
5 Use the four knurled screws to remount the cable and tubing cover. Caution Close the safety shield again after the titration head has been equipped. The 862 Compact Titrosampler is not permitted to be operated unless the safety shield is correctly mounted. Connecting a stirrer A DIN socket for connecting a rod stirrer 802 Stirrer is located on the rear of the instrument. -
Page 28: Connecting Keyboard, Printer And Other Usb Devices
3.7 Connecting keyboard, printer and other USB devices Connecting keyboard, printer and other USB devices The 862 Compact Titrosampler has a USB (OTG) connector. Use the provi- ded 6.2151.100 adapter USB MINI (OTG) - USB A for connecting USB devices as e.g. printers, keyboards or USB sticks, see the following figure. -
Page 29: Figure 12 Connecting The Usb Stick
USB hubs are available in specialty stores in a number of different models. The USB (OTG) connector of the 862 Compact Titrosampler has no such hub. The 6.2147.000 numerical USB keypad has a USB hub and two USB connectors. -
Page 30: Connecting A Balance
Connecting the USB hub with USB stick, printer and the 6.2148.030 RS-232/USB Box (for connecting balances). Connecting a balance Balances are equipped with a serial RS-232 interface as a rule. To connect a balance, you require a 6.2148.030 RS-232/USB Box. Figure 15 Connecting a balance ■■■■■■■■ 862 Compact Titrosampler... -
Page 31: Connecting A Sensor
3 Installation When a 6.2151.020 USB cable is used, then the 6.2148.030 RS-232/USB Box can be connected to the 862 Compact Titrosampler by means of a USB hub or a 6.2151.100 adapter (see Chapter 3.7, page 18). Connect the 9-pin plug of the respective balance connecting cable to the RS 232/1 connector. -
Page 32: Figure 17 Connecting A Reference Electrode
The red plug must always be plugged into the red socket at the temper- ature sensor for the purpose of shielding against disruptions. If you use an electrode with an integrated NTC probe, then you must plug the red plug into the red socket. ■■■■■■■■ 862 Compact Titrosampler... -
Page 33: Remote Connections
3.10 Remote connections The 862 Compact Titrosampler can be used as a control instrument for a simple automation system with a large variety of different instruments. Even older Metrohm instruments can thus be integrated into an automa- ted analysis system. -
Page 34: Example Systems
The Dosimat is operated in XDOS mode. The volume of the auxiliary solu- tion is defined on the Dosimat plus. On the 843 Pump Station the 862 is connected to Remote 1, the Dosimat plus to Remote 2. Pump 1 is used for rinsing the electrode, pump 2 for aspirating the sample solution. -
Page 35: Figure 22 Remote Connection 862 Compact Titrosampler - Dosimat
862 — Dosimat The small combination for titrations, with adding auxiliary solution by a Dosimat of the 6xx/7xx series. If no 843 Pump Station is used, a Dosimat can directly be connected to the 862 Compact Titrosampler. 862 Compact Titrosampler Dosimat 6 . -
Page 36: Mounting The Cable Cover And The Safety Shield
When each of the lower knurled screws is slightly loosened, the safety shield can be folded up if needed. Warning The 862 Compact Titrosampler may not be operated without a safety shield! ■■■■■■■■ 862 Compact Titrosampler... -
Page 37: Connecting The Mains Cable
This instrument must not be operated except with the mains voltage specified for it (see rear of the instrument). Protect the connection sockets against moisture. The connector for the mains cable is located on the rear of the instru- ment. Figure 24 Connecting the mains cable ■■■■■■■■ 862 Compact Titrosampler... -
Page 38: Titration And Automation Sequences
The reagent is added in constant volume steps. Measured value acceptance is drift-con- trolled (equilibrium titration) or after a waiting time. Equivalence points are evaluated automatically. U/mV V/mL Figure 26 Reagent dosing for MET ■■■■■■■■ 862 Compact Titrosampler... -
Page 39: Endpoint Titration (Set)
Dosimat/Dosimat plus. A filled rinsing beaker should be placed on the special beaker position. The individual steps: Move to the sample ■ Lower the lift to work position ■ Start the determination ■ ■■■■■■■■ 862 Compact Titrosampler... -
Page 40: Dipping In Special 2
If necessary, initiate dosing (Activation pulse) and switch on the stir- ■ If necessary, wait for Start delay time ■ Wait for end of determination ■ Switch off the stirrer and move the lift upward ■ ■■■■■■■■ 862 Compact Titrosampler... -
Page 41: Double Dipping
Wait for Rinsing time to be completed ■ Switch off the stirrer and move the lift upward ■ Wait for Dripping time to be completed ■ After the last sample: Lower the lift in the rinsing beaker to work position ■ ■■■■■■■■ 862 Compact Titrosampler... -
Page 42: Rinsing In Sample
If required, auxiliary solution can be added prior to the determination with a Dosimat/Dosimat plus. An empty rinsing beaker should be placed on the special beaker posi- tion. The individual steps: Move to the sample ■ Lower the lift to work position ■ ■■■■■■■■ 862 Compact Titrosampler... -
Page 43: Pump Control
Rinsing the electrode and aspirating the sample vessels is carried out with the aid of an 843 Pump Station with two membrane or peristaltic pumps. These are connected to the 862 Compact Titrosampler by means of a remote cable (see Chapter 3.10.2, page 24). The pumps can be operated manually by push-button or controlled by means of remote lines. -
Page 44: Dosing Auxiliary Solutions
Dosing auxiliary solutions The addition of an auxiliary solution can be carried out with a 6xx/7xx Dosimat or a Dosimat plus. This is connected via remote cable to the 862 Compact Titrosampler . The triggering of the dosing is accomplished by switching on the Activa- tion pulse which is put out at the beginning of a titration. -
Page 45: Operation
"Preparing the buret unit (PREP)", page 62. Confirm the message with [OK]. ■ The display of this message can be deactivated in the system set- tings (see "PREP warning", page 71). The main dialog is displayed: ■■■■■■■■ 862 Compact Titrosampler... -
Page 46: Fundamentals Of Operation
Fundamentals of operation 5.2.1 The keypad Figure 28 Keypad 862 Compact Titrosampler BACK Apply the input and exit the dialog. ⇧ ⇩ Move the selection bar either up or down by one line at a time. -
Page 47: Structure Of The Dialog Windows
">", then additional settings are available in a subordinate dialog. Use [OK] to access this dialog. Example: System settings Use the [BACK] key to return to the next higher level. ■■■■■■■■ 862 Compact Titrosampler... -
Page 48: Entering Text And Numbers
The [BACK] key has the same function as Accept. A commercially available USB keyboard can be connected to make it eas- ier to enter text and numbers. The assignment of the keys on the PC key- board is described in chapter 10.4.2, page 142. ■■■■■■■■ 862 Compact Titrosampler... -
Page 49: Selecting From A Selection List
Mean value of result R# (# = 1…5) TITER Titer of selected solution CONC Concentration of selected solution List of additional variables (see "Variables", page 40) Templates List of predefined calculation formulas (see "Calculation templates", page 40) ■■■■■■■■ 862 Compact Titrosampler... - Page 50 Measured value of fixed endpoint FP# (# = 1…9) Time at fixed endpoint FP# (# = 1…9) For Molw, see the following section. Calculation templates Pressing Templates displays a list with calculation templates. You can apply these templates directly with [OK]. ■■■■■■■■ 862 Compact Titrosampler...
-
Page 51: Methods
Blank value as single value Methods 5.4.1 Creating a new method Proceed as follows to create a new method: 1 Open the method table In the main dialog, select Method and press [OK]. ■ The method table opens: ■■■■■■■■ 862 Compact Titrosampler... -
Page 52: Saving A Method
If you modify method parameters, then you can save these as a your own method. A maximum of 100 methods can be saved. To save a method, proceed as follows: 1 Open the method table In the main dialog, select Method and press [OK]. ■ The method table opens: ■■■■■■■■ 862 Compact Titrosampler... -
Page 53: Loading A Method
The method will be saved and the method table is displayed. 5.4.3 Loading a method To load a method, proceed as follows: 1 Open the method table In the main dialog, select Method and press [OK]. ■ The method table with the stored methods opens: ■■■■■■■■ 862 Compact Titrosampler... -
Page 54: Exporting A Method
To export a method, proceed as follows: 1 Open the method table In the main dialog, select Method and press [OK]. ■ The method table with the stored methods opens: 2 Select a method Select the desired method. ■ ■■■■■■■■ 862 Compact Titrosampler... -
Page 55: Sample Data
The sample table contains numbered lines. The identification (ID1) and the sample size of each sample are displayed. Edit Edit data of the selected line Delete Delete the selected line from the sample table. Insert Insert a new line above the line selected. ■■■■■■■■ 862 Compact Titrosampler... - Page 56 Sample identification. The sample identification can be used in calculations as the variable CI1. Input max. 10 characters Default value empty Sample identification. The sample identification can be used in calculations as the variable CI2. Input max. 10 characters Default value empty ■■■■■■■■ 862 Compact Titrosampler...
- Page 57 If you would like to enter the sample size in a particular line, then you must open the corresponding editing dialog (i.e. the Sample data dia- log is displayed). If the editing dialog for the sample size is opened, then the sent value will be ignored. ■■■■■■■■ 862 Compact Titrosampler...
-
Page 58: Entering Sample Data In The Main Dialog
| mg | µg | mL | µL | pieces | User-defined Selection Default value User-defined A user-defined unit can be created. This will be added to the selection list. The previous entry will be overwritten as soon as the new unit has been defined. ■■■■■■■■ 862 Compact Titrosampler... -
Page 59: Performing A Sample Series
Close the entry dialog with [BACK] or Accept. ■ 3 Enter the rack position of the first sample Select Next sample pos. and press [OK]. ■ ■■■■■■■■ 862 Compact Titrosampler... -
Page 60: Pausing A Sample Series And Continuing
The method run is stopped. The sample series cannot be resumed. 5.6.2 Pausing a sample series and continuing Interrupting a sample series A method run of the 862 Compact Titrosampler can be paused and then continued again. The connected instruments are however not stopped. ■■■■■■■■ 862 Compact Titrosampler... - Page 61 It is thus possible to shorten a sample series or to extend it, without stopping it. 2 Press the [OK] key and enter the number of samples that still need to be processed. The current sample must be taken into account. 3 Press the [START] key. ■■■■■■■■ 862 Compact Titrosampler...
-
Page 62: Status Of The Sample Series
Place the required buffer solutions on the rack positions ahead of the ■ sample solutions on the sample rack. The calibration method is run first when the sample series is being execu- ted. The buffer solutions are approached automatically. ■■■■■■■■ 862 Compact Titrosampler... -
Page 63: Live Modifications
Edit the sample data and accept with Accept or [BACK]. ■ 3 Display the live dialog Press [BACK]. ■ Select Menu and press [OK]. ■ Select the menu item Live dialog and press [OK]. ■ The live dialog is displayed once again. ■■■■■■■■ 862 Compact Titrosampler... -
Page 64: Editing The Sample Table While A Determination Is Running
The main dialog is displayed. The determination continues to run in the background. 2 Open the main menu Select Menu and press [OK]. ■ 3 Select the sample data Select the menu item Sample table and press [OK]. ■ Select the desired line. ■ ■■■■■■■■ 862 Compact Titrosampler... -
Page 65: Live Parameters
Proceed as follows to edit the parameters: 1 Display the main dialog Press [BACK]. ■ The main dialog is displayed. The determination continues to run in the background. ■■■■■■■■ 862 Compact Titrosampler... -
Page 66: Results
The method run can be interrupted with the Hold function in the live dialog. Recalculations and the display of the titration curves in the results win- dow are not possible during a sample series. ■■■■■■■■ 862 Compact Titrosampler... - Page 67 Recalculating Note Recalculation cannot be undone. All of the results are recalculated with the Recalc function. This is neces- sary if, for example, the calculation, the titer or the sample size has been modified. ■■■■■■■■ 862 Compact Titrosampler...
-
Page 68: Statistics
Details Display additional data. Reset Delete all statistical data. Increase Add a further determination to the determination series. Displaying statistical details Additional data from the determination series can be displayed with the Details function. ■■■■■■■■ 862 Compact Titrosampler... -
Page 69: Printing A Report Manually
1 Open the main menu In the main dialog, select Menu and press [OK]. ■ 2 Open the print dialog Select the menu item Print reports and press [OK]. ■ The dialog window with the available reports opens: ■■■■■■■■ 862 Compact Titrosampler... - Page 70 This report can be saved as a TXT file on a connected USB stick or sent to a terminal program or to a LIMS via an RS-232 interface. The definition is made in the system settings (see "PC/LIMS report", page 80). ■■■■■■■■ 862 Compact Titrosampler...
-
Page 71: Manual Control
At the same time, the starting position (Next sample pos.) is reset to 1 for the start of the next sample series. The rack position display is always updated as soon as the rack is in the new position. ■■■■■■■■ 862 Compact Titrosampler... -
Page 72: Moving The Lift
Proceed as follows: 1 Open the manual control In the main dialog, select Menu and press [OK]. ■ The main menu opens. Select the menu item Manual control and press [OK]. ■ Manual control opens. ■■■■■■■■ 862 Compact Titrosampler... - Page 73 [START] key pressed down. Proceed as follows: 1 Open the manual control In the main dialog, select Menu and press [OK]. ■ The main menu opens. Select the menu item Manual control and press [OK]. ■ Manual control opens. ■■■■■■■■ 862 Compact Titrosampler...
- Page 74 5 Fill the cylinder Press [STOP] or [BACK]. ■ The dosing cylinder is filled. If you start the filling with [BACK], then the dialog will also be exited. ■■■■■■■■ 862 Compact Titrosampler...
- Page 75 The dosing and filling rate should be decreased for viscous liq- ■ uids. The maximum dosing and filling rate depends on the cylinder ■ volume (see Chapter 10.1.1, page 139). Enter the desired volume. ■ Enter the dosing rate. ■ Enter the filling rate. ■ ■■■■■■■■ 862 Compact Titrosampler...
-
Page 76: Measuring
The main menu opens. Select the menu item Manual control and press [OK]. ■ Manual control opens. 2 Select a measuring mode Select the Measure item. ■ In the function bar, select the measuring mode and press [OK]. ■ ■■■■■■■■ 862 Compact Titrosampler... -
Page 77: Stirring
You can control a connected stirrer manually. Proceed as follows: 1 Open the manual control In the main dialog, select Menu and press [OK]. ■ The main menu opens. Select the menu item Manual control and press [OK]. ■ Manual control opens. ■■■■■■■■ 862 Compact Titrosampler... - Page 78 The stirrer is started and stirs at the rate which has been set. Off is now displayed in the function bar. 4 Switch off the stirrer In the function bar, select Off and press [OK]. ■ The stirrer is stopped. ■■■■■■■■ 862 Compact Titrosampler...
-
Page 79: System Settings
Current time. Only valid numbers can be entered. Format: hh:mm:ss Date Current date. Only valid numbers can be entered. Format: YYYY:MM:DD Language Setting the dialog language. In addition to English a further language can be selected. ■■■■■■■■ 862 Compact Titrosampler... - Page 80 If the limited dialog is activated for routine operations, then the expert dialog cannot be switched on during running operations. To change the dialog type, the 862 Compact Titrosampler must be switched off and then back on again. The expert dialog can be forced at the time the instrument is started.
- Page 81 After the instrument has been switched on. ■ Each time a buret unit has been attached. ■ This function causes all tubings and the cylinder to be rinsed (see Chapter 10.1.2, page 139). Selection on | off Default value ■■■■■■■■ 862 Compact Titrosampler...
-
Page 82: Lift Settings (Lift)
4100 K Lift settings (Lift) Menu ▶ System ▶ Lift Work position The working height of the lift can be set to the desired value. This is accomplished by means of the direct operation of the lift. ■■■■■■■■ 862 Compact Titrosampler... -
Page 83: Managing Sensors
60 mm Initial lift pos. After the 862 Compact Titrosampler has been switched on, the lift moves all the way to the top to the home position for the initialization of the drive. It can then be moved back down to the working height if desired. -
Page 84: Editing The Sensor Data
Range –20.000 ... 20.000 Default value 7.000 Calibration temp. This parameter only appears for pH electrodes. Temperature at which the last calibration was carried out. Range –20.0 ... 150.0 °C Default value 25.0 °C ■■■■■■■■ 862 Compact Titrosampler... -
Page 85: Managing Solutions
The number of solutions in buret units without data chip is limited to 10 items. Meaning of the type: DU: dosing unit without data chip ■ ■■■■■■■■ 862 Compact Titrosampler... -
Page 86: Editing The Solution Data
A user-defined unit can be created. This will be added to the selection list. The previous entry will be overwritten as soon as the new unit has been defined. A blank entry can be generated this way as well. Titer Titer of the solution. ■■■■■■■■ 862 Compact Titrosampler... -
Page 87: Managing Common Variables
Determination of a blank value which will be taken into account during ■ the content determination of the sample. Determination of the content of a standard solution, which will be ■ taken into account during the content determination of the sample. ■■■■■■■■ 862 Compact Titrosampler... -
Page 88: Editing Common Variables
In the function bar, select Edit and press [OK]. ■ 2 Adjust the result properties Select the parameter Save as CV and press [OK]. ■ Select the entry on in the selection list and apply with [OK]. ■ ■■■■■■■■ 862 Compact Titrosampler... -
Page 89: File Management
Restore Load the backup copy from a connected USB stick. Directory structure on the USB stick A directory with the instrument number is generated on the USB stick. The structure within the directory appears as follows: ■■■■■■■■ 862 Compact Titrosampler... -
Page 90: Configuring External Devices
If a printer is connected, then the printer type needs to be defined here in order for the reports to be printed out correctly. The printers that have the designation ESC-POS are so-called POS printers (point-of-sale printers), i.e. they print on continuous paper. ■■■■■■■■ 862 Compact Titrosampler... - Page 91 Type of balance Mettler AB, AG, AM, PM, Mettler XP, XS Mettler AT Mettler AT Mettler AX, MX, UMX, PG, Mettler AX AB-S Ohaus Voyager, Explorer, Ohaus Analytical Plus Precisa Precisa Sartorius Sartorius Shimadzu BX, BW Shimadzu ■■■■■■■■ 862 Compact Titrosampler...
- Page 92 Editing the COM2 settings Under COM2 settings the interface parameters for devices connected to the RS-232/2 connector of the RS-232 USB Box are set (e.g. PC). The parameters and input ranges are the same as for the COM1 interface. ■■■■■■■■ 862 Compact Titrosampler...
-
Page 93: Instrument Diagnosis
(OTG) - USB A) at the USB port on the instrument. Switch on the instrument. ■ 2 Open the update dialog Under Menu ▶ System ▶ Diagnosis, select the menu item ■ Software update. Press [OK]. ■ ■■■■■■■■ 862 Compact Titrosampler... -
Page 94: Diagnosis Functions
Electronic and mechanical functional groups in Metrohm instruments can and should be checked as part of regular maintenance by specialist per- sonnel from Metrohm. Please ask your local Metrohm agent regarding the precise terms and conditions involved in concluding a corresponding maintenance agreement. -
Page 95: Parameters
Default value max. Pause Waiting time, e.g. in case of a slow response of the electrode after the start or reaction time after the dosing of a start volume. Range 0 ... 999999 s Default value ■■■■■■■■ 862 Compact Titrosampler... -
Page 96: Titration Parameters
For titrations in which the finest details are also to be visible. This could however also lead to an increase in noise, which could result in unwan- ted equivalence points. optimal For all standard titrations. The parameters have been optimized for the most frequent applications. ■■■■■■■■ 862 Compact Titrosampler... - Page 97 A maximum volume increment should be selected in the following cases: when titration consumption is very low up until the equivalence point ■ is reached. when a start volume is dosed up until shortly before the equivalence ■ point is reached. ■■■■■■■■ 862 Compact Titrosampler...
- Page 98 Measuring mode pH, U and Ipol: Range 0.1 ... 999.0 mV/min 50.0 mV/min Default value ■■■■■■■■ 862 Compact Titrosampler...
- Page 99 Default value 26 s Table 1 Standard values for predefined titration rates for DET Titration rate slow optimal fast Meas. point density Min. increment 10.00 µL 10.00 µL 30.00 µL Max. increment Dosing rate maximum maximum maximum ■■■■■■■■ 862 Compact Titrosampler...
- Page 100 Default value not defined not defined No check takes place. I(pol) The polarization current is the current that is applied at a polarizable elec- trode during the voltametric measurement. This parameter is available only with I(pol) determinations. ■■■■■■■■ 862 Compact Titrosampler...
-
Page 101: Stop Conditions
When the stirrer is viewed from above, this means: "+": counterclockwise rotation ■ "–": clockwise rotation ■ Range –15 ... 15 Default value 7.1.3 Stop conditions Menu ▶ Parameters ▶ Stop conditions The conditions for stopping a titration are defined under Stop condi- tions. ■■■■■■■■ 862 Compact Titrosampler... - Page 102 This volume will be added when the number of equivalence points defined under Stop EP has been found. The curve shape after the equiva- lence point can also be seen this way. Range 0.01000 ... 9999.99 mL Selection Default value ■■■■■■■■ 862 Compact Titrosampler...
-
Page 103: Evaluation
Measured value for the lower limit. Measuring mode pH: Range –20.000 ... 20.000 Default value –20.000 Measuring mode U, Ipol: –1250.0 ... 1250.0 mV Range –1250.0 mV Default value Measuring mode Upol: Range –125.00 ... 125.00 µA Default value –125.00 µA ■■■■■■■■ 862 Compact Titrosampler... - Page 104 Only the equivalence point with the greatest ERC value, i.e. the steep- est jump, will be recognized. last Only the last equivalence point will be recognized. No evaluation takes place. for Window = on Selection first | greatest | last Default value first ■■■■■■■■ 862 Compact Titrosampler...
- Page 105 [1] C. F. Tubbs, Anal. Chem. 1954, 26, 1670–1671. [2] E. Bartholomé, E. Biekert, H. Hellmann, H. Ley, M. Weigert, E. Weise, Ullmanns Encyklopädie der technischen Chemie, Bd. 5, Verlag Chemie, Weinheim, 1980, S. 659. ■■■■■■■■ 862 Compact Titrosampler...
-
Page 106: Calculation
The result name is specified in the list for each calculation. Edit Edit the data of the selected calculation, see following chapter. ■■■■■■■■ 862 Compact Titrosampler... - Page 107 Selection on | off Default value Save as CV The calculated result can be saved as a method-independent variable, a so-called common variable. The result is then also available in other meth- ■■■■■■■■ 862 Compact Titrosampler...
-
Page 108: Statistics
The result report contains the calculated results, equivalence points and endpoints, sample data, etc. Selection on | off Default value Curve Curve report. The width of the curve is defined in the system settings (see "Graphics width", page 81). Selection on | off Default value ■■■■■■■■ 862 Compact Titrosampler... - Page 109 USB storage medium or sent via an RS-232 interface to a LIMS. The output location is defined in the system settings (see "PC/LIMS report", page 80). The file name of the TXT file is constructed as follows: PC_LIMS_Report- ID1-YYYYMMDD-hhmmss.txt. Selection on | off Default value ■■■■■■■■ 862 Compact Titrosampler...
-
Page 110: Monotonic Equivalence Point Titrations (Met)
Waiting time, e.g. in case of a slow response of the electrode after the start or reaction time after the dosing of a start volume. Range 0 ... 999999 s Default value Request sample ID Selection of the sample identification that is queried in the method run. ■■■■■■■■ 862 Compact Titrosampler... -
Page 111: Titration Parameters
For all standard titrations. The parameters have been optimized for the most frequent applications. fast For fast and less critical titrations. user The individual titration parameters can be modified. ■■■■■■■■ 862 Compact Titrosampler... - Page 112 This parameter is visible only when Titration rate = user. Maximum permissible drift for the measured value acceptance, i.e. maxi- mum change of the measured value per minute. This type of titration is often referred to as equilibrium titration. ■■■■■■■■ 862 Compact Titrosampler...
- Page 113 This parameter is visible only when Titration rate = user. If signal drift has been switched off or has not yet been reached, then the measured value will be accepted when the maximum waiting time has elapsed. ■■■■■■■■ 862 Compact Titrosampler...
- Page 114 The validity of the titer is checked for the selected solution at the start of the determination. Selection Selection of configured solution | not defined Default value not defined ■■■■■■■■ 862 Compact Titrosampler...
- Page 115 The algebraic sign of the stirring rate changes the direction in which the stirring is done. When the stirrer is viewed from above, this means: "+": counterclockwise rotation ■ "–": clockwise rotation ■ Range –15 ... 15 Default value ■■■■■■■■ 862 Compact Titrosampler...
-
Page 116: Stop Conditions
Selection Volume after EP This volume will be added when the number of equivalence points defined under Stop EP has been found. The curve shape after the equiva- lence point can also be seen this way. ■■■■■■■■ 862 Compact Titrosampler... -
Page 117: Evaluation
This parameter is visible only when Window = on. Measured value for the lower limit. Measuring mode pH: Range –20.000 ... 20.000 Default value –20.000 Measuring mode U, Ipol: Range –1250.0 ... 1250.0 mV Default value –1250.0 mV ■■■■■■■■ 862 Compact Titrosampler... - Page 118 0.1 ... 99.9 µA Default value 2.0 µA EP recognition This parameter allows you to filter out only the equivalence points that are being sought. for Window = off Selection all | greatest | last | off Default value ■■■■■■■■ 862 Compact Titrosampler...
-
Page 119: Measuring Mode Upol: Range -125.00
–20.000 ... 20.000 Selection Default value Measuring mode U, Ipol: Range –1250.0 ... 1250.0 mV Selection Default value Measuring mode Upol: Range –125.00 ... 125.00 µA Selection Default value Fixed EP2 at See Fixed EP1 at. ■■■■■■■■ 862 Compact Titrosampler... -
Page 120: Calculation
Evaluation and equivalence point criterion with MET The equivalence points (EPs) are localized by a method based on the For- tuin method which has been adapted by Metrohm for numerical methods. A search is made for the largest measured value alteration ( ). The exact EP is determined by using an interpolation factor which depends on the Δ... - Page 121 The result can be saved as titer for this selected solution. If statistics has been switched on, then the current mean value of the determination ser- ies will be saved. Selection on | off Default value ■■■■■■■■ 862 Compact Titrosampler...
-
Page 122: Statistics
The reports that will be printed out automatically in connection with a determination are defined under Reports. Results The result report contains the calculated results, equivalence points and endpoints, sample data, etc. Selection on | off Default value ■■■■■■■■ 862 Compact Titrosampler... - Page 123 USB storage medium or sent via an RS-232 interface to a LIMS. The output location is defined in the system settings (see "PC/LIMS report", page 80). The file name of the TXT file is constructed as follows: PC_LIMS_Report- ID1-YYYYMMDD-hhmmss.txt. Selection on | off Default value ■■■■■■■■ 862 Compact Titrosampler...
-
Page 124: Endpoint Titrations (Set)
If the volume drift is known throughout a prolonged period of time, then this can be entered manually. No drift correction takes place. Drift value This parameter is visible only when Drift correction = manual. Volume drift for manual drift correction. ■■■■■■■■ 862 Compact Titrosampler... -
Page 125: Start Conditions
(parameterization at the Dosimat). The Activation pulse parameter must however be switched on for this purpose. Range 0 ... 999999 s Default value Start volume Volume that is dosed prior to the start of the titration. ■■■■■■■■ 862 Compact Titrosampler... - Page 126 If this parameter is switched on, then the method run will be paused dur- ing the query. If the parameter is switched off, the titration will be started in the background. Selection on | off Default value ■■■■■■■■ 862 Compact Titrosampler...
-
Page 127: Titration Parameters
5 µA U(pol) The polarization voltage is the voltage applied to the polarizable electrode during an amperometric measurement. This parameter is available only with U(pol) determinations. Range –1250 ... 1250 mV (Increment: 10) Default value 400 mV ■■■■■■■■ 862 Compact Titrosampler... - Page 128 If two endpoints have been set then the titration direction will be defined automatically. In this case the setting will be ignored. + | – | auto Selection Default value auto ■■■■■■■■ 862 Compact Titrosampler...
-
Page 129: Control Parameters Ep1
The control parameters for the first endpoint are defined under Control parameters EP1. Endpoint 1 at Measured value for the first endpoint. Measuring mode pH: Range –20.000 ... 20.000 Selection Default value Measuring mode U and Ipol: Range –1250.0 ... 1250.0 mV Selection Default value ■■■■■■■■ 862 Compact Titrosampler... -
Page 130: Measuring Mode Upol: Range -125.00
Max. rate. Measuring mode pH: Range 0.001 ... 20.000 Default value 2.000 Selection Measuring mode U and Ipol: Range 0.1 ... 1250.0 mV Default value 100.0 mV Selection ■■■■■■■■ 862 Compact Titrosampler... - Page 131 If no stop criterion has been selected then the titration will not be stopped. The stop conditions (see Chapter 7.3.6, page 122) always lead to a stop, even if the stop criterion has not been reached. ■■■■■■■■ 862 Compact Titrosampler...
-
Page 132: Control Parameters Ep2
The titration is stopped when the specified volume has been dosed since the start of the titration. This volume should be adjusted to the size of the titration vessel in order to prevent the contents from running over. ■■■■■■■■ 862 Compact Titrosampler... -
Page 133: Calculation
The result name is specified in the list for each calculation. Edit Edit the data of the selected calculation, see following chapter. Delete Delete the selected calculation. ■■■■■■■■ 862 Compact Titrosampler... - Page 134 The calculated result can be saved as a method-independent variable, a so-called common variable. The result is then also available in other meth- ods for calculations. If statistics has been switched on, then the current mean value of the determination series will be saved. ■■■■■■■■ 862 Compact Titrosampler...
-
Page 135: Statistics
The result report contains the calculated results, equivalence points and endpoints, sample data, etc. Selection on | off Default value Curve Curve report. The width of the curve is defined in the system settings (see "Graphics width", page 81). Selection on | off Default value ■■■■■■■■ 862 Compact Titrosampler... - Page 136 USB storage medium or sent via an RS-232 interface to a LIMS. The output location is defined in the system settings (see "PC/LIMS report", page 80). The file name of the TXT file is constructed as follows: PC_LIMS_Report- ID1-YYYYMMDD-hhmmss.txt. Selection on | off Default value ■■■■■■■■ 862 Compact Titrosampler...
-
Page 137: Ph Calibration (Cal)
Range –20.0 ... 150.0 °C Default value 25.0 °C Sensor Selection of the sensor from the sensor list. The selection depends on the measuring mode. Sensors are defined under System ▶ Sensors. ■■■■■■■■ 862 Compact Titrosampler... -
Page 138: Buffers
Selection Baker | Beckman | DIN | Fisher | Fluka Basel | Hamilton | Merck CertiPUR | Merck Titrisol | Metrohm | Mettler | NIST | Precisa | Radiome- ter | Special Merck CertiPUR Reference temperature = 25 °C. The buffer type Merck Titrisol must be selected when using Merck CertiPUR buffers (20 °C). -
Page 139: Reports
The reports that will be printed out automatically in connection with a cal- ibration are defined under Reports. Results The result report contains the specifications for the calibration (slope, pH(0), etc.). Selection on | off Default value ■■■■■■■■ 862 Compact Titrosampler... -
Page 140: Automation: Dipping In Special
Setting the stirring rate. It can be set in steps of –15 to +15. The default setting 8 corresponds to 1000 U/min. The formula for calculating the rota- tional speed is specified in chapter 10.2, page 140. The optimum stirring rate can be tested in the manual control. ■■■■■■■■ 862 Compact Titrosampler... -
Page 141: Automation: Dipping In Special 2
The algebraic sign of the stirring rate changes the direction in which the stirring is done. When the stirrer is viewed from above, this means: "+": counterclockwise rotation ■ ■■■■■■■■ 862 Compact Titrosampler... -
Page 142: Automation: Double Dipping
The algebraic sign of the stirring rate changes the direction in which the stirring is done. When the stirrer is viewed from above, this means: "+": counterclockwise rotation ■ "–": clockwise rotation ■ Range –15 ... 15 Default value ■■■■■■■■ 862 Compact Titrosampler... -
Page 143: Automation: Rinsing In Sample
0 ... 999 s Default value 10 s Rinsing time Rinsing time of Pump 1, if an 843 Pump Station is connected. Rinsing pump and aspiration pump run during the rinsing time. Range 0 ... 999 s Default value ■■■■■■■■ 862 Compact Titrosampler... -
Page 144: Automation: Rinsing In Special
Rinsing pump and aspiration pump run during the rinsing time. At the end of a sample series, the rinsing time determines how long rins- ing solution will be filled into the rinsing beaker. Range 0 ... 999 s Default value ■■■■■■■■ 862 Compact Titrosampler... -
Page 145: Handling And Maintenance
Metrohm» available from your local Metrohm agent. Validation Please contact your local Metrohm agent for support in validating instru- ments and software. Here you can also obtain validation documentation to provide help for carrying out the Installation Qualification (IQ) and the Operational Qualification (OQ). - Page 146 ■■■■■■■■■■■■■■■■■■■■■■ 8.2 Quality Management and validation with Metrohm Note You can find information on the subjects of quality management, vali- dation and maintenance as well as an overview of the documents cur- under Support. rently available at www.metrohm.com/com/ ■■■■■■■■ 862 Compact Titrosampler...
-
Page 147: Troubleshooting
Define Titration rate = user and increase ■ minimum rate (Min. rate). The results are The minimum dosing rate Define Titration rate = user and reduce min- spread widely. is too high. imum rate (Min. rate) (see Chapter 7.3.4, page 119). ■■■■■■■■ 862 Compact Titrosampler... -
Page 148: Miscellaneous
Miscellaneous Problem Cause Remedy No report is printed. The printer is not recog- Switch the 862 Compact Titrosampler off ■ nized by the instrument. and on again. Use a hub on the USB connector and con- ■ nect the printer to the hub. -
Page 149: 10 Appendix
– Tubing on port 1: length = 70 cm, diameter = 2 mm – Tubing on port 2: length = 25 cm, diameter = 2 mm Dosing and filling are both carried out with the same maximum rate. ■ ■■■■■■■■ 862 Compact Titrosampler... -
Page 150: Stirring Rate
The algebraic sign is however ignored for the calculations. Note With some balances, the sample identification and the method can be sent in addition to the sample size. Make sure that the balance does not send the sample size until the end. ■■■■■■■■ 862 Compact Titrosampler... -
Page 151: Usb Devices
The key [Num Lock] must be pressed for navigating in the dialog. Then the arrow keys are effective. The respective editing dialog must be opened for the number input. Table 4 Keyboard assignment Key of the 862 Compact Titro- Key on the numerical USB sampler or function in the keypad editing dialog... -
Page 152: Key Assignment Of A Usb Keyboard
The lettering of the USB keyboard can differ from above lettering, depending on the country-specific keyboard used. 10.4.3 PC mouse In order to make navigating in the dialog of the 862 Compact Titrosam- pler easier, a PC mouse can be connected. Table 6 Mouse functions... -
Page 153: Printer
■■■■■■■■■■■■■■■■■■■■■■ 10 Appendix Key of the 862 Compact Titro- Mouse function sampler [BACK] Right mouse button Mouse movement vertical/hori- [⇧] [⇩] [⇦] [⇨] zontal Scroll wheel vertical [⇧] [⇩] 10.4.4 Printer The range of USB printers available is extremely varied and constantly changing. - Page 154 If the query is not confirmed within 8 s, then the procedure will be interrupted. Press [BACK] twice. ■ Initialization is started. The process takes approximately 80 s. The instrument will be automatically restarted after successful initializa- tion. ■■■■■■■■ 862 Compact Titrosampler...
-
Page 155: Remote Interface
Pin assignment of the remote interface Figure 32 Pin assignment of remote socket and plug The above figure of the pin assignment applies for all Metrohm instru- ments with 9-pin D-Sub remote connectors. Table 7 Inputs and outputs of the remote interface Pin No. -
Page 156: Status Diagram Of The Remote Interface
Status diagram of the remote interface [START] SampleReady Sample ready Output 0 Dosimat Output 1 Pump 1 Output 2 Pump 2 Output 3 Error Output 4 Start/Continue Input 0 Stop Input 1 [STOP] Figure 33 Remote status diagram ■■■■■■■■ 862 Compact Titrosampler... -
Page 157: 11 Technical Specifications
–120…120 µA (increment: 1 µA) current –125…–121 µA / +121…+125 µA: non-guaranteed values, dependent on reference voltage +2.5 V Measuring –1200…1200 mV range Resolution 0.1 mV Measuring ±0.2 mV accuracy (±1 digit, without sensor error, under reference conditions) ■■■■■■■■ 862 Compact Titrosampler... -
Page 158: Temperature
(For an NTC sensor with R (25 °C) = 30000 Ω and B (25/50) = 4100 K) Resolution Pt1000 0.1 °C 0.1 °C Measuring accu- racy Pt1000 ± 0.2 °C (applies for measuring range –20…150 °C) ±0.6 °C (applies for measuring range –10…40 °C) ■■■■■■■■ 862 Compact Titrosampler... -
Page 159: Dosing Drive
Stirrer connector DIN socket Stirring rate Rod Stirrer 722/802: 180…3000 rpm Adjustable in 15 steps each in both directions of rotation. USB (OTG) connec- For connecting USB devices. For connecting instruments with a remote interface. Remote connector ■■■■■■■■ 862 Compact Titrosampler... -
Page 160: Mains Connection
EN 55022 / CISPR 22 ■ Immunity Standards fulfilled: EN/IEC 61326-1 ■ EN/IEC 61000-6-1 ■ EN/IEC 61000-4-2 ■ EN/IEC 61000-4-3 ■ EN/IEC 61000-4-4 ■ EN/IEC 61000-4-5 ■ EN/IEC 61000-4-6 ■ EN/IEC 61000-4-11 ■ EN/IEC 61000-4-14 ■ NAMUR ■ ■■■■■■■■ 862 Compact Titrosampler... -
Page 161: Ambient Temperature
25 °C (±3 °C) ture ≤ 60 % Relative humidity 11.11 Dimensions Width 0.26 m Height 0.47 m Depth 0.43 m Weight 9.09 kg (without accessories) Material Housing Lower part: Crastin PBTP Lift: Metal, surface-treated Rack ■■■■■■■■ 862 Compact Titrosampler... -
Page 162: 12 Conformity And Warranty
Name of commodity 862 Compact Titrosampler Combined sample changer and titrator for automated processing of small sample series in analytical laboratories. -
Page 163: Warranty (Guarantee)
61010-1 and CSA-C22.2 No. 61010-1. This product is listed in Intertek’s Directory of Listed Products. Manufacturer Metrohm Ltd., CH-9101 Herisau/Switzerland Metrohm Ltd. is holder of the SQS certificate ISO 9001:2000 Quality man- agement system for development, production and sales of instruments and accessories for ion analysis. Herisau, 28 September 2009 D. -
Page 164: Quality Management Principles
Components All components used in the Metrohm instruments have to satisfy the qual- ity standards that are defined and implemented for our products. Suppli- ers of components are audited by Metrohm as the need arises. - Page 165 ■■■■■■■■■■■■■■■■■■■■■■ 12 Conformity and warranty tional Qualification and Performance Verification of the system compo- nents or in carrying out the System Validation for the quantitative determi- nation of a substance in a given matrix. ■■■■■■■■ 862 Compact Titrosampler...
-
Page 166: 13 Accessories
■■■■■■■■■■■■■■■■■■■■■■ 13.1 Scope of delivery 2.862.0010 13 Accessories Note Subject to change without notice. 13.1 Scope of delivery 2.862.0010 Qty. Order no. Description 1.802.0010 802 Stirrer Rod stirrer with 6.1909.010 Propeller stirrer. 1.862.0010 862 Compact Titrosampler Compact and economic instrument for the automatic determination of dynamic (DET) and monotonic (MET) titrations with automatic equivalence point detection as well as SET endpoint titration. - Page 167 For holding together different cables or tubing. Length (m): 6.1909.050 Propeller for 120 mL beaker (6.1459.300) Propeller for 802 Stirrer when this is used with sample racks for 120 mL beakers (6.1459.300) Material: ETFE Length (mm): ■■■■■■■■ 862 Compact Titrosampler...
- Page 168 Adapter black 2 mm plug / B socket 4 mm For connecting plug B (4 mm) to 2 mm socket. 6.2147.000 Numerical USB keypad Numerical USB keypad for Titrino plus, Dosimat plus, 862 Compact Titrosampler and 869 Compact Sample Changer. Incl. USB Hub with two connectors. 6.2151.100 Adapter USB MINI (OTG) - USB A For connecting USB instruments.
- Page 169 Order no. Description 6.2621.130 Hexagon key 2 mm 2 mm. 6.2621.140 Hexagon key 2.5 mm A.725.0003 Metrohm USB Stick, 256 MB 6.2122.0x0 Mains cable with C13 line socket IEC-60320-C13 Cable plug according to customer requirements. Switzerland: Type SEV 12 6.2122.020 Germany, …:...
-
Page 170: Optional Accessories
869 Compact Sample Changer via remote sig- nals. The Rinse / Aspirate version is provided with all the accessories needed for automatically emptying the titration beaker and rinsing the titration equipment. ■■■■■■■■ 862 Compact Titrosampler... - Page 171 876 Dosimat plus for manual titration and dosing applications. Including push- button cable for manual dispensing control and 6.3026.220 Exchange Unit 20 6.2104.020 Electrode cable / 1 m / F For connecting electrodes with Metrohm plug-in head G to Metrohm instru- ments (socket F). Length (m): 6.2136.010...
- Page 172 Dosing unit 50 mL Dosing unit with integrated data chip with 50 mL glass cylinder and light protec- tion, mountable on reagent bottle with ISO/DIN GL45 thread. FEP tubing con- nection, antidiffusion buret tip. Volume (mL): ■■■■■■■■ 862 Compact Titrosampler...
-
Page 173: Index
Delete ........ 79 Curve ........57 Export ........ 44 FEP tubing ........ 14 Import ........ 79 FEP tubings ......15 DET ........2, 28 Load ........43 Filling rate Parameters ......85 Save ........42 Maximum ......139 ■■■■■■■■ 862 Compact Titrosampler... - Page 174 Warranty ........ 153 Spiral band ....... 16 Save as common variable 78, Working height ......72 Splash protection ....... 8 97, 112, 124 Work position ......72 Spray nozzles ......15 Save as titer ..97, 111, 124 ■■■■■■■■ 862 Compact Titrosampler...
Need help?
Do you have a question about the 862 and is the answer not in the manual?
Questions and answers