
Related Manuals for VDO M1WL


Summary of Contents for VDO M1WL
- Page 1 M1 WL Installation video Operating video Settings video www.vdocyclecomputing.com/service...
-
Page 2: Table Of Contents
M1 WL Preface Congratulations In choosing a VDO computer, you have opted for high-quality device with first rate technology. To optimally use the computer, we recommend that you read this manual carefully. It contains full operating instructions and many useful tips. -
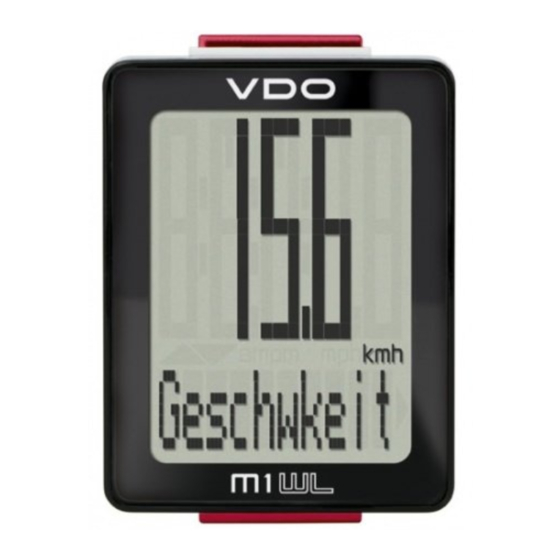
Page 3: Display
M1 WL Display The VDO M1 WL has a large, easy-to-read display that can be divided into three areas. – The top line of the display shows the value for the selected function. – The middle line displays “am” or “pm” if the 12-hour clock format is used. -
Page 4: Functions
M1 WL Functions The VDO M1 WL has the following functions Current speed With a wheel circumference of 2,155 mm, the maximum possible speed is 199 kmh or 124 mph. Current distance The current distance counts up to 999.99 km or miles. -
Page 5: Operation While Cycling
See page 18: Settings – speed indicator settings Wireless transmission of the speed The VDO M1 WL comes with analogue wireless transmission. Note: LED front lights can interfere with analogue wireless transmission. -
Page 6: Attaching The Handlebar Bracket
M1 WL Attaching the handlebar bracket You can attach the computer to the right or left of the handle- bars or the centre of the stem. Attach the handlebar bracket – in the corresponding position. STEP 1 Decide whether you want to attach the computer to the handlebars or the stem. -
Page 7: Attaching The Speed Transmitter
STEP 2 90° – 45° Place the spoke magnet around an outside spoke. The VDO logo of the rod-shaped magnet core should point toward the ✔ transmitter. Align the magnet with the cross-hatched sensor marking on the transmitter at a distance of 1- 5 mm. -
Page 8: Inserting The Computer Into The Bracket
M1 WL Inserting the computer into the bracket The VDO twist-click system securely connects the computer to the handlebar bracket. Lock How to insert the computer: STEP 1 UNLock Place the computer into the bracket in a 10 o’clock position. -
Page 9: Sleep Mode And Wireless Receiver
This can be seen from the flashing antenna icon. If you now set off cycling again, the auto-start function is used. The VDO M1 WL instantly switches back to the function mode. The current speed is once again displayed. This can take up to eight seconds. -
Page 10: Settings
If you want to configure further settings, press the BIKE button to access these. If you do not want to configure any other settings, press and hold the SET button. The settings menu closes. The VDO M1 WL returns to function mode. -
Page 11: Wheel Circumference
M1 WL Settings – wheel circumference You can set the roll circumference of your wheel on the VDO M1 WL. Wheel Wheel The more accurate this setting, the more accurate your speed circumference circumference Tyre size ETRTo in mm in inches indicator and the measurement of the distance you have 16 x 1.75... - Page 12 M1 WL Settings – wheel circumference How to set your wheel circumference: Press and hold the SET button until the settings menu opens. “Language” appears on the display. Press the BIKE button to scroll to the setting for the wheel circumference.
- Page 13 If you want to configure further settings, press the BIKE button to access these. If you do not want to configure any other settings, press and hold the SET button. The settings menu closes. The VDO M1 WL returns to function mode.
-
Page 14: Unit
If you want to configure further settings, press the BIKE button to access these. If you do not want to configure any other settings, press and hold the SET button. The settings menu closes. The VDO M1 WL returns to function mode. -
Page 15: Clock
M1 WL Settings – clock In the VDO M1 WL, you can set the clock in 12-hour AM/PM format or 24-hour format. Press and hold the SET button until the settings menu opens. “Language” appears on the display. Press the BIKE button to scroll to the setting for the clock. - Page 16 If you want to configure further settings, press the BIKE button to access these. If you do not want to configure any further settings, press and hold the SET button. The settings menu closes. The VDO M1 WL returns to function mode.
- Page 17 If you want to configure further settings, press the BIKE button to access these. If you do not want to configure any other settings, press and hold the SET button. The settings menu closes. The VDO M1 WL returns to function mode.
-
Page 18: Speed Indicator Settings
If you want to configure further settings, press the BIKE button to access these. If you do not want to configure any other settings, press and hold the SET button. The settings menu closes. The VDO M1 WL returns to function mode. -
Page 19: Total Distance
M1 WL Settings – setting the total distance You can set the total distance ridden on the VDO M1 WL. For example, you can enter your data here at the start of a new cycling season. ATTENTION: the M1 WL has a data memory. -
Page 20: Resetting Trip Data After The Trip
M1 WL Resetting trip data after the trip After each trip, you can reset the data for this trip to zero. The VDO M1 WL is then ready for the next trip. ATTENTION: your total distance (total number of kilometres ridden) is not reset to zero. -
Page 21: Replacing The Battery In The Computer
M1 WL Low battery indicator The M1 WL has a low battery warning. The text “Computer low” appears on the display. Press the BIKE button to acknowledge this low battery warning. You can keep using the cycle computer for approx. a week. Replace the battery as soon as possible on seeing the low battery warning. - Page 22 M1 WL Replacing the battery in the speed transmitter The battery in the speed transmitter should be replaced annually to guarantee seamless wireless transmission. You need a 3 V 2032 battery. We recommend using a branded battery from Sony, Panasonic, Varta or Duracell. The process is as follows: STEP 1 oPEN...
-
Page 23: Terms Of Guarantee
M1 WL Terms of guarantee VDO Cycle Parts offers a two-year guarantee on your VDO If your complaint is legitimate, you will receive a comparable computer, starting from the date of purchase. This replacement device. You are not entitled to a replacement of... -
Page 24: Troubleshooting
M1 WL Troubleshooting Error Possible cause Correction Half segments on the display Computer software not running Remove and re-insert the battery (e.g. after a battery change) correctly after battery change No speed displayed Distance from sensor to magnet too Correct the sensor and magnet positions great No speed displayed Computer not properly clicked... - Page 25 The declaration of conformity can be viewed at: Neustadt/Weinstraße, declare that when used as intended, www.vdocyclecomputing.com. the VDO cycle computers with wireless transmission VDO M1 WL and the A1 transmitter comply with the essential requirements established in Article 3 of the R&TTE Directive 1999/5/EC.
- Page 26 Cycle Parts GmbH Le Quartier Hornbach 13 67433 Neustadt/Weinstrasse (Germany) +49 (0) 63 21- 95 82 7 - 0 www.vdocyclecomputing.com...
Need help?
Do you have a question about the M1WL and is the answer not in the manual?
Questions and answers