Table of Contents

Related Manuals for VDO MC 2.0 WR


Summary of Contents for VDO MC 2.0 WR
- Page 1 MC 2.0 WR Bedienungsanleitung ENG Instruction Manual Manuel d‘ Installation et d‘ Utilisation Manuale d‘ Installazione e Funzionamento Instalacion y operación manual Handleiding Instrukcja obslugi licznika...
- Page 2 Congratulations In choosing a VDO computer, you have opted for high-quality device with the latest technology. In order to fully benefit from the potential of the computer, we recommend that you carefully read this manual. It contains the full operating instructions and many useful tips.
-
Page 3: Table Of Contents
Fitting the sensor, magnet and handlebar bracket Installing the battery in the computer >>> P02 references at the start of a section refer to the pictures in the picture book! Inserting the computer into the handlebar bracket www.vdocyclecomputing.com MC 2.0 WR... -
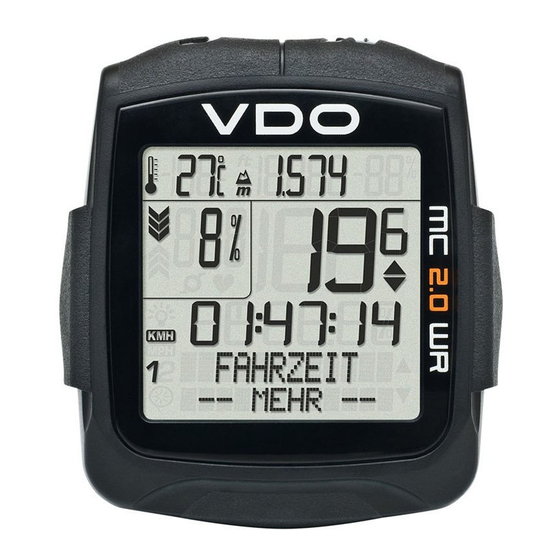
Page 4: Display
Your VDO computer comes without battery built in. Before you start, please insert battery. See also section 5.2. 1. Display The display can be divided into six areas: Area 1 Area 3 Temperature, Current speed current altitude Area 4 Area 2... - Page 5 The computer can display both KMH and MPH. Distances are correspondingly displayed in kilometers or miles. The indicator Downhill-Indicator, shows declination shows the selected measurement unit. Uphill-Indicator, shows inclination Display backlight The LIGHT ICON indicates if the backlight-mode has been switched on. www.vdocyclecomputing.com MC 2.0 WR...
-
Page 6: Operation
Scroll backwards in the menu. Scroll forwards in the menu. FUNCTION 4 Decrease the number to be set. Increase the number to be set. FUNCTION 5 FUNCTION 6 BIKe = BIKe In function mode: Bike functions MC 2.0 WR VDO CYCLECOMPUTING... - Page 7 ATTENTION: press the buttons BIKE + CLEAR again to switch off the In setting mode: display backlight during the day. Scroll up within the setting modes. This SAVES BATTERY POWER. Increase a digit. = BIKe Displays the bike functions, e.g. trip distance, average speed etc. www.vdocyclecomputing.com MC 2.0 WR...
-
Page 8: Functions
Accuracy: 2 decimal places. RIDe TIMe Shows the ride time for the current trip distance since the last reset. Maximum 99:59:59 HH:MM:SS. If the maximum value is exceeded, the ride time measurement starts again at zero. MC 2.0 WR VDO CYCLECOMPUTING... -
Page 9: Information Functions, Alti
Total altitude gain uphill for bikes 1 + 2 highest point of all previous trips with bike 1. Exit the submenu by pressing ALTI MAX for BIKe 2: highest point of all previous trips with bike 2. www.vdocyclecomputing.com MC 2.0 WR... -
Page 10: Information On P-Button
MORE indicates that there is a submenu for the main menu ALTI DOWN. Open the submenu by pressing 3.3 Information on P-button STOPWATCH CLOCK independent stopwatch for shows the current time. measuring times/intervals. 12 hour AM/PM or 24 hour-mode possible MC 2.0 WR VDO CYCLECOMPUTING... -
Page 11: Selecting Bike 1 Or Bike
3.4 Selecting Bike 1 or Bike 2 >>> P03 Your VDO Computer can be used on 2 bikes. All data is either stored for Confirm with Bike 1 or Bike 2. The selected bike is indicated in lower left part of the SELECT BIKE---BIKE 1 or BIKE 2 is shown display. -
Page 12: Display Backlight
The selection is confirmed by pressing For the start altitudes, the query 300 appears (numerical example). HOME ALTI 1 (or 2) SELECT OK ? The selection is confirmed by pressing MENU. The MC 2.0 confirms by displaying ALTITUDE DONE. MC 2.0 WR VDO CYCLECOMPUTING... -
Page 13: Auto-Start/Stop Of The Computer
The MC 2.0 confirms by displaying ACTUAL ALTI – SET DONE. 3.7 Auto-start/stop of the computer The MC 2.0 WR will automatically wake up form Sleep Mode, when you continue your ride. The computer can also be manually activated after a break by pressing a button. -
Page 14: Reset
The stopwatch can only be reset when shown on the display. The query STOPWATCH--RESET? appears on the display. The stopwatch To reset the stopwatch, press and hold the button for three seconds. is reset to zero. MC 2.0 WR VDO CYCLECOMPUTING... -
Page 15: Resetting The Navigator
ATTENTION: this process deletes all data and all personal settings. The MC 2.0 confirms by displaying RESET--DONE. Press and hold all buttons simultaneously for three seconds. The query FACTORY--RESET appears on the display. RESET--SURE? www.vdocyclecomputing.com MC 2.0 WR... -
Page 16: Installation
1 - 5 mm. Step 3 Align the sensor and magnet for good and fasten them in place: pull the cable ties tight and push the magnet in firmly. MC 2.0 WR VDO CYCLECOMPUTING... -
Page 17: Installing The Battery In The Computer
5.3 Inserting the computer into the handlebar bracket >>> P05 The VDO twist-click system securely connects the computer to the Step 3 To remove the computer, twist it to the left handlebar bracket. (do not push or pull). -
Page 18: Basic Settings
DIMENSION---SET---. Speed and distance (KMH or MPH) Confirm the selection by pressing Altitude (meters or feet) Temperature (Celsius or Fahrenheit) Process: Press and hold for three seconds. SETTINGS--OPEN? flashes. LANGUAGE---SELECT---appears on the display. MC 2.0 WR VDO CYCLECOMPUTING... -
Page 19: Setting The Tyre Size (Wheel-Circumference)
SETTINGS--OPEN? flashes. tyre circumference can be manually entered in mm or automatically LANGUAGE---SELECT---appears on the display. determined from a table with tyre sizes. Press to scroll to WHEEL SIZE---SET---. Confirm the selection by pressing www.vdocyclecomputing.com MC 2.0 WR... - Page 20 SETTINGS--CLOSE? flashes. The MC 2.0 switches back to function mode. BIKE 1 (or BIKE 2) SET OK? is shown on the display. Press in confirmation or to make a correction. The MC 2.0 confirms by displaying WHEEL SIZE--SET DONE. MC 2.0 WR VDO CYCLECOMPUTING...
-
Page 21: Setting The Clock
Press in confirmation. CLOCK---SET HOURS appears on the display. The hour flashes. Press ALTI to reduce the value or to increase it. Once you have set the correct value, press confirm your setting. www.vdocyclecomputing.com MC 2.0 WR... -
Page 22: Setting The Odometer
ODOMETER ODO BIKE 1 or ODO BIKE 2 is shown on the display. Press ALTI to make a selection. To exit settings mode, press and hold the button for three seconds. Press in confirmation. SETTINGS--CLOSE? flashes. The MC 2.0 switches back to function mode. MC 2.0 WR VDO CYCLECOMPUTING... -
Page 23: Setting The Navigator
NAVIGATOR--SET DISTANCE appears on the display. function mode. The distance in KM or MILES flashes. The first digit flashes. Press ALTI to reduce the value or to increase it. Once you have set the correct value, press confirm your setting. www.vdocyclecomputing.com MC 2.0 WR... -
Page 24: Setting The Ride Time
Press in confirmation. TIME BIKE 1--SET HOURS appears on the display. The hours flash. Press ALTI to reduce the value or to increase it. Once you have set the correct value, press confirm your setting. MC 2.0 WR VDO CYCLECOMPUTING... -
Page 25: Setting The Start Altitude/Home Altitude
HOME ALTI---SET---. Press in confirmation. The MC 2.0 confirms by displaying HOME ALTI 1--SET DONE. To exit settings mode, press and hold the button for three seconds. SETTINGS--CLOSE? flashes. The MC 2.0 switches back to function mode. www.vdocyclecomputing.com MC 2.0 WR... -
Page 26: Setting The Current Altitude/Actual Altitude
Press in confirmation. it. Once you have set the correct value, press confirm your setting. ACTUAL ALTI––SET OK? Press in confirmation. The MC 2.0 confirms by displaying ACTUAL ALTI--SET DONE. MC 2.0 WR VDO CYCLECOMPUTING... -
Page 27: Automatic Altitude Adjustment During Bike Transport
Before the start of the season, you can reset the total altitude gain LANGUAGE---SELECT---appears on the display. to zero. Press to scroll to ALTI UP---SET---. ATTENTION: the total altitude gain is SAVED when the battery is Press in confirmation. changed. The data is not lost. www.vdocyclecomputing.com MC 2.0 WR... -
Page 28: Setting The Altitude Loss Downhill
Before the start of the season, you can reset the total altitude loss to LANGUAGE---SELECT--- appears on the display. zero. Press to scroll to ALTI DOWN---SET---. ATTENTION: the total altitude loss is SAVED when the battery is Press in confirmation. changed. The data is not lost. MC 2.0 WR VDO CYCLECOMPUTING... -
Page 29: Sleep Mode
7. Sleep mode The MC 2.0 has a sleep mode to save the battery. Pressing any button or continue the ride will wake up the MC 2.0 WR. The MC 2.0 goes into sleep mode after five minutes if no speed signals are received. -
Page 30: Terms Of Guarantee
8. Terms of guarantee VDO Cycle Parts offers a 3-year guarantee on your VDO computer, Cycle Parts GmbH starting from date of purchase. This guarantee covers material and Le Quartier Hornbach 13 processing defects on the computer itself, the sensor/transmitter 67433 Neustadt/Weinstrasse (Germany) and the handlebar bracket. -
Page 31: Troubleshooting
At normal temperatures the display sluggish will work normally again Incorrect altitude displayed Air pressure has changed but the current Recalibrate the current altitude (current altitude incorrect) altitude has not been recalibrated in line with the new air pressure www.vdocyclecomputing.com MC 2.0 WR... -
Page 32: Technical Specifications
Total distance ODO 1 + ODO 2 measurement range: Up to value 199,999 km or mi Altitude measurement range: -999 m to +4999 m (-999 to 16 400 feet) Wheel circumference setting range: From 100 mm to 3999 mm (3.9 to 157.4 inches) MC 2.0 WR VDO CYCLECOMPUTING... - Page 33 Business users should contact their supplier and check the terms and conditions of the purchase contract. This product should not be mixed with other commercial wastes for disposal. www.vdocyclecomputing.com MC 2.0 WR...
- Page 34 www.cyclecomputing.com...
Need help?
Do you have a question about the MC 2.0 WR and is the answer not in the manual?
Questions and answers