Table of Contents

Related Manuals for VDO MC 2.0 WL


Summary of Contents for VDO MC 2.0 WL
- Page 1 MC 2.0 WL Bedienungsanleitung ENG Instruction Manual Manuel d‘ Installation et d‘ Utilisation Manuale d‘ Installazione e Funzionamento Instalacion y operación manual Handleiding Instrukcja obslugi licznika...
- Page 2 Congratulations In choosing a VDO computer, you have opted for high-quality device with the latest technology. In order to fully benefit from the potential of the computer, we recommend that you carefully read this manual. It contains the full operating instructions and many useful tips.
-
Page 3: Table Of Contents
4.4. resetting to factory settings 10. Technical specifications 5. Installation Fitting the transmitter, magnet and handlebar bracket >>> P02 references at the start of a section refer to the pictures in the Installing the battery in the computer picture book! www.vdocyclecomputing.com MC 2.0 WL... -
Page 4: Display
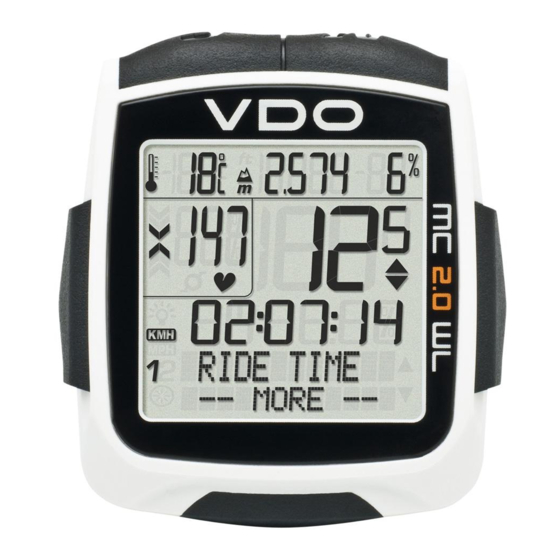
Your VDO computer comes without battery built in. Before you start, please insert battery. See also section 5.2. 1. Display The display can be divided into six areas: Area 1 Area 3 Temperature, Current speed current altitude, current uphill/ downhill gradient... - Page 5 (tolerance +/- 1 km/h) Menu prompt indicator When a submenu has been accessed, these indicators flash and show that there are other selection options or that the computer is waiting for an entry (setting mode). www.vdocyclecomputing.com MC 2.0 WL...
-
Page 6: Operation
Cadence information FUNCTION 4 Decrease the number to be set. In setting mode: FUNCTION 5 Scroll forwards in the menu. FUNCTION 6 Increase the number to be set. BIKe = BIKe In function mode: Bike functions MC 2.0 WL VDO CYCLECOMPUTING... - Page 7 ATTENTION: press the buttons BIKE + CLEAR again to switch off the (if heart rate transmitter has been paired). display backlight during the day. In setting mode: This SAVES BATTERY POWER. Scroll up within the setting modes. Increase a digit. www.vdocyclecomputing.com MC 2.0 WL...
-
Page 8: Functions
Accuracy: 2 decimal places. RIDe TIMe Shows the ride time for the current trip distance since the last reset. Maximum 99:59:59 HH:MM:SS. If the maximum value is exceeded, the ride time measurement starts again at zero. MC 2.0 WL VDO CYCLECOMPUTING... -
Page 9: Information Functions, Alti
Total altitude gain uphill for bikes 1 + 2 highest point of all previous trips with bike 1. Exit the submenu by pressing ALTI MAX for BIKe 2: highest point of all previous trips with bike 2. www.vdocyclecomputing.com MC 2.0 WL... -
Page 10: Pulse Option
(see transmitter selection in sections 3.8 and 6.5). accessed by pressing the button P/CAD the PULSE transmitter was paired during pairing. rESETTInG the trip data also resets the Hr data to zero. Note: the heart rate and cadence cannot be received simultaneously. MC 2.0 WL VDO CYCLECOMPUTING... -
Page 11: Cadence Option
MAX PULSe: shows the maximum (highest) heart rate for the current trip (since the last reset). TIMe IN: shows the time during which the heart rate was within the set training zone. www.vdocyclecomputing.com MC 2.0 WL... -
Page 12: Information Functions Cadence
(since the last reset). TIMe IN: shows the time during which the cadence was within the set training zone. MAX CAD: shows the maximum cadence of the current trip (since the last reset). MC 2.0 WL VDO CYCLECOMPUTING... -
Page 13: Selection Of Bike 1 Or Bike
3.7 Selection of BIKE 1 or BIKE 2 >>> P02 Your VDO computer can be used on two bikes. If you want to change The selected bike 1 or 2 is shown at the bottom left of the display ( from bike 1 to bike 2, the computer detects the transmitter for bike 2. -
Page 14: Pairing Of Transmitters, Selecting The Transmitters
OK? appears on the display. is started by pressing a button. Confirm the selection by pressing Alternatively: The MC 2.0 confirms by displaying SEnSOr Place the computer back into the handlebar bracket. SELECT--DOnE. MC 2.0 WL VDO CYCLECOMPUTING... -
Page 15: Display Backlight
The desired training zone is selected by pressing the or ALTI button . The selection is confirmed by pressing the button. OWn 105-155 (numerical example) SELECT OK? Is queried. Confirmed by pressing the button. The MC 2.0 confirms by displaying PULSE ZOnE--SELECT DOnE. www.vdocyclecomputing.com MC 2.0 WL... -
Page 16: Selecting The Start Altitude
This can be done by entering the (known) altitude in METErS or the AIr PrESSUrE. The sea level pressure can be found online on weather forecast websites. The MC 2.0 confirms by displaying ACTUAL ALTI – SET DOnE. MC 2.0 WL VDO CYCLECOMPUTING... -
Page 17: Auto-Starting/Stopping The Computer
The stopwatch is shown directly on the display and started. directly on the display. When shown on the display, the stopwatch can also be started/ stopped by pressing the button. www.vdocyclecomputing.com MC 2.0 WL... -
Page 18: Reset
The query nAVIGATOr--rESET? appears on the display. The navigator shown on the display. is reset to zero. To reset the navigator, press and hold the button for three seconds. MC 2.0 WL VDO CYCLECOMPUTING... -
Page 19: Resetting To Factory Settings
Depending on the room available, the sensor can be fitted at the front of the forks, on the inner side (side showing to spokes) of the ATTENTION: do not overtighten the screws. forks or pointing backwards on the forks. >>> P03 www.vdocyclecomputing.com MC 2.0 WL... -
Page 20: Installing The Battery In The Computer
5.3 Inserting the computer into the handlebar bracket >>> P08 The VDO twist-click system securely connects the computer to the Step 3 To remove the computer, twist it to the left handlebar bracket. (do not push or pull). -
Page 21: Basic Settings
Speed and distance (KMH or MPH) Confirm the selection by pressing Altitude (meters or feet) Temperature (Celsius or Fahrenheit) Weight (kilos or pounds) Process: Press and hold for three seconds. OPEn SETTInG flashes. LAnGUAGE---SELECT---appears on the display. www.vdocyclecomputing.com MC 2.0 WL... -
Page 22: Setting The Tyre Size
SETTInGS--OPEn? flashes. tyre circumference can be manually entered in mm or automatically LAnGUAGE---SELECT---appears on the display. determined from a table with tyre sizes. Press to scroll to WHEEL SIZE---SET---. Confirm the selection by pressing MC 2.0 WL VDO CYCLECOMPUTING... - Page 23 SETTInGS--CLOSE? flashes. The MC 2.0 switches back to function mode. An overview of the tyre list can be found in the picture book >>> P07. Press in confirmation or to make a correction. The MC 2.0 confirms by displaying WHEEL SIZE--SET DOnE. www.vdocyclecomputing.com MC 2.0 WL...
-
Page 24: Setting Personal Data
SET AGE appears on the display. it. Once you have set the correct value, press Press ALTI to reduce the value or to increase confirm your setting. it. Once you have set the correct value, press confirm your setting. MC 2.0 WL VDO CYCLECOMPUTING... -
Page 25: Selecting The Transmitter (Pulse Or Cadence Or None)
You can use this area to determine whether you want to ride with heart rate data or cadence data. You can change this before each trip. Process: Press and hold for three seconds. SETTInGS--OPEn? flashes. LAnGUAGE---SELECT---appears on the display. www.vdocyclecomputing.com MC 2.0 WL... -
Page 26: Setting The Clock
CLOCK---SET HOUrS appears on the display. Press to scroll to CLOCK---SET---. The hour flashes. Press in confirmation. Press ALTI to reduce the value or to increase it. Once you have set the correct value, press confirm your setting. MC 2.0 WL VDO CYCLECOMPUTING... -
Page 27: Setting The Odometer
The second digit now flashes. Press ALTI to reduce the value or to increase it. Once you have set the correct value, press confirm your setting. Continue the setting process until all digits have been set. www.vdocyclecomputing.com MC 2.0 WL... -
Page 28: Setting The Navigator
DISTAnCE appears on the display. function mode. The distance in meters flashes. The first digit flashes. Press ALTI to reduce the value or to increase it. Once you have set the correct value, press confirm your setting. MC 2.0 WL VDO CYCLECOMPUTING... -
Page 29: Setting The Ride Time
The hours flash. SETTInGS--CLOSE? flashes. The MC 2.0 switches back to function mode. Press ALTI to reduce the value or to increase it. Once you have set the correct value, press confirm your setting. www.vdocyclecomputing.com MC 2.0 WL... -
Page 30: Setting The Start Altitude/Home Altitude
Press in confirmation. The MC 2.0 confirms by displaying HOME ALTI 1--SET DOnE. To exit settings mode, press and hold the button for three seconds. SETTInGS--CLOSE? flashes. The MC 2.0 switches back to function mode. MC 2.0 WL VDO CYCLECOMPUTING... -
Page 31: Setting The Current Altitude/Actual Altitude
Press in confirmation. it. Once you have set the correct value, press confirm your setting. ACTUAL ALTI––SET OK? Press in confirmation. The MC 2.0 confirms by displaying ACTUAL ALTI--SET DOnE. www.vdocyclecomputing.com MC 2.0 WL... -
Page 32: Automatic Altitude Adjustment During Bike Transport
The MC 2.0 has a movement sensor. If the bike is transported with To do this, the MC 2.0 WL must be positioned in the handlebar bracket. the MC 2.0 (e.g. by car), the movement sensor will adjust the current altitude if the air pressure changes during transportation. -
Page 33: Setting The Altitude Loss Downhill
Before the start of the season, you can reset the total altitude loss to LAnGUAGE---SELECT--- appears on the display. zero. Press to scroll to ALTI DOWn---SET---. ATTENTION: the total altitude loss is SAVED when the battery is Press in confirmation. changed. The data is not lost. www.vdocyclecomputing.com MC 2.0 WL... -
Page 34: Setting The Beeper
If the current heart rate is below the lower limit set or above the Press in confirmation. upper limit set, the beeper will beep. Process: Press and hold for three seconds. SETTInGS--OPEn? flashes. LAnGUAGE---SELECT---appears on the display. MC 2.0 WL VDO CYCLECOMPUTING... -
Page 35: Sleep Mode
Pressing any button or moving the handlebars reactivates/wakes up the MC 2.0. The MC 2.0 goes into sleep mode after five minutes if no speed signals are received. SLEEP MODE-- PrESS BUTTOn appears on the display. www.vdocyclecomputing.com MC 2.0 WL... -
Page 36: Terms Of Guarantee
8. Terms of guarantee VDO Cycle Parts offers a 3-year guarantee on your VDO computer, Cycle Parts GmbH starting from date of purchase. This guarantee covers material and Le quartier Hornbach 13 processing defects on the computer itself, the sensor/transmitter 67433 neustadt/Weinstrasse (Germany) and the handlebar bracket. -
Page 37: Troubleshooting
Incorrect altitude displayed Air pressure has changed but the current recalibrate the current altitude (current altitude incorrect) altitude has not been recalibrated in line with the new air pressure www.vdocyclecomputing.com www.vdocyclecomputing.com MC 2.0 WL MC 2.0 WL... - Page 38 Magnet incorrectly positioned Correct the magnet position no cadence displayed Magnet positioned too far from the Move the magnet or the transmitter to transmitter reduce the distance Cadence display doubled Magnet incorrectly positioned Correct the magnet position MC 2.0 WL VDO CYCLECOMPUTING...
-
Page 39: Technical Specifications
Display operating temperature: Altitude measurement range: -10°C to +60°C (14 °F to 140 °F) -999 m to +4999 m (-999 to 16 400 feet) Wheel circumference setting range: From 100 mm to 3999 mm (3.9 to 157.4 inches) www.vdocyclecomputing.com MC 2.0 WL... - Page 40 Business users should delle risorse materiali. Gli utenti domestici sono invitati a contattare il contact their supplier and check the terms and conditions of the rivenditore presso il quale è stato acquistato il prodotto o l‘ufficio locale MC 2.0 WL VDO CYCLECOMPUTING...
- Page 41 Dit merkteken op het product of het bijbehorende informatiemateri- aal duidt erop dat het niet met ander huishoudelijk afval verwijderd moet worden aan het einde van zijn gebruiksduur. Om mogelijke scha- de aan het milieu of de menselijke gezondheid door ongecontroleerde www.vdocyclecomputing.com MC 2.0 WL 269...
- Page 42 We, CYCLE PArTS GmbH, Le quartier Hornbach 13 , D- 67433 neustadt/Weinstr. declare under our responsibility that the product VDO MC 2.0 WL and all transmitters SPD-TX , CAD-TX and PULS-TX are compliant with the essential requirements and other Neustadt/Weinstraße, Februar 2012 relevant requirements of the r&TTE Directive 1999/5/EG.
- Page 43 (2) this device must accept any interference received, including interference that may cause undesired operation. NOTICe: Warning: Changes or modifications made to this equipment not expressly approved by VDO Cycle Parts GmbH may void the FCC authorization to operate this equipment. www.vdocyclecomputing.com...
- Page 44 www.cyclecomputing.com...
Need help?
Do you have a question about the MC 2.0 WL and is the answer not in the manual?
Questions and answers