
Related Manuals for VDO M4WL


Summary of Contents for VDO M4WL
- Page 1 Installation video Operating video Settings video www.vdocyclecomputing.com/service...
- Page 2 M4 WL Preface Congratulations In choosing a VDO computer, you have opted for high-quality device with first rate technology. To optimally use the computer, we recommend that you read this manual carefully. It contains full operating instructions and many useful tips.
-
Page 3: Table Of Contents
M4 WL Table of contents ....................... Display Setting the navigator ....................Buttons Resetting the navigator to zero ......................Functions Trip section counter ........... Accessing the total values Resetting the trip section counter to zero ..............Operation while cycling Resetting trip data after the trip ............ -
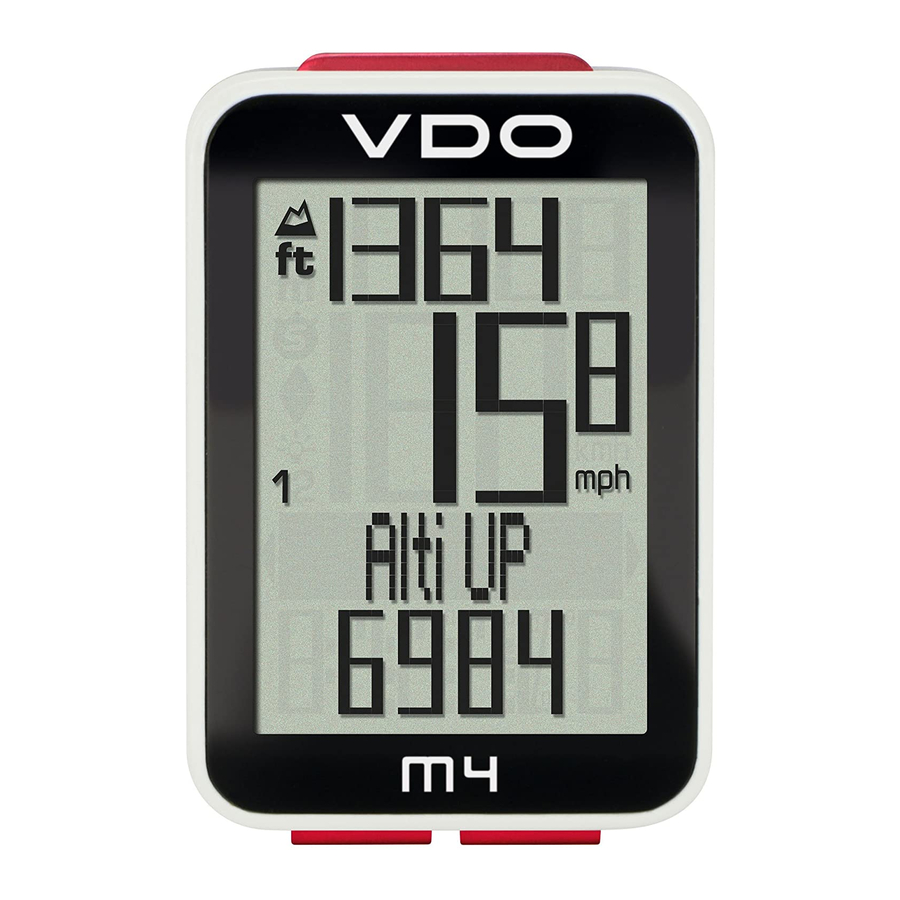
Page 4: Display
M4 WL Display The VDO M4 WL has a large, easy-to-read display that can be divided into four areas. Area 1: Area 1 The top line of the display permanently indicates the current altitude. Area 2 Area 2: The next line permanently shows the current speed. - Page 5 “ ” or “ ” The VDO M4 WL can be used on two bikes. The indicator icons 1 and 2 show whether your VDO M4 WL is currently using the settings for bike 1 or bike 2. “UP/DOWN arrow”...
-
Page 6: Buttons
M4 WL Buttons The VDO M4 WL has three buttons. In function mode: – Scroll backwards through the functions – Open the setting mode (press and hold) – Access the total values for distance and ride time, altitude gain/loss (press and hold) In setting mode: –... -
Page 7: Functions
M4 WL Functions The VDO M4 WL has the following functions: Current speed The current speed is permanently shown on the display. With a wheel circumference of 2,155 mm, the maximum possible speed is 199 kmh or 124 mph. Current altitude The current altitude is permanently shown on the display. - Page 8 The maximum speed is specified to two decimal places. Section time The VDO M4 WL has a trip section counter. The trip section counter is like a stopwatch. If the trip section counter is running, the section time is recorded, as on a stopwatch.
- Page 9 Information on how to operate the navigator can be found on page 40. Temperature The VDO M4 WL has a temperature indicator. The temperature is displayed in increments of 0.1 degrees. Time The current time is displayed in 24 H or 12 H mode.
- Page 10 M4 WL ALTI button functions Press the ALTI button to access the following altitude information: Current gradient uphill/downhill Displays the gradient uphill/downhill as a percentage. Altitude gain Displays the altitude gain for the current trip. Maximum altitude Displays the maximum altitude reached on the current trip. The value is updated if a new, higher altitude is reached.
-
Page 11: Accessing The Total Values
M4 WL ALTI button functions Altitude loss Displays the altitude loss for the current trip. Average gradient downhill Shows you the average gradient downhill for the current trip. Maximum gradient downhill Shows you the maximum gradient downhill you have recorded so far on the current trip. The value is updated if you ride down a steeper section at a later point. -
Page 12: Total Ride Time
M4 WL Accessing the total values Total distance 1 (Sum of all trips on bike 1) The total distance counts up to 99,999 km or miles. If this value is exceeded, the total distance counter restarts at zero. If the unit is switched from miles to km and the conversion result is greater than 100,000 km, the total distance counter is reset to zero. -
Page 13: Operation While Cycling
The model name VDO M4 WL and the time appear on the display. If you set off again after a break, the VDO M4 WL has an auto-start function. The VDO M4 WL instantly switches back to the function mode... -
Page 14: Attaching The Handlebar Bracket
M4 WL Attaching the handlebar bracket You can attach the computer to the right or left of the handlebars or in the centre on the stem. Attach the – handlebar bracket in the corresponding position. STEP 1 Decide whether you want to attach the computer to the handlebars or the stem. -
Page 15: Attaching The Speed Transmitter
STEP 2 90° – 45° Place the spoke magnet around an outside spoke. The VDO logo of the rod-shaped magnet core should point toward the ✔ transmitter. Align the magnet with the cross-hatched sensor marking on the transmitter at a distance of 1- 5 mm. -
Page 16: Inserting The Computer Into The Bracket
M4 WL Inserting the computer into the bracket The VDO twist-click system securely connects the computer to the handlebar bracket. Lock How to insert the computer: STEP 1 UNLock Place the computer into the bracket in a 10 o’clock position. -
Page 17: Pairing The Transmitter (Initial Use)
– Heart rate (if the heart rate option is activated) – Cadence (if the cadence option is activated) The VDO M4 WL has an automatic bike recognition function. Depending on whether you are using bike 1 or bike 2, the data is recorded for bike 1 or bike 2. -
Page 18: Settings
M4 WL Settings – language The following display languages can be selected for the VDO M4 WL: – German – English – French – Italian – Spanish – Dutch – Polish How to select a language: Press and hold the SET button until the settings menu opens. - Page 19 If you want to configure further settings, press the BIKE or ALTI button to access these. If you do not want to configure any further settings, press and hold the SET or BIKE button. The settings menu closes. The VDO M4 WL returns to function mode.
-
Page 20: Unit
M4 WL Settings – unit Use the unit settings to specify the measurement formats for: – Speed (kmh or mph) – Altitude (metres or feet) – Temperature (C or F) – Time (24-hour or 12-hour with AM/PM) How to set the units: Press and hold the SET button until the settings menu opens. - Page 21 If you want to configure further settings, press the BIKE or ALTI button to access these. If you do not want to configure any further settings, press and hold the SET or BIKE button. The settings menu closes. The VDO M4 WL returns to function mode.
-
Page 22: Wheel Circumference
M4 WL Settings – wheel circumference/wheel size You can set the roll circumference of your wheel in kMh Wheel MPh Wheel millimetres on the VDO M4 WL or select the applicable circum- circum- tyres from a tyres table. ference ference... - Page 23 M4 WL Settings – wheel circumference/wheel size How to set your wheel circumference: Press and hold the SET button until the settings menu opens. Press the BIKE button to switch from Totals to Settings. Press the SET button to open the settings. “Language”...
- Page 24 If you want to configure further settings, press the BIKE or ALTI button to access these. If you do not want to configure any further settings, press and hold the SET or BIKE button. The settings menu closes. The VDO M4 WL returns to function mode.
- Page 25 If you want to configure further settings, press the BIKE or ALTI button to access these. If you do not want to configure any further settings, press and hold the SET or BIKE button. The settings menu closes. The VDO M4 WL returns to function mode.
-
Page 26: Clock
M4 WL Settings – clock On the VDO M4 WL, you can set the clock in 12-hour AM/PM format or 24-hour format. Specify the desired time format in the unit settings (see page 20). How to set the clock: Press and hold the SET button until the settings menu opens. - Page 27 If you want to configure further settings, press the BIKE or ALTI button to access these. If you do not want to configure any further settings, press and hold the SET or BIKE button. The settings menu closes. The VDO M4 WL returns to function mode.
-
Page 28: Start Altitude
M4 WL Settings – start altitude You can enter two different start altitudes on the M4 WL. Start altitude 1 can be that of your home, start altitude 2 can be that of your holiday location. The start altitude is required as a basis for reconfiguring the altitude measured by the air pressure sensor before starting a trip. -
Page 29: Current Altitude
If you do not want to configure any further settings, press and hold the SET or BIKE button. The settings menu closes. The VDO M4 WL returns to function mode. Settings – current altitude Further to the two start altitudes, it is also possible to set the current altitude. - Page 30 M4 WL Settings – current altitude You can set the current altitude as either an altitude in metres or feet or by entering the sea level pressure. We will first explain how to set the current altitude by entering the altitude in metres (or feet). Press the SET button to confirm the selection “Altitude”.
- Page 31 If you want to configure further settings, press the BIKE or ALTI button to access these. If you do not want to configure any further settings, press and hold the SET or BIKE button. The settings menu closes. The VDO M4 WL returns to function mode.
-
Page 32: Total Distance
M4 WL Settings – total values – total distance You can set the total distance ridden on the VDO M4 WL. For example, you can enter your data here at the start of a new cycling season. You can set the total distance separately for bike 1 and bike 2. - Page 33 If you want to configure further settings, press the BIKE or ALTI button to access these. If you do not want to configure any further settings, press and hold the SET or BIKE button. The settings menu closes. The VDO M4 WL returns to function mode.
-
Page 34: Total Ride Time
M4 WL Settings – total values – total ride time You can set the total ride time on the VDO M4 WL. E.g. you can set your total ride time (total ride time for all trips) at the start of the new cycling season). - Page 35 If you want to configure further settings, press the BIKE or ALTI button to access these. If you do not want to configure any further settings, press and hold the SET or BIKE button. The settings menu closes. The VDO M4 WL returns to function mode.
-
Page 36: Altitude Gain
M4 WL Settings – total values – altitude gain You can set the total altitude gain for the year on the VDO M4 WL. This can be done at the start of a new season or if you want to transfer the data from your previous cycle computer to the new VDO M4 WL. - Page 37 If you want to configure further settings, press the BIKE or ALTI button to access these. If you do not want to configure any further settings, press and hold the SET or BIKE button. The settings menu closes. The VDO M4 WL returns to function mode.
-
Page 38: Altitude Loss
M4 WL Settings – total values – altitude loss You can set the total altitude loss for the year on the VDO M4 This can be done at the start of a new season or if you want to transfer the data from your previous cycle computer to the new VDO M4 WL. - Page 39 If you want to configure further settings, press the BIKE or ALTI button to access these. If you do not want to configure any further settings, press and hold the SET or BIKE button. The settings menu closes. The VDO M4 WL returns to function mode.
-
Page 40: Setting The Navigator
M4 WL Setting the navigator The navigator is a second, completely independent trip distance counter. The navigator can: – be reset to zero any number of times during a trip – be set to a distance value – count forwards or backwards from the set distance value. How to set the navigator: Press the BIKE button to display the navigator function. -
Page 41: Resetting The Navigator To Zero
Once all the digits have been set, confirm the entry by pressing the SET button. The response “Set OK” appears on the display. The VDO M4 WL returns to function mode. Resetting the navigator to zero The navigator can be reset to zero any number of times during a trip. -
Page 42: Trip Section Counter
M4 WL Trip section counter The VDO M4 WL has a time and distance counter that works similarly to a stopwatch. When the trip section counter is running, the time and the distance covered in this time are recorded. Starting the trip section counter Simultaneously press the BIKE and SET buttons. -
Page 43: Resetting The Trip Section Counter To Zero
– Section ride time Resetting trip data after the trip After each trip, you can reset the data for this trip to zero. The VDO M4 WL is then ready for the next trip. ATTENTION: your total distance (total number of kilometres/ miles ridden), total ride time and total altitude gain/loss for the year are not reset to zero. -
Page 44: Recalibrating The Altitude Before Starting
M4 WL Recalibrating the altitude before starting Why is it necessary to recalibrate the M4 WL? The M4 WL measures the current air pressure and converts it into an altitude measurement. The air pressure changes daily depending on the weather. This leads to a constantly changing current altitude measurement HOWEVER: your home start altitude has not changed. - Page 45 M4 WL Recalibrating the altitude before starting In addition to choosing between the two start altitudes, you can also enter a value under “current altitude”. Do this if you are not setting off from either start altitude 1 or start altitude 2. Press the SET button to select “Actual Alti”.
- Page 46 M4 WL Recalibrating the altitude before starting Making an entry based on the air pressure is practical if you are at a location where you do not know the precise altitude. On the M4 WL, the sea level pressure is recalculated to the current altitude.
-
Page 47: Light Mode
M4 WL Switching the backlight mode on or off The M4 WL has a backlit display. To use the backlight, the backlight mode must be activated. How to activate the backlight mode: Simultaneously press the ALTI and SET buttons. The backlight mode is now activated. This is indicated by the light icon on the display. -
Page 48: Battery Status Indicator
M4 WL Battery status indicator The VDO M4 WL has a low battery warning. If the remaining battery capacity falls below a certain level, a warning appears on the display. Press any button to clear the warning. Following a low battery warning, you still have approx. -
Page 49: Replacing The Battery In The Speed Transmitter
M4 WL Replacing the battery in the speed transmitter The battery in the speed transmitter should be replaced annually to guarantee seamless wireless transmission. You need a 3 V 2032 battery. We recommend using a branded battery from Sony, Panasonic, Varta or Duracell. How to replace the battery: STEP 1 oPEN... -
Page 50: Terms Of Guarantee
M4 WL Terms of guarantee VDO Cycle Parts offers a two-year guarantee on your If your complaint is legitimate, you will receive a comparable VDO computer, starting from the date of purchase. replacement device. You are not entitled to a replacement of... -
Page 51: Troubleshooting
M4 WL Troubleshooting Error Possible cause Correction Half segments on the display Computer software not running Remove and re-insert the battery (e.g. after a battery change) correctly after battery change No speed displayed Distance from sensor to magnet too Correct the sensor and magnet positions great No speed displayed Computer not properly clicked... -
Page 52: Technical Specifications
M4 WL Technical specifications Computer: Temperature indicator range on the display: Approx. 49 H x 33 B x 12 D mm -20 to +70 °C or -4 to +158 °F Computer weight: Speed range for wheel size 2,155 mm: Approx. 30 g Min 2.0 km/h, Handlebar bracket weight: Max 199 km/h... - Page 53 The declaration of conformity can be viewed at: Neustadt/Weinstraße, declare that when used as intended, www.vdocyclecomputing.com. the VDO cycle computer with wireless transmission VDO M4 WL and the transmitter D3-SPD comply with the essential requirements established in Article 3 of the R&TTE Directive 1999/5/EC. Neustadt, October 2013 FCC-Addendum This device complies with part 15 of the FCC Rules.
- Page 54 Cycle Parts GmbH Le Quartier Hornbach 13 67433 Neustadt/Weinstrasse (Germany) +49 (0) 63 21- 95 82 7 - 0 www.vdocyclecomputing.com...
Need help?
Do you have a question about the M4WL and is the answer not in the manual?
Questions and answers