Table of Contents
Advertisement
Quick Links
Advertisement
Table of Contents

Related Manuals for Crestron QM-WMC


Summary of Contents for Crestron QM-WMC
- Page 1 Crestron QM-WMC Wall Plate Media Center Operations & Installation Guide...
- Page 2 This document was prepared and written by the Technical Documentation department at: Crestron Electronics, Inc. 15 Volvo Drive Rockleigh, NJ 07647 1-888-CRESTRON All brand names, product names and trademarks are the property of their respective owners. ©2003 Crestron Electronics, Inc.
-
Page 3: Table Of Contents
Crestron QM-WMC Contents Wall Plate Media Center: QM-WMC Introduction...1 Features and Functions ...1 Part Number Compatibility ...2 Applications...3 Specifications...5 Physical Description ...7 Industry Compliance...14 Setup...14 Network Wiring ...14 QuickMedia Wiring ...15 Identity Code ...18 Installation ...22 Programming Software ...26 Programming with SystemBuilder...28 Programming with SIMPL Windows...29... -
Page 5: Wall Plate Media Center: Qm-Wmc
Crestron QM-WMC Wall Plate Media Center: QM-WMC Introduction Features and Functions The Wall Plate Media Center (QM-WMC) is part of the Crestron MediaManager™ line of network devices, room control systems, and signal routing solutions. Functional Summary • 2-gang Decora optional QM-WMIC) can be mounted in a wall or podium •... -
Page 6: Part Number Compatibility
SystemBuilder™ software. All media and control signals can be routed via a single QuickMedia cable. The QM-WMC can be combined in a multi-gang electrical box with Crestron’s Media Center Microphone Input (QM-WMIC) for microphone inputs or C2N-DB6/8/12 decorator wall panels for room control functions such as source selection, lighting, and volume. -
Page 7: Applications
The QM-WMC allows users to bring their own A/V devices to a wall plate in a presentation room while taking advantage of the auditorium’s audio and video capabilities. - Page 8 Wall Plate Media Center The following block diagram represents the operation of the QM-WMC with the optional QM-WMIC. Block Diagram of Wall Plate Media Center 4 • Wall Plate Media Center: QM-WMC Crestron QM-WMC Operations & Installation Guide - DOC. 6237A...
-
Page 9: Specifications
Crestron QM-WMC Specifications The following table provides specifications for the QM-WMC. Specifications for the QM-WMC SPECIFICATION Power Requirements With Optional QM-WMIC Default Network ID Video Formats Video Detection Firmware Control System Update Files 2-Series Control System Front Connectors: Computer Input... - Page 10 Analog-Digital Conversion Maximum line-level input Input Impedance Bandwidth Operating Temperature and Humidity Dimensions and Weight 6 • Wall Plate Media Center: QM-WMC Crestron QM-WMC DETAILS Composite, S-video, and RGB Automatic sensing of composite, S-video (luminance), and RGB (H-Sync) with corresponding LED...
-
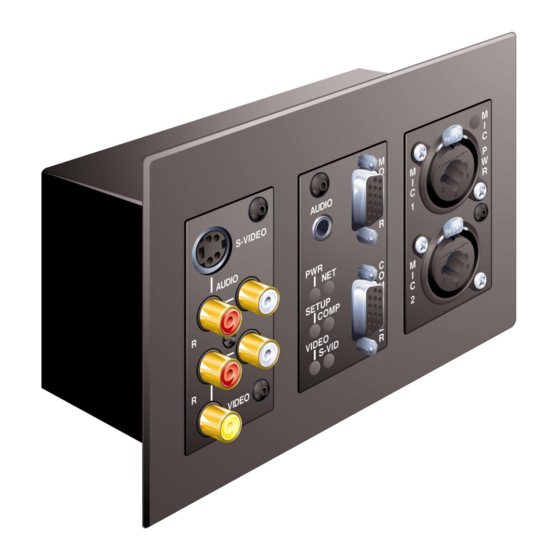
Page 11: Physical Description
Updates section of the Crestron website (www.crestron.com). Refer to the NOTE following these footnotes. 2. Crestron 2-Series control systems include the AV2 and PRO2. Consult the latest Crestron Product Catalog for a complete list of 2-Series control systems. 3. Longer lengths of CAT5/5E/6 cable can be used. However, the cumulative skew must be ≤... - Page 12 Wall Plate Media Center Crestron QM-WMC QM-WMC Shown with Optional QM-WMIC 8 • Wall Plate Media Center: QM-WMC Operations & Installation Guide - DOC. 6237A...
- Page 13 2.10 in (5.34 cm) 2.70 in (6.85 cm) Ports All user A/V connections to the QM-WMC are made through the ports on the front panel. Network, QM-WMIC, and QuickMedia connections Operations & Installation Guide - DOC. 6237A 3.50 in (8.89 cm)
-
Page 14: Pin Description
H-sync video signal on pin 15. An LED near the RGB connector indicates the presence of an H-sync signal. Refer to the following table for pin-assignments. 10 • Wall Plate Media Center: QM-WMC Ground Ground Operations &... - Page 15 Monitor Sense 2 FUNCTION No Connect Ground No Connect No Connect Horizontal Sync Vertical Sync No Connect Wall Plate Media Center: QM-WMC • 11 PIN 1 PIN 6 PIN 11 PIN 10 PIN 5 PIN 15 PIN 1 PIN 6...
- Page 16 One connector is used to connect to the Cresnet network while the second connector can be used to connect an optional C2N-DBF12 button pad or other Cresnet device. Cresnet power to the QM-WMC is supplied through either of these connectors. For more information, refer to “Network Wiring”...
- Page 17 The QM-WMC indicators are described in the following paragraphs. PWR (Power) This LED illuminates when 24 volts DC is supplied to the QM-WMC. This LED illuminates when communication between the control system and the QM-WMC is established (the unit is polled on the network).
-
Page 18: Industry Compliance
If the unit is a home-run from a Crestron system power supply network port, the power factor of that unit is the power factor of the entire run. The... -
Page 19: Quickmedia Wiring
QuickMedia connections. QuickMedia Wiring The Crestron QuickMedia cable (sold under the name “Crescat-QM”) contains one CAT5E cable and one Cresnet cable in siamese jackets. Installation of any QuickMedia device is as simple as installing one set of Operations &... - Page 20 CAT6 cables (where skew rating is ≤ 15 ns / 100 meters). The total accumulated length of the cable determines the actual skew. For example, when connecting the QM-WMC to a QM-MD9x2 and then to the QM- RMCRX, the total accumulated skew must not exceed 15 ns.
- Page 21 The pin assignments for Crescat-QM, CAT5, CAT5E, and CAT 6 wiring are based on the EIA/TIA 568B RJ-45 Jack standard. RJ-45 QuickMedia Connector Pin 1 Operations & Installation Guide - DOC. 6237A Wall Plate Media Center Wall Plate Media Center: QM-WMC • 17...
-
Page 22: Identity Code
Settings” on page 31 for details of the SIMPL Windows procedure. Refer to the note The Net ID of the QM-WMC has been factory set to 04. The Net IDs on page 34 for a of multiple QM-WMCs in the same system must be unique. Net IDs definition of Viewport. - Page 23 This method does not require that any devices be disconnected from the network; Net IDs may be set with the entire Cresnet system intact. This method requires the use of the Crestron Viewport version 3.35 or later. Use the appropriate method to set the Net ID.
- Page 24 Ensure that all network devices are connected to the control system. Open the Crestron Viewport version 3.35 or later. From the Viewport menu, select Functions | Assign Cresnet ID by Serial Number. The “Set Net ID by TSID” window appears.
- Page 25 TSID but not the serial number, and your site installation list is based on device serial numbers. In this (or the reverse) situation, do the following: Open the Crestron Viewport. Operations & Installation Guide - DOC. 6237A Wall Plate Media Center Wall Plate Media Center: QM-WMC • 21...
-
Page 26: Installation
NOTE: If the QM-WMIC is to be used, refer to the installation instructions in the latest revision of the QM-WMIC Operations & Installation Guide (Doc. 6245) which can be downloaded from the Downloads | Product Manuals section of the Crestron website (www.crestron.com). The following tools/hardware are required for installation. - Page 27 Operations & Installation Guide - DOC. 6237A diagram, to the electrical box (the electrical box must be earth grounded) or a ground wire in the electrical box. SHIELD Wall Plate Media Center Grounded Electrical Box QM-WMC Floating Grounding Wire Wall Plate Media Center: QM-WMC • 23...
- Page 28 Cresnet ground. SHIELD NOTE: When the Cresnet shield is used to connect the QM-WMC to the ground terminal of a PRO2, PAC2, AV2, or any other 2-Series control system where the chassis is already earth grounded, the grounding wire from the control system to earth ground is unnecessary.
- Page 29 Attach the wall plate to the electrical box using the supplied 6-32 x ¾”L pan-head screws as shown in the following diagram. Operations & Installation Guide - DOC. 6237A Wall Plate Media Center Wall Plate Media Center: QM-WMC • 25...
-
Page 30: Programming Software
Have a question or comment about Crestron software? Answers to frequently asked questions (FAQs) can be viewed in the Online Help section of the Crestron website (www.crestron.com). Go to http://www.crestron.com/accounts/login.asp view questions you have submitted to Crestron’s True Blue Support. - Page 31 NOTE: Crestron recommends the use of SystemBuilder and Digital Media Tools software for creating and fine-tuning a QuickMedia system. NOTE: Crestron recommends that you use the latest software to take advantage of the most recently released features. The latest software is available from the Downloads | Software Updates section of the Crestron website (www.crestron.com).
-
Page 32: Programming With Systembuilder
• (Optional) SystemBuilder version 1.02 or later. Requires SIMPL Windows. • SIMPL Windows version 2.05.08 or later. Requires SIMPL+ Cross Compiler version 1.1. • Crestron Database version 16.0.5 or later. Required by SIMPL Windows. • Digital Media Tools software version 3.00.00 or later. Programming with SystemBuilder... -
Page 33: Programming With Simpl Windows
Crestron Database. Both access these tools behind the scenes, enabling you to easily create robust systems. Programming with SIMPL Windows NOTE: While SIMPL Windows can be used to program the QM-WMC, it is recommended to use SystemBuilder and Digital Media Tools software for configuring and tuning a QuickMedia system. - Page 34 Cresnet Control Modules | QM Series folder of the Device Library and drop it in System Views. The QM-RMCRX system tree displays the QM-WMC in Slot 5, with a default Net ID of 04 as shown in the following illustration.
- Page 35 Crestron QM-WMC C2Net Device, Slot 5 The QM-WMC is broken down into two slots. The first slot (Slot 1) is for programming the QM-WMC. The second slot (Slot 2) is for programming the QM-WMIC when it is installed. Setting the Net ID in Device Settings Double-click the QM-WMC icon in the upper pane to open the “Device...
- Page 36 Wall Plate Media Center NOTE: This procedure sets the Net ID for the QM-WMC in the program only. It does not automatically set the Net ID for the wall plate itself. SIMPL Windows automatically changes Net ID values of a device added to a program if a duplicate device or a device with the same Net ID already exists in the program.
-
Page 37: Signal Source
Goes high when video signal is detected. Goes high when luminance signal is detected. DESCRIPTION Indicates the video source that is selected. Indicates the audio source that is selected. Wall Plate Media Center Wall Plate Media Center: QM-WMC • 33... -
Page 38: Programming With Visiontools™ Pro-E
Programming with VisionTools™ Pro-e Touchpanel screens should be created in VT Pro-e to allow selection of video and audio source signals. There are no special programming requirements to use the functions of the QM-WMC in a room-control system. Example Program An example program for the wall plate is available from the Crestron FTP site (ftp://ftp.crestron.com/Examples). -
Page 39: Communication Settings
Crestron QM-WMC The following sections define how one would upload a SIMPL Windows program to the control system, or upgrade the firmware of the QM-WMC. However, before attempting to upload or upgrade, it is necessary to establish communications. Communication Settings... - Page 40 Setup | Communications Settings Command Select RS-232 as the connection type. Verify that an available COM port (COM 1 is shown after this step) is selected, and 36 • Wall Plate Media Center: QM-WMC Crestron QM-WMC Operations & Installation Guide - DOC. 6237A...
- Page 41 COM port and baud rate. If communication cannot be established, refer to the “Troubleshooting Communications” section in the respective Operations Guide for the control system. Operations & Installation Guide - DOC. 6237A Wall Plate Media Center Wall Plate Media Center: QM-WMC • 37...
-
Page 42: Uploading A Simpl Windows Program
If it does contain SIMPL+ modules, then the SIMPL+ Program(s) check box will also be enabled. Select one or both check boxes and then click Send Program to begin the transfer. 38 • Wall Plate Media Center: QM-WMC Crestron QM-WMC Operations & Installation Guide - DOC. 6237A... -
Page 43: Firmware Upgrade
.csf. the latest version of firmware. Not every product has a firmware upgrade, but as Crestron improves functions, adds new features, and extends the capabilities of its products, firmware upgrades are posted. To upgrade the firmware, complete the following steps. - Page 44 Network Device… from the Viewport menu bar. File Transfer | Load Network Device… Command As shown in the “Select Network ID” window, select the Net ID of the QM-WMC, and then click OK. The “Open” window appears (refer to the following graphics). “Select Network ID” Window 40 •...
- Page 45 38400 to match the Cresnet bus speed. “Open” Window Browse to the desired [filename].upg file and click Open to begin the transfer. Operations & Installation Guide - DOC. 6237A Wall Plate Media Center Wall Plate Media Center: QM-WMC • 41...
-
Page 46: Problem Solving
Wall Plate Media Center Problem Solving Troubleshooting The table below provides corrective action for possible trouble situations. If further assistance is required, please contact a Crestron customer service representative. QM-WMC Wall Plate Troubleshooting TROUBLE Wall plate is not functioning. Source LEDs do not light. - Page 47 Incorrect peak and / Adjust QM-RMCRX peak or or boost setting. boost controls until image quality is improved. For more information refer to the latest revision of the QM-RMCRX Operations and Installation Guide (Doc. 6236). Wall Plate Media Center: QM-WMC • 43...
-
Page 48: Further Inquiries
• In Australia and New Zealand, call Crestron Pacific at +613-9480-2999. You can also log onto the online help section of the Crestron website (www.crestron.com) to ask questions about Crestron products. First-time users will need to establish a user account to fully benefit from all available features. -
Page 49: Return And Warranty Policies
CRESTRON shall not be liable to honor the terms of this warranty if the product has been used in any application other than that for which it was intended, or if it has been subjected to misuse, accidental damage, modification, or improper installation procedures. - Page 50 Wall Plate Media Center Crestron QM-WMC This page is intentionally left blank. 46 • Wall Plate Media Center: QM-WMC Operations & Installation Guide - DOC. 6237A...
- Page 51 Crestron QM-WMC Wall Plate Media Center This page is intentionally left blank. Wall Plate Media Center: QM-WMC • 47 Operations & Installation Guide - DOC. 6237A...
- Page 52 Crestron Electronics, Inc. Operations & Installation Guide - DOC. 6237A 15 Volvo Drive Rockleigh, NJ 07647 06.04 Tel: 888.CRESTRON Fax: 201.767.7576 Specifications subject to www.crestron.com change without notice.
Need help?
Do you have a question about the QM-WMC and is the answer not in the manual?
Questions and answers