Advertisement
Available languages
Available languages
H-8314, H-8315
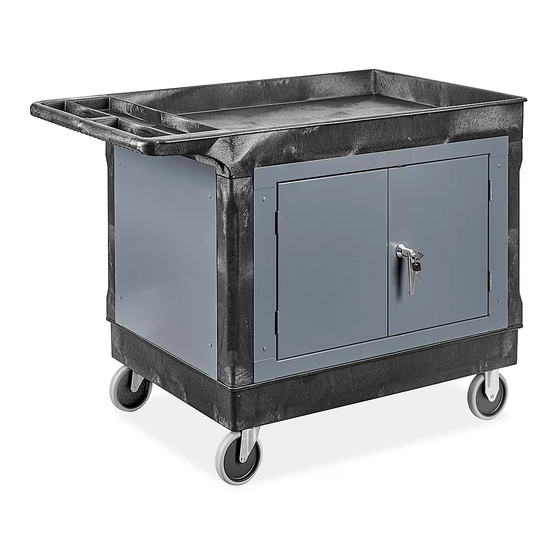
UTILITY CART
WITH CABINET
TOOLS NEEDED
Phillips Screwdriver
Rigid Caster x 2
Swivel Caster x 2
Left Side
Panel x 1
Corner Bracket x 4
1.
Screw supports into the top of the bottom shelf using
four screws. (See Figure 1)
PAGE 1 OF 9
1-800-295-5510
uline.com
7 mm Wrench
PARTS
Support x 4
Screw x 24
Right Side
Panel x 1
Back Panel
Plastic Grommet x 1
Flange x 1
ASSEMBLY INSTRUCTIONS
Top Shelf x 1
Back Panel x 1
Bolt x 18
Figure 1
Para Español, vea páginas 4-6.
Pour le français, consulter les pages 7-9.
Bottom Shelf x 1
Cabinet Door and
Frame Set x 1
Nut x 18
Washer x 16
(For H-8315)
0321 IH-8314
Advertisement
Table of Contents

Related Manuals for U-Line H-8314


Summary of Contents for U-Line H-8314
- Page 1 Para Español, vea páginas 4-6. Pour le français, consulter les pages 7-9. H-8314, H-8315 1-800-295-5510 uline.com UTILITY CART WITH CABINET TOOLS NEEDED Phillips Screwdriver 7 mm Wrench PARTS Support x 4 Top Shelf x 1 Bottom Shelf x 1 Rigid Caster x 2...
- Page 2 ASSEMBLY INSTRUCTIONS CONTINUED 2. Attach back panel flange to back panel using two 4. Attach cabinet door and frame set to cart by bolts and nuts. Insert plastic grommet into hole. attaching corner brackets to cabinet door and frame (See Figure 2) set and side panels.
- Page 3 ASSEMBLY INSTRUCTIONS CONTINUED 6. Flip cart onto side. Screw the casters into the NOTE: Swivel casters can be installed at either underside of the bottom shelf using 16 screws. end of the cart. It is recommended that rigid (See Figure 6) casters be installed at the front of the cart and swivel casters at the rear.
-
Page 4: Herramientas Necesarias
H-8314, H-8315 800-295-5510 uline.mx CARRITO UTILITARIO CON GABINETE HERRAMIENTAS NECESARIAS Llave de 7 mm Desarmador de Cruz PARTES 4 Soportes 1 Repisa Superior 1 Repisa Inferior 2 Ruedas Rígidas 2 Ruedas 24 Tornillos Giratorias 1 Panel 1 Panel 1 Panel Posterior 1 Set de Puerta y Armazón... - Page 5 CONTINUACIÓN DE INSTRUCCIONES DE ENSAMBLE 2. Fije el reborde del panel posterior al panel posterior 4. Fije el set de la puerta y armazón del gabinete utilizando dos pernos y tuercas. Inserte el ojal de uniendo los soportes de esquina al set de la puerta plástico en el orificio.
- Page 6 CONTINUACIÓN DE INSTRUCCIONES DE ENSAMBLE 6. Voltee el carrito de lado. Atornille las ruedas en NOTA: Las ruedas giratorias pueden instalarse en la parte inferior de la repisa superior utilizando 16 cualquier extremo del carrito. Se recomienda tornillos. (Vea Diagrama 6) que las ruedas rígidas se instalen al frente del carrito y las ruedas giratorias en la parte posterior.
-
Page 7: Outils Requis
H-8314, H-8315 1-800-295-5510 uline.ca CHARIOT UTILITAIRE AVEC ARMOIRE OUTILS REQUIS Clé de 7 mm Tournevis cruciforme PIÈCES Support x 4 Tablette Tablette Roulette fixe x 2 Roulette Vis x 24 supérieure x 1 inférieure x 1 pivotante x 2 Panneau latéral Panneau latéral... - Page 8 INSTRUCTIONS DE MONTAGE SUITE 2. Fixez la bride de panneau arrière au panneau 4. Joignez l'ensemble cadre et porte de l'armoire arrière à l'aide de deux boulons et de deux écrous. au chariot en fixant les supports en cornière à Insérez l'œillet en plastique dans le trou.
- Page 9 INSTRUCTIONS DE MONTAGE SUITE 6. Faites basculer le chariot sur le côté. Vissez les REMARQUE : Les roulettes pivotantes peuvent roulettes dans le dessous de la tablette inférieure à être installées sur l'une ou l'autre extrémité du l'aide de 16 vis. (Voir Figure 6) chariot.
Need help?
Do you have a question about the H-8314 and is the answer not in the manual?
Questions and answers