Table of Contents
Advertisement
Available languages
Available languages
Quick Links
Chrysler Data Interface with SWC
*Visit AxxessInterfaces.com for up-to-date vehicle specific applications.
INTERFACE FEATURES
• Provides accessory power (12-volt 10-amp)
• Retains R.A.P. (retained accessory power)
• Provides NAV outputs (parking brake, reverse, speed sense)
• Retains audio controls on the steering wheel
• Retains safety chimes
• Retains the factory backup camera (if through the factory radio)
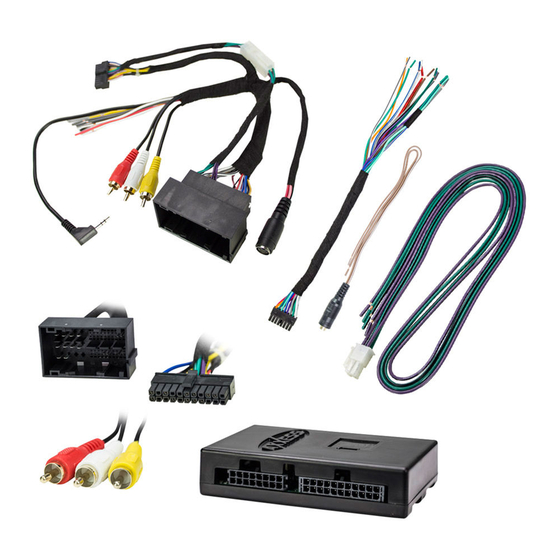
INTERFACE COMPONENTS
• AX-CH5-SWC interface
• AX-CH5-SWC harness
APPLICATIONS
CHRYSLER
FIAT
200 LX
2015-2016
500L
500X
DODGE
JEEP
Dart (small screen option)
Cherokee Sport
2013-2016
Renegade
AxxessInterfaces.com
2013-up*
• Retains the factory AUX-IN jack
• Used in non-amplified models, or when bypassing a factory amplifier
• Fiat 500L only: For use in both amplified and non-amplified systems
• Retains balance and fade (non-amplified models only)
• Micro "B" USB updatable
• 16-pin harness with stripped leads
• 4-pin harness with stripped leads
RAM
2014-up
1500, 2500, 3500
2016-up
(small screen option) 2013-up
Chassis Cab 3500, 4500, 5500
(small screen option) 2013-up
2014-up
2015-up
© COPYRIGHT 2017 METRA ELECTRONICS CORPORATION
• Female 3.5mm connector with stripped leads
RAM (CONT)
Promaster
(with a 5.0" screen)
Promaster (with NAV)
Promaster City
AX-CH5-SWC
I N S TA L L AT I O N I N S T R U C T I O N S
TABLE OF CONTENTS
Connections to be made ................................... 2-4
Installing the AX-CH5-SWC ....................................4
Initializing the AX-CH5-SWC ..................................4
Adjusting the AX-CH5-SWC ...................................5
Steering wheel control settings ........................5-7
- L.E.D. feedback ....................................................5
- Changing radio type ...........................................6
- Resetting the AX-CH5-SWC .................................7
TOOLS REQUIRED
• Wire cutter • Crimp tool • Solder gun • Tape
• Connectors (example: butt-connectors, bell
caps, etc.)
CAUTION!
All accessories, switches, climate
controls panels, and especially air bag indicator
2014-up
lights must be connected before cycling the
2014-up
ignition. Also, do not remove the factory radio
2015-up
with the key in the on position, or while the
vehicle is running.
REV. 7/18/17 INSTAX-CH5-SWC
Advertisement
Table of Contents

Subscribe to Our Youtube Channel
Related Manuals for Axxess AX-CH5-SWC


Summary of Contents for Axxess AX-CH5-SWC
-
Page 1: Table Of Contents
- Remapping the steering wheel control buttons ...6 • Retains the factory backup camera (if through the factory radio) - Dual assignment instructions (long button press) ...7-8 - Resetting the AX-CH5-SWC .........7 INTERFACE COMPONENTS • AX-CH5-SWC interface • 16-pin harness with stripped leads •... -
Page 2: Connections To Be Made
CONNECTIONS TO BE MADE Attention! This interface will work with models that are either factory amplified, or non-amplified. From the AX-CH5-SWC harness to the aftermarket radio: Please follow the instructions carefully for your model vehicle. Failure to do so will result in either •... - Page 3 • Tape off and disregard the following (1) wire, it will not be used in this application: Brown From the 16-pin harness with stripped leads to the aftermarket radio: From the AX-CH5-SWC harness to the aftermarket radio: • Connect the Red wire to the accessory wire.
-
Page 4: Installing The Ax-Ch5-Swc
Note: If the radio does not come back on within a minute, the interface is not • For all other radios: Connect the 3.5mm jack from the AX-CH5-SWC harness into the jack on the aftermarket radio designated for an external steering wheel control interface. Please refer to the communicating to the vehicle. -
Page 5: Adjusting The Ax-Ch5-Swc
9 flashes - Valor 18 flashes - JBL * Note: If the AX-CH5-SWC flashes Red (7) times, and you do not have an Alpine radio connected to it, that means the AX-CH5-SWC does not detect a radio connected it. Verify that the 3.5mm jack is connected to the correct steering wheel jack/wire in the radio. -
Page 6: Changing Radio Type
3. Refer to the Radio Legend (next page) to know which radio number you would like to have programmed. 1. Ensure the AX-CH5-SWC is visible so you can see the L.E.D. flashes to confirm button 4. Press and hold the Volume-Up button until the L.E.D. goes solid, and then release. Repeat this recognition. -
Page 7: Dual Assignment Instructions (Long Button Press)
The AX-CH5-SWC has the capability to assign (2) functions to a single button, except Volume- the AX-CH5-SWC that this function is not available and it will move on to the next function. Up and Volume-Down. Follow the steps below to program the button(s) to your liking. -
Page 8: Resetting The Ax-Ch5-Swc
12. PTT 15. Fan-Up * 18. Temp-Down * * Not applicable in this application Resetting the AX-CH5-SWC 1. With the radio on, turn the potentiometer: Note: Before proceeding, remember the position the potentiometer is at. Turn left the LED will come on... - Page 9 2013 y mas* INDICE Conexiones que se deben hacer ....... 2-4 * Visite AxxessInterfaces.com para aplicaciones específicas de vehículos actualizadas. Instalación del AX-CH5-SWC .........4 Inicialización del AX-CH5-SWC ......4 CARACTERÍSTICAS DE LA INTERFASE Ajuste del AX-CH5-SWC .........5 • Provee corriente de accesorios (12 voltios 10 amperes) •...
- Page 10 CONEXIONES QUE SE DEBEN HACER ¡Atención! Esta interfase funcionará con modelos que cuenten con amplificador de fábrica o que Del arnés AX-CH5-SWC al radio de mercado secundario: no estén amplificados. Siga las instrucciones cuidadosamente para su modelo de vehículo. Ignorar •...
- Page 11 Del arnés de 16 pins con conectores pelados al radio de mercado secundario: • Conecte el cable rojo con el cable de accesorios. Del arnés AX-CH5-SWC al radio de mercado secundario: Nota: Si va a instalar el AX-LCD (se vende por separado), habrá un cable de accesorio que • Conecte el cable negro al cable de tierra.
- Page 12 Nota: Si el radio no se enciende de nuevo en un plazo de un minuto, la interfaz no se está • Para todos los demás radios: Conecte el conector de 3.5mm del AX-CH5-SWC arnés en el conector del comunicando con el vehículo. Apague la marcha, revise todas las conexiones y después radio de mercado secundario designado para una interfase externa de control en el volante. Consulte inténtelo de nuevo. Es posible que tenga que restablecer la interfaz en este punto.
- Page 13 • Con el vehículo y el radio encendidos, aumente el volumen hasta 3/4 de su totalidad. Los (18) parpadeos en rojo del foco L.E.D. representan la marca de radio que el AX-CH5-SWC cree que está conectada. Cada parpadeo representa un diferente fabricante de radio. Por •...
- Page 14 3. Consulte la Leyenda de radio (pagina siguiente) para saber qué número de radio desearía programar. 1. Asegúrese que el AX-CH5-SWC esté visible para que se pueda ver el parpadeo del foco L.E.D. para confirmar el reconocimiento de los botones.
- Page 15 Asignación dual de instrucciones (presión de botones por largo tiempo) Nota: Si la siguiente función de la lista no está en el volante, presione el botón de “Subir volumen” durante (1) segundo hasta que el foco L.E.D. se encienda, luego suelte “Subir volumen”. El AX-CH5-SWC tiene la capacidad de asignar (2) funciones a un solo botón, excepto “Subir Esto le indica al AX-CH5-SWC que la función no está disponible y pasará a la siguiente función. volumen” y “Bajar volumen”. Siga los pasos que están a continuación para programar los botones según lo desee.
- Page 16 8. Bajar preestablecido 12. PTT * 15. Aumentar ventilador * 18. Disminuir temperatura * * No es aplicable en esta aplicacione Restablecimiento del AX-CH5-SWC 1. Con el radio encendido, encienda el potenciómetro: Nota: Antes de proseguir, recuerde la posición en la que está el potenciómetro. Gire a la izquierda el LED se encenderá...
Need help?
Do you have a question about the AX-CH5-SWC and is the answer not in the manual?
Questions and answers