Advertisement
Quick Links
Advertisement

Related Manuals for Hover-1 FALCON-1


Summary of Contents for Hover-1 FALCON-1
- Page 1 E L E C T R I C S C O O T E R A C C E S S O R Y...
-
Page 3: Warranty
WARRANTY For warranty information, Please visit us at: www.hover-1.com Please visit www.hover-1.com/troubleshoot to request missing or defective parts... - Page 4 E L E C T R I C S C O O T E R A C C E S S O R Y Operation Manual H1-F1-BGY Falcon-1 IMPORTANT: KEEP FOR FUTURE REFERENCE *Images used in this manual may vary slightly from the product and are for reference purposes only.
- Page 5 WARNING HELMETS SAVE LIVES! Always wear a properly fitted helmet that complies with CPSC or CE safety standards when you ride your scooter. Incorrect Fitting: Correct Fitting: Forehead is exposed and Make sure your helmet vulnerable to serious injury. covers your forehead.
- Page 6 Hover-1 Falcon-1. Failure to do so, or failure to follow its guidelines could lead to serious injury or death. • Section One of this manual involves safety and Hover-1 Falcon-1 care. Understanding and following this Information will help you and your Hover-1 Falcon-1 avoid injury or damage.
-
Page 7: Specifications
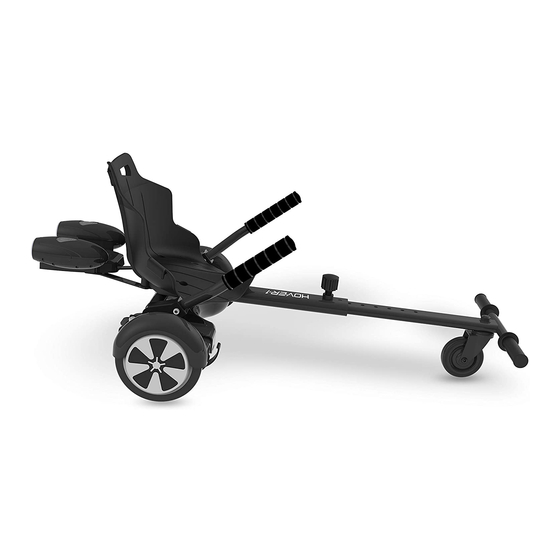
HOVER-1 FALCON-1 DIAGRAM 1. Bucket Seat 2. Fog Blaster & Mount 3. Handle Bar (R) 4. Pedal Mounts 5. Hook and Loop Strap 6. Handle Bar (L) 7. Frame Base 8. Twist Knob 9. Frame Extension 10. Foot Rests 11. Caster Wheel... - Page 8 (1) Twist Knob (1) Fog Blaster Mount (4) M8 Short Screw (4) M8 Long Screw (1) Frame Extension (4) Short Screw (1) Right Handle Bar (8) Anti-Slip M8 Nuts (1) Left Handle Bar to request missing Please visit www.hover-1.com/troubleshoot or defective parts...
- Page 9 Service Team at www.hover-1.com. A representative will be in touch to walk you through these steps. Carefully follow the steps shown in the following pages for assembling the Hover-1 Falcon-1. Remove all Hover-1 Falcon-1 contents from the box. Ensure all contents from the “Parts List” section are accounted for.
- Page 10 Screws as shown below. Tools needed 3. Insert the Frame Extension into the Frame Base. Adjust the Frame Extension to your desired length. Secure in place using the Twist Knob as shown below. Please visit www.hover-1.com/troubleshoot to request missing or defective parts...
- Page 11 2. Attach the Fog Blaster to the Fog Blaster Mount and secure in place using the athead screwdriver and the included Short Screws as shown below. Tools needed 3. Align the holes of the Fog Blaster Mount to the holes of the Frame Base as shown below. Please visit www.hover-1.com/troubleshoot to request missing or defective parts...
- Page 12 Key to fasten four of the M8 Short Screws. Secure the Bucket Seat to the frame using the 2 wrenches with four Anti-Slip M8 nuts and four nuts as shown below. Tools needed 5. Your Hover-1 Falcon-1 is now assembled! Please visit www.hover-1.com/troubleshoot to request missing...
- Page 13 Tank buttons while pouring water into the fill port (fig 2.). Release when filled. Do not overfill! Hold down to open the tank while pouring water into the fill port Please visit www.hover-1.com/troubleshoot (fig. 1) (fig. 2) to request missing or defective parts...
- Page 14 Team at www.hover-1.com. A representative will be in touch to walk you through these steps. Carefully follow the steps shown on the following pages for installing the Hover-1 Falcon-1 onto your electric scooter. Read this entire manual before riding your Hover-1 Falcon-1.
- Page 15 B facing the ground. One set of rubber protective straps should come pre-assembled with the hook and loop straps. Please visit RUBBER PROTECTORS HOOK & LOOP STRAP LOCATION OF RUBBER www.hover-1.com/troubleshoot ASSEMBLY DIRECTIONS PROTECTORS to request missing or defective parts...
- Page 16 4. WARNING: Do not over tighten straps when you are assembling your Falcon-1 to your scooter. Ensure that the Falcon-1 is securely attached to the scooter. See below diagram for correct fitting. 5. When fully installed, your Hover-1 Falcon-1 should look like the diagram below.
-
Page 17: Before Riding
It is important that you fully understand all elements of your Hover-1 Falcon-1. If these elements are not used correctly, you will not have full control of your Hover-1 Falcon-1. Before you ride fast, or outside of a controlled environment, learn the functions of the various mechanisms on your Hover-1 Falcon-1. - Page 18 PRE-RIDE HOVER-1 FALCON-1 CHECKLIST Ensure that your Hover-1 Falcon-1 and scooter are in proper working order each and every time you ride. If a part of the Hover-1 Falcon-1 does not function correctly, please contact our Customer Support Center. • Ensure the battery of your scooter is fully charged before riding your Hover-1 Falcon-1.
-
Page 19: Safety Precautions
SAFETY PRECAUTIONS The first rule in safe riding is to use common sense. A Hover-1 Falcon-1 is vulnerable; it cannot protect you in a crash, against impact, or loss of control the way driving a car can. A Hover-1 Falcon-1 can tip over sideways or pitch you over the front wheel. - Page 20 • Do not weave in and out of traffic or swerve from side to side. • A crash can put extraordinary stress on Hover-1 Falcon-1 components, possibly causing them to fatigue prematurely. Components suffering from stress fatigue can fail suddenly, causing loss of control...
- Page 21 2. Due to the particularity of the product, the assembly pieces are to be checked before every ride to avoid an accident while riding. 3. Do not make a sharp turns as you may drift and overturn the Hover-1 Falcon-1 which can result in injury to yourself and/or damage the unit.
- Page 22 RIDING YOUR HOVER-1 FALCON-1 Ensure your Hover-1 Falcon-1 is fully assembled and correctly installed onto your scooter with all straps, screws and nuts secured in place. Ensure your scooter is properly maintained as well. Failure to do so may result in serious bodily harm or death and damage to the unit.
- Page 24 @RideHover1 @RideHover1 @RideHover1...
Need help?
Do you have a question about the FALCON-1 and is the answer not in the manual?
Questions and answers