Table of Contents
Advertisement
Quick Links
Advertisement
Table of Contents

Subscribe to Our Youtube Channel
Related Manuals for Hover-1 KART


Summary of Contents for Hover-1 KART
- Page 1 KART...
- Page 3 KART Operation Manual HY-EU-BGY IMPORTANT: KEEP FOR FUTURE REFERENCE *Images used in this manual may vary slightly from the product and are for reference purposes only. Even if you have ridden a scooter for years, it is important for you...
- Page 4 WARNING HELMETS SAVE LIVES! Always wear a properly tted helmet that complies with CPSC or CE safety standards when you ride your scooter. Incorrect Fitting: Correct Fitting: Forehead is exposed Make sure your helmet and vulnerable to covers your forehead. serious injury.
- Page 5 Section Two of this manual gives assembly and installation instructions for your Hover-1 Kart. Section Three of this manual covers speci c safety and operating instructions for your Hover-1 Kart. Even if you are an experienced rider, you should review this section before your rst ride.
-
Page 6: Specifications
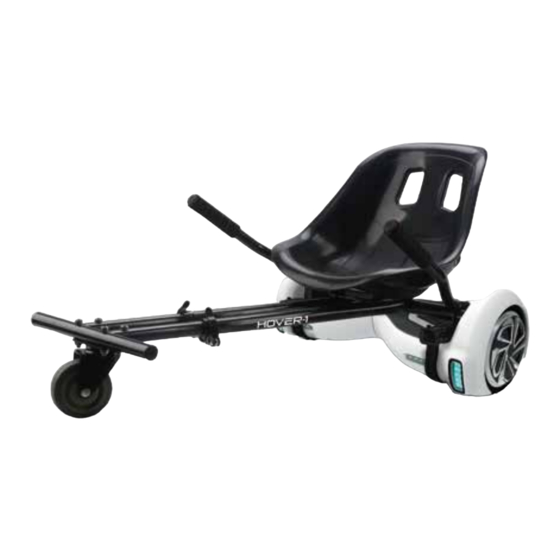
HOVER-1 KART DIAGRAM 1. Seat 2. Handle Bars 3. Pedal Mounts 4. Adjustable Strap 5. Seat Frame 6. Locker 7. Frame 8. Foot Rests 9. Front Wheel 10. Flag 11. Flag Holder SPECIFICATIONS Compatibility: Most self-balancing scooters (with 6.5" tires) -
Page 7: Parts List
(1) Left Handle Bar (4) M6*16 Screw (2) M8 Nut (4) M6 Nut (1) Right Handle Bar (1) Flag Set (2) Set Hook & Loop Straps with Rubber Protectors Preassembled (1) Flag Holder to request missing Please visit www.hover-1.eu/troubleshoot or defective parts... - Page 8 Team by scaning the QR code below or visiting www.hover-1.eu/troubleshoot. Carefully follow the steps shown on the following pages for assembling the Hover-1 Kart. Remove all Hover-1 Kart contents from the box. Ensure all contents from the “Parts List” section are accounted for.
- Page 9 Screws and Nuts. 3. Insert the frame into the seat frame. Adjust the foot rest extension and the seat frame to your preferred length. Secure the frame in place using the 2 lockers. Please visit www.hover-1.eu/troubleshoot to request missing or defective parts...
- Page 10 4. Align the 4 screws holes in the seat with the seat frame. Secure the seat in place by 4pc M6*16 screws and 4pcs M6 nuts using allen wrench. 5. Your Hover-1 Kart is now completely assembled and should look like the below image. Please visit www.hover-1.eu/troubleshoot...
- Page 11 Team at www.hover-1.eu/troubleshoot. Someone will be in touch to walk you through these steps. Carefully follow the steps shown on the following pages for installing the Hover-1 Kart onto your electric scooter. Read the remainder of this manual before riding your Hover-1 Kart.
- Page 12 2. Secure your Hover-1 Kart to your self-balancing scooter using both adjustable straps with rubber protectors. Attach one end of each strap to the holes on the front of each pedal mount as shown below. Wrap one set of adjustable straps under your self-balancing scooter and attach the ends of the straps on the back of each pedal mount.
- Page 13 2. Secure your Hover-1 Kart to your self-balancing scooter using both adjustable straps with rubber protectors. Attach one end of each strap to the holes on the front of each pedal mount as shown below. Wrap one set of adjustable straps under your self-balancing scooter and attach the ends of the straps on the back of each pedal mount.
- Page 14 2. Secure your Hover-1 Kart to your self-balancing scooter using both adjustable straps with rubber protectors. Attach one end of each strap to the holes on the front of each pedal mount as shown below. Wrap one set of adjustable straps under your self-balancing scooter and attach the ends of the straps on the back of each pedal mount.
- Page 15 4. Adjust both adjustable straps so that they are secured tightly around your scooter. 5. Attach the Flag segments together then insert the assembled Flag into the Flag Holder of the kart shown below. Please visit www.hover-1.eu/troubleshoot to request missing...
- Page 16 6. Your Hover-1 Kart should be properly installed onto your scooter as shown below. Please visit www.hover-1.eu/troubleshoot to request missing or defective parts...
-
Page 17: Before Riding
It is important that you fully understand all elements of your Hover-1 kart. If these elements are not used correctly, you will not have full control of your Hover-1 Kart. Before you ride fast, or outside of a controlled environment, learn the functions of the various mechanisms on your Hover-1 Kart. - Page 18 PRE-RIDE HOVER-1 KART CHECKLIST Ensure that your Hover-1 Kart and scooter are in proper working order each and every time you ride. If a part of the Hover-1 Kart does not function correctly, please contact our Customer Support Center. • Ensure your tire pressure is at the suggested PSI level for your scooter before riding.
-
Page 19: Safety Precautions
SAFETY PRECAUTIONS The rst rule in safe riding is to use common sense. A Hover-1 Kart is vulnerable; it cannot protect you in a crash, against impact, or loss of control. A Hover-1 Kart can tip over sideways or pitch you over the front wheel. It moves faster than a typical scooter. - Page 20 Components su ering from stress fatigue can fail suddenly, causing loss of control or serious injury. CAUTION: RIDING IN WET WEATHER Do not ride your Hover-1 Kart in wet weather, as there are electronic components in your scooter that may be damaged if exposed to water.
- Page 21 Hover-1 Kart. 2. Check all components and make sure kart is securely and correctly attached to scooter before each ride. Be sure the scooter is properly calibrated before each ride. The kart must be detached from the scooter for proper calibration of the scooter.
- Page 22 RIDING YOUR HOVER-1 KART Ensure your Hover-1 Kart is fully assembled and correctly installed onto your scooter with all straps and screws secured in place. Ensure your scooter is properly calibrated as well. Failure to do so may result in serious bodily harm or death and damage to the unit and your scooter.
-
Page 23: Warranty
WARRANTY For warranty information, Please visit us at: www.hover-1.eu Replacement parts may be available for purchase at www.hover-1.eu. Parts availability is not guaranteed. IMPORTED BY: DGL Group LE5 1TL, United Kingdom WARNING WARNING Read The Information Wear Personal Supplied By... -
Page 24: Weee Directive
WEEE DIRECTIVE Following information is only for EU-member states: The mark shown to the right is in compliance with the Waste Electrical and Electronic Equipment Directive 2012/19/EU (WEEE). The mark indicates the requirement NOT to dispose the equipment as unsorted municipal waste, but use the return and collection systems according to local law. - Page 26 @RideHover1 @RideHover1 @RideHover1...
Need help?
Do you have a question about the KART and is the answer not in the manual?
Questions and answers