Vivax Metrotech vLoc3 Series Quick Manual
Hide thumbs
Also See for vLoc3 Series:
- User handbook manual (68 pages) ,
- User manual (16 pages) ,
- Quick manual (4 pages)
Table of Contents
Advertisement
Quick Links
vLoc3 Series Quick guide* V1.1
(vLoc3-Pro, vLoc3-5000, vLoc3-ML, vLoc3-XLF)
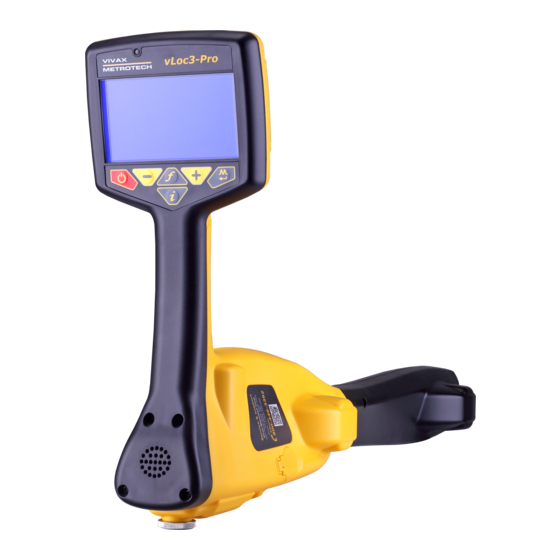
vLoc3 Series Receivers - Overview
1
3
4
7
5
2
6
Mini-USB Port for data transfer
1
Pushbutton keypad & display
5
and firmware updates
2
Model & Serial numbers
Battery compartment cover
6
Accessory socket and
3
Battery retaining clip
7
charging port
Battery compartment - Li-ion
Bluetooth module expansion
4
8
or Alkaline battery packs
port
Receiver Keypad
1
2
3
4
6
1
button
On/Off
2
Reduce sensitivity (scroll up when in the user menu)
3
Frequency selector
4
Increase sensitivity (scroll down when in the user menu)
Short press = Change between Peak, Null, Sonde, etc.
5
Long press = Change operational screen
Short press = Enter information screen (Depth/Current/GPS)
6
Long press = Enter user set-up menus
P/N: 4.04.000204
Transmitter Keypad (Loc3 series transmitters)
1
2
4
Locating Utilities**
Passive location Power 60Hz and Radio
(No compass indicator is available in Power 60Hz or Radio
Modes) All other Passive locate modes will show the Compass
line direction indicator. And left/right arrows as seen in the Classic
Locate Mode section of this document.
1.
Select the passive frequency with the "f"-button. (If the desired
8
frequency is not preset, switch to the user menu by pressing
and holding the "i"-button and choose it in the sub-menu
"frequency." Press the "Enter" button to highlight it. Go back
with a short press on the "i" button.)
2.
Hold the receiver vertically and adjust the sensitivity by
pressing the "+" / "-" buttons so that the bar graph shows a
signal.
3.
Continue locating in a grid across the area. See illustration (a)
below.
4.
Determine signal maximum by carefully moving the receiver
back and forth. Adjust the sensitivity again with the "+" "-"
buttons.
(a)
5
5.
Continue to locate the position of the line.
1
www.vivax-metrotech.com
1
On/Off button
3
2
Frequency selector
Info = Volume, Volts, Ohms,
multi-frequencies, LCD
3
contrast, frequency menu
4
Output decrease
5
Output increase
5
94.4
12.1
94.4
31dB
Power 50
31dB
Power 50
31dB
Power 50
(b)
Active locating
Direct connection**
Connect the transmitter with the supplied connection leads. Connect
the red wire to the target conductor and the black wire to ground. The
ground stake should be at a 90o angle to the target line if possible. To
help reduce signal interference, there should be no other lines (if
possible) between the ground spike and the target line.
1.
Switch on the transmitter and select the desired frequency
with the "f" button (If the frequency is not present, use the "i"
key to access "frequency selection" in the menu and mark the
desired frequency with the "f" key. Press the "i" key to return.
Always select the lowest possible frequency to minimize
coupling to other lines.
2.
Set the output power accordingly. (less is more)
From this point on, follow points 1 through 6 of the Passive
3.
location 60Hz / Radio / CTV section of this document.
Signal clamp** (Frequencies above 8kHz):
Connect the signal clamp to the transmitter and place it around the
corresponding target line.
Then follow points 1 - 3 from the Direct connection section of this
document.
Induction** (Frequencies above 8kHz):
Place the transmitter (without connection leads or clamp attached)
on the ground with the handle in the cable's direction. Do not place
the transmitter on manhole covers or other metallic objects as the
signal will not be able to penetrate them. When locating, maintain
a distance of at least 50ft from the transmitter. Otherwise, the
airborne signal from the transmitter will be located and not the
target line. Now follow points 1 through 3 in the Direct Connection
section of this document.
2
3
Advertisement
Table of Contents

Related Manuals for Vivax Metrotech vLoc3 Series


Summary of Contents for Vivax Metrotech vLoc3 Series
- Page 1 Series Quick guide* V1.1 Transmitter Keypad (Loc3 series transmitters) Active locating Direct connection** On/Off button (vLoc3-Pro, vLoc3-5000, vLoc3-ML, vLoc3-XLF) Connect the transmitter with the supplied connection leads. Connect Frequency selector the red wire to the target conductor and the black wire to ground. The...
- Page 2 Vector Screen If the signal path is distorted, or the two signal peaks are not on the (Refer to the vLoc3 Series manual) centerline, there is interference in the electromagnetic field. To Shows a cross-sectional view through the ground. determine the cable's exact position now, please refer to the user manual, section "Distorted fields."...
Need help?
Do you have a question about the vLoc3 Series and is the answer not in the manual?
Questions and answers